• When you click on links to various merchants on this site and make a purchase, this can result in this site earning a commission. Affiliate programs and affiliations include, but are not limited to, the eBay Partner Network.

Running lights no longer running...

All sorts of epic man, thanks! I'll see what I can dig up on that other connector. Although, out of curiosity, would the fact that my under dash light worked before have any bearing? I also don't have the 4-speed hump. Man, I wish I had the fender tag. I'm going to have to roll the dice and see if the build sheet is still in the seat.

Found the black with white stripe wire. That car has a 4-speed reverse light harness in it. I would tape up the exposed connector and forget about it. It was originally connected to the dash mounted reverse light, should have a single wire coming into the engine department through a rubber grommet from the light. Appears it was an original 4-speed car. The other double black wire female I can't find in the diagrams, would need to know what cavity of the bulkhead connector it originates to identify the circuit.
GRP-08-PG-154r2.jpg
 
The dash mounted reverse indicator light is 4-speed only, factory autos didn't get them. If it works now, it has been connected to the reverse lamp circuit at some point under the dash. May have been added sure but with the presence of the 4-speed trans harness, it makes one wonder. Does the neutral safety switch function correctly (no starter operation while in gear)? I would be curious enough myself to have a closer look at the floor pan for evidence that the hump was removed and patched.
GRP-08-PG-156r.jpg
 
That's super helpful, I'll take a gander tonight or tomorrow when I get it back in my garage. Swung it back through the transmission shop to seal the tranny they just put in a smidge better as it was just barely leaking. But, just barely enough to smell horribly when it hits the hot exhaust.

It's raining today, but now that the lights are fixed (Huge thanks btw), it should pass inspection tomorrow!!! Now I can antique it and not have to worry about it until I get stationed somewhere else.

BTW, you wouldn't happen to like cigars would you? lol
 
holy crap, I do have that notch. It's a little bent up, but it's there. I'll try to uopload the picture I took tonight! I really need to see if I can find the build sheet...
 
Bringing this one back from the dead. It's a great thread, :thankyou: although 1/2 of the pictures are gone now that Photobucket has turned into greedy Nazi's :mad:

Anyway,..... I have a similar problem: All of my lights are dim. Right side headlight is super dim, left side is brighter, but not full brightness, - tail lights are only getting 10 volts, and i'm getting one of the signal light indicators on the dash to light when i pull the parking or headlights on.

I also have the same overheated spot in the fuse panel. :(

Might need some guidance on this one 72RoadRunnerGTX
 
Sounds like you have some grounding issues as well as overheated connections. Where are you measuring 10 volts? Just finished moving all the old pictures off Photobucket and onto one of my servers. Problem here on this site is after sometime passes, editing is not allowed, can’t edit the picture links, can’t even see what pictures I posted years ago.
 
Yeah, i have the same problem on one of my other hobby forums. I've been wanting to give Photobucket the finger for a couple years now (can't stand all the adware that attacks your computer when opening their site)

Anyway,.... measured the 10v at the sockets. I haven't measured voltages at the headlights yet but at this point seems moot. I'm going to read thru this post once more and start checking all the things you recommended and try to learn the flow of DC current thru this system.

One quick question: Now that i have the cluster out, (ammeter disconnected) how can i get power back to the system - do i just need to connect the big red and big black gauge wires together that were on the ammeter ? Maybe run them thru an inline fuse for safety sake ?
 
Did some poking around today with a meter. Started at the battery, 12.67. At starter relay 12.67, From large gauge red wire off relay to firewall side of junction block 12.67, Head to other side of firewall, have 12.67 at BATT terminal at bottom of fuel panel. Unclip the fuse panel from the junction block and start hearing the horn relay clicking (no horn sound though) as i get the fuse panel turned sideways, i notice this:
FullSizeRender(4).jpg


That connection goes to a black wire. The horn still works. Would there be any reason to do this on purpose ?
Also, found this green wire with pink/red trace disconnected and hanging out behind the fuse panel. Any idea what it's for ? Maybe it goes to the piggy back spade at the bottom of the panel ?
FullSizeRender(3).jpg
 
Looking at a wiring schematic, it shows my horn relay to only have 3 terminals. This one has 4. 3 Are grouped together, the one at the end that is bent up. Looks like the Green with Red trace should go to one of these 3 terminals, along with a Violet, and Black. Part number on this relay is 3513206. Maybe it's wrong for the car ?
 
The green and red was the original horn wire, if the horn works, look for a bypass of some kind. The horn relay also contains the key in switch buzzer, disconnecting the small black wire ( or bending over the relay/buzzer tab) kills the buzzer without affecting the horn relay function.
Sure you have the correct wiring diagram? Should show four connections at the horn relay/buzzer.
grp-08-pg-158-1.jpg
 
Last edited:
Yep, just figured all that out. The red/green must have come unplugged as i pulled the panel off. Bent the tab back straight, buzzer works properly and so does the horn.
I'm no good at reading schematics so maybe i've mis-read. This is what i've been using. - Top right corner.
71SatelliteWiringA.JPG


Anyway, back at it and i think i have the issue located to the rear of the car. I'm at the tail light harness - White plastic, flat 4 connector. 12v in at the black wire, 10v on the other side. Heading back out after confirming with the schematic to see what all is in that connector.
Tail, Left turn, Right turn, and ? Reverse ? Ground ?
 
Last edited:
Never trust the third party produced diagrams, Get a digital copy of the factory service manual.
 
Last edited:
Never trust the third party produced diagrams, Get a digital copy of the factory service manual.

Where can i find one ?

So, i thought i'd made some progress with the low voltage at the taillights, but now i'm not sure.

Pulled all the bulbs to break the path thru each bulb to ground, and found the very last socket (right side) was grounding out. There's been some shennanigans inside this taillight, but it seemed like a good enough repair, but.... the spring inside the socket was touching the contacts for the bulb.
FullSizeRender(2).jpg

IMG_5433.JPG


Made this repair with heat shrink at the back of each lug and solved that issue.
FullSizeRender(3).jpg


Anyway, once i put it all back together, still seems like a sizeable voltage drop. Each bulb (4) equals about .30v drop in voltage. So by the time i start with say 12v at the connector in the truck, i've dropped to 10.8v
I cannot find anything else wrong with this part of the system.

I still do not have the headlights working properly and assume that is a separate issue since these tests are all being done with only the parking lights on.

Open to suggestions if you have any.

My headlight issue: When turned on, i get Left high beam on (dimmer than it should be) the Left low beam is just an orange glow, and nothing on the right side. If i hit the high beams, i get the Left high beam on very bright, low beam is a little brighter, and right low beam now becomes an orange glow.

Headlight, and dimmer switches are new. Right low beam is new. I don't even know where i'll start on this one.
 
Last edited:
http://www.ebay.com/itm/1971-Plymouth-Chrysler-Shop-Service-Repair-Manual-CD-/140815096586?fits=Year:1971|Make:plymouth&hash=item20c93bdb0a:g:eVUAAOSwQYZW1IOg&vxp=mtr
Don’t recall how the ’71 tail lights ground, looks like it has been hacked up a bit. Verify the socket shells have a good ground path. The ’72 tail lights are plastic and use a third ground wire from the socket springs to the rear body in the tail light harness. Headlights still sound like a missing or weak ground issue in the forward harness. All headlights should ground to the radiator support.
 
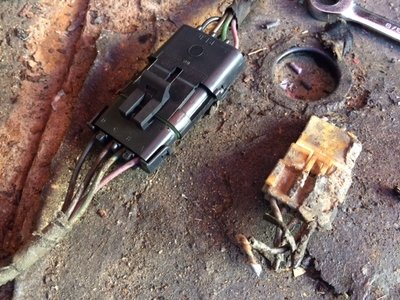
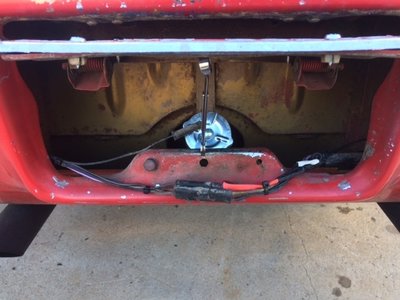
Not much progress in the past couple days, but i did replace the connector in the trunk.

Do i get points taken away for having a GM weather pack connector on my Mopar ;)

IMG_5459.JPG
 
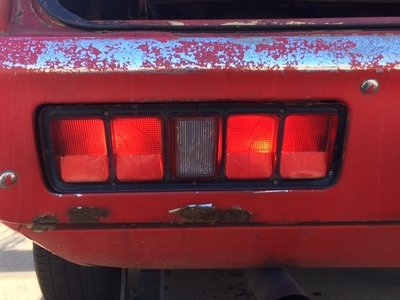
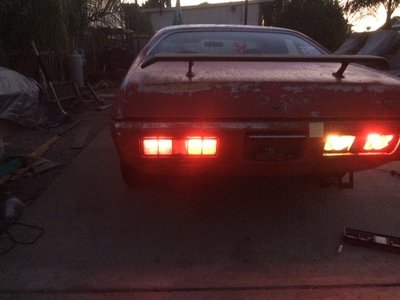
Put in a couple hours tonite at the rear. Chopped out the hack job wiring and tidied things up. I'm satisfied with the function of the rear lights now, and think i'll run LED's in the back. This will be less electrical load for this old wiring system. I bought a couple RED LED's to try and am happy with how they look. I've tried them in the past and wasn't impressed. I think when using them for a taillight, the key is to use a RED LED. Otherwise it washes out the lens color and ends up being more pink. Here's a couple pics- Both are just the parking lights. Regular 1157 bulb on the left, RED LED on the right half. Daytime, then evening. LED light is full, and actually more red than the incandescent bulb.

IMG_5471.JPGIMG_5470.JPG
The bulbs on the right side of the car are without lens. Same configuration. 1157 on left, LED on right
IMG_5472.JPG
 
Moving on to the front,..... The headlights are bonkers. Starting to trace the flow of power and see they are fed by what starts as a GREEN wire at the headlight switch that travels to the floor dimmer switch. Then on low beam, power becomes a RED wire. (is there not a headlamp relay in this system? - haven't seen one yet, and i can't use that online service manual as it comes in CD format. Don't have a CD drive on my computer. They are becoming a thing of the past. Now everything is via USB)
Anyway, low beams on and i get drivers low on about 80%. Unplug the drivers highbeam at the bulb, and the low beam goes to 100%. I feel the black wires on the high beam connector are warm to the touch. If i plug the high beam back in you can see the bulb filament glow ever so slightly. Pass. side low beam will change from about 10% lit, to 40%, and a couple times went full 100%. Made some progress at the floor dimmer switch, the connector shows signs of getting hot, and the terminals are dark and were not making a tight connection. I'll try to replace the spades.
 
Last edited:
Auto Transport Service
Back
Top