• When you click on links to various merchants on this site and make a purchase, this can result in this site earning a commission. Affiliate programs and affiliations include, but are not limited to, the eBay Partner Network.

Trunk Weatherstrip

JimKueneman

Well-Known Member
Local time
8:08 AM
Joined
Mar 25, 2016
Messages
3,255
Reaction score
3,824
Location
Sonoita, Az
Can someone post a few shots of the correct positioning of the trunk weatherstrip for a '68 Coronet type B-Body? Not how the ends are suppose to be offset from the middle by a few inches but where it lays on the body lip along the dutchman panel and sides then at the back of the opening by the trunk lip.

Thanks,
Jim
 
20160210_193631.jpg
1968 Super Bee (52).jpg

Here are a couple of pics of my '68 Bee. Hope this helps...
 
I just installed mine a couple of weeks ago on my 67 coronet and it takes a bit of finagling bit really only fits one way. Start with the odd corner section on one side or the other as it will only lay correctly one way. I used wide 2" masking tape to hold mi e in place while the permatek sets up but alot of guys use clothes line clips. Once you have the corner section set up slowly work your way around the side then front of the trunk back atound to the other rear corner cliping or taping as you go.
 
So does the larger overhang lip at the surface that seals against the lid change away from the trunk opening? Mine has one side being a larger over hang than the other.

I'm not sure I follow you. A photo would be helpful. There really is only one area that the seal can be installed. I would recommend using 3M Super Weatherstrip & Gasket Adhesive P/N 18-9900.
 
I'm not sure I follow you. A photo would be helpful. There really is only one area that the seal can be installed. I would recommend using 3M Super Weatherstrip & Gasket Adhesive P/N 18-9900.


If you cut the strip and looked at it from the cut end the top of the seal would look like a "T" where the trunk lid seals on the top of the "T". Mine the horizontal part of the "T" one leg is longer than the other. The longer end goes away from the trunk opening and the shorter towards it.
 
Ok, I understand what you are referring to now. Yes, the "longer end" will face away (towards the outside of the car.)
 
The trunk seal style that overhangs over into the trunk compartment is the more correct style of seal. Back in the day, the seals were bonded with the two different styles as the trunk gutter has provisions for the extra lip to overhang inside the trunk. The current seal available now can be simply cut correctly with a sharp razor blade. Place the trunk seal in place as you would be installing it. You will see the area where the trunk gutter does not allow the seal to sit flat to the metal. Mark this area. With your blade, remove the lip so that the seal sits flat to the gutter. Apply your glue and attach to the body.
 
The trunk seal style that overhangs over into the trunk compartment is the more correct style of seal. Back in the day, the seals were bonded with the two different styles as the trunk gutter has provisions for the extra lip to overhang inside the trunk. The current seal available now can be simply cut correctly with a sharp razor blade. Place the trunk seal in place as you would be installing it. You will see the area where the trunk gutter does not allow the seal to sit flat to the metal. Mark this area. With your blade, remove the lip so that the seal sits flat to the gutter. Apply your glue and attach to the body.

Do you have a photo of where your talking about?
 
Make sure it is "relaxed. Mine was somewhat taut, and pulled away from glue in center and is misaligned. Repair attempts did not work.
 
I will snap a picture tomorrow of the different styles and post.
 
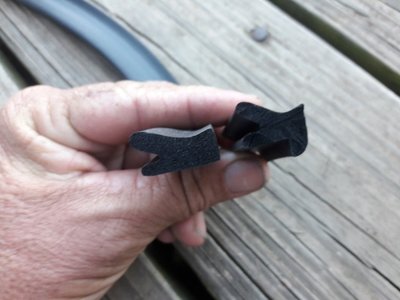
The trunk weatherstrip as pictured on the left is the generic style as used on the B-Bodies from 63 to 74. It can be used on all of the other models as well. The trunk weatherstrip pictured on the right is the correct style as used on the 63 to 70 model applications. This seal has the lip that extends over into the trunk area so as to locate the seal. If you should look at an original seal on a car, there will be an area where this lip was removed due to the metal lip of the trunk gutter. Back in the day, these seals were a molded piece unique to each application. The current seals are an extrusion and that is why it is no longer possible to have the lip molded correctly into the seal. It has to be manually removed to duplicate the factory original style as used back in the day.

Trunk WS1A.jpg
 
The trunk weatherstrip as pictured on the left is the generic style as used on the B-Bodies from 63 to 74. It can be used on all of the other models as well. The trunk weatherstrip pictured on the right is the correct style as used on the 63 to 70 model applications. This seal has the lip that extends over into the trunk area so as to locate the seal. If you should look at an original seal on a car, there will be an area where this lip was removed due to the metal lip of the trunk gutter. Back in the day, these seals were a molded piece unique to each application. The current seals are an extrusion and that is why it is no longer possible to have the lip molded correctly into the seal. It has to be manually removed to duplicate the factory original style as used back in the day.

View attachment 502430

Thanks, I am now glad I re-ordered mine from Steel Rubber (don't ask what happened to the first one, rookie restorer mistake). It was 2x Classic Industries but I bet I know know the difference.
 
Which style did you order from Steele? Steele pieces are usually a good piece and come at a premium price. I custom cut the style on the right for the more popular cars so that they can be simply removed from the packaging and glued in place. As mentioned earlier, do not stretch the seal. We use the old wooden style cloths pin to install the seals. You can use a good quality masking tape as well. We place the clips about every 4 inches and use the 3M weatherstrip adhesive as found at appliance repair shops. This is the yellowish-brown style as used originally. It is significantly stronger and more costly as well. The black style as found at most retail stores will work ok, but make sure it is completely cured prior to closing and opening the deck lid.
 
Which style did you order from Steele? Steele pieces are usually a good piece and come at a premium price. I custom cut the style on the right for the more popular cars so that they can be simply removed from the packaging and glued in place. As mentioned earlier, do not stretch the seal. We use the old wooden style cloths pin to install the seals. You can use a good quality masking tape as well. We place the clips about every 4 inches and use the 3M weatherstrip adhesive as found at appliance repair shops. This is the yellowish-brown style as used originally. It is significantly stronger and more costly as well. The black style as found at most retail stores will work ok, but make sure it is completely cured prior to closing and opening the deck lid.

The more correct style on the right. Yes I bought the 3M from the local auto body shop a while ago. thanks again.
 
The trunk weatherstrip as pictured on the left is the generic style as used on the B-Bodies from 63 to 74. It can be used on all of the other models as well. The trunk weatherstrip pictured on the right is the correct style as used on the 63 to 70 model applications. This seal has the lip that extends over into the trunk area so as to locate the seal. If you should look at an original seal on a car, there will be an area where this lip was removed due to the metal lip of the trunk gutter. Back in the day, these seals were a molded piece unique to each application. The current seals are an extrusion and that is why it is no longer possible to have the lip molded correctly into the seal. It has to be manually removed to duplicate the factory original style as used back in the day.

View attachment 502430

Got my strip. The Steel parts are a mixture of both above. The ends are more like the one on the left (at the rear of the trunk) and once around the rear corners transitions in to the on on the right.

Can you identify which edge of the strip on the right gets the glue and is attached to the channel?
 
If you will look at your trunk opening, the area closest to the tail lamp panel will have a raised lip. The flat area of the seal goes along this section of the trunk gutter. The two parallel sides and the side next to the dutchman panel does not have this lip. This area takes the section with the extended lip which extends over the flat edge. If you still have an issue understanding, drop me a message and I will call you to hopefully explain it better.
 
If you will look at your trunk opening, the area closest to the tail lamp panel will have a raised lip. The flat area of the seal goes along this section of the trunk gutter. The two parallel sides and the side next to the dutchman panel does not have this lip. This area takes the section with the extended lip which extends over the flat edge. If you still have an issue understanding, drop me a message and I will call you to hopefully explain it better.
May have to. I get the back edge. If you look at your photo can you lay the strip on the right in the position it goes in real car? If you say the edge where you index finger is resting is the top of the strip which of those edges gets the glue?
 
Yes, the top of the seal for both styles is closest to my index finger. The glue would be applied to the side opposite of the top edge.
 
Now I get it. Piece of cake. If you use the technique that Steel has in a YouTube video no clamps needed. Put a bead of adhesive on the trunk lip and one one the seal. Spread it with a scrap of cardboard, much like contact cement. Wait 5 minutes, put down a bead about 1/3 of the way around and start putting in the seal. The fresh bead reactivates the first smeared adhesive (which will dry to the touch) and it will stick but not enough that you can't slide it for about 5 minutes. Quickly move to the next 1/3 then the final 1/3 and get it adjusted quickly because in about 15 min you can't move it anymore. Clean up with some Acetone and done! The Steel part is 2x but it fits perfectly and seems to be 100% correct with the different tails for the back of the trunk bonded to the full extrusion for the rest of the opening.

DSC_0085.jpg
DSC_0086.jpg
 
Auto Transport Service
Back
Top