• When you click on links to various merchants on this site and make a purchase, this can result in this site earning a commission. Affiliate programs and affiliations include, but are not limited to, the eBay Partner Network.

727 rebuild 71 charger end play

velrob

Well-Known Member
Local time
12:58 PM
Joined
Jan 15, 2016
Messages
603
Reaction score
110
Location
toronto
trying to figure out why my tranny has no end play.

took it apart again. should I be able to push the input shaft in and out easily and have it move slightly? I have a dial indicator. I'm using the thinnest fiber ring I have. also should I be able to spin the output shaft easily with the pump on?

I noticed the bushing that sits on the input shaft is tight.

all seals and bushings are new along with frictions and plates.

lastly should I be soaking the frictions in tranny oil for 30 minutes thanks
 
Sometimes the last friction in the front clutch doesn't align over the splines of the input shaft hub. This causes the input shaft not to settle all the way on the output shaft. just make sure the frictions are dipped and wet.
Doug
 
that part i can get through its when the input shaft is inside the pump I cant spin the pump without giving it good force. i know the pump doesnt spin but i want to see what was giving so much tension.

getting all the frictions in are good and that spins nice and free but i just tried to spin the pump with the two clutch packs out and the pump resting on the input shaft on a table and the pump doesnt spin smoothly it requires some force. is that normal?
 
Not sure I'm following. The convertor hub turns the pump rotor. What are you turning the pump with?

Set your convertor on the table hub up. Set the pump on the converter oriented as it would when installed. Turn the body of the pump. Does it turn freely?
 
the pump doesnt spin smoothly it requires some force. is that normal?
No. Sounds like the pump itself is binding. It should turn freely, with no drag, by itself.
I'd suggest pulling the pump apart, and check your clearances, and to be sure it's together right.
 
hmmm it shouldnt be cleances

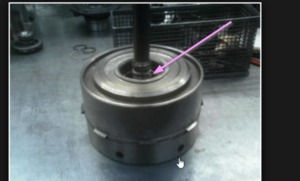
im sitting the pump on the output shaft (picture attached)

i sit the assembly like in the picture on a table then place the pump on top and try to spin the pump. theres quite a bit of drag on the bushing.

im reading there were different size shafts and maybe the kit i bought had the wrong pushing now im wondering what else is wrong in my kit

i did a pressure test in the first drum and the plates/frictions dropped quickly meanwhile i read it should go down slowly?

m5Mqr2w.png
 
Got it.

No, you shouldn't be able to spin the output shaft easily. There is a lot of drag and weight.

Lift the front drum off the rear, then set the pump on the front drum (bushing and hub lubricated properly. Does that turn easily? If that's okay move the pump over and slide it over the input shaft and let it sit down all the way against the rear clutch.. Does it turn easily on there? This will tell you which part it's tight on, inner or outer area of the hub. Make sure you're seal rings are locked and didn't get damaged.

If they go on, but are just a little tight I would just wiggle them around to ensure the bushing is seated properly. If they are still a little tight, take a hone to them and clean them up.

To check end play stand the trans on it's end, not resting on the output shaft. (if you don't have an assembly stand or holding fixture you can wedge it in a pail. With the pump torqued down set your dial gauge on the end of the input shaft. Use a screwdriver between the sun shell and rear planet carrier and pry up. Take your reading. It should drop down again under it's own weight.

I always soak friction discs and bands before assembling the trans.
 
Yep, fully agree!
Many separate parts in the assembly, each needs to be checked, mainly the spacers.
 
the bushing is in straight. it doesn't turn freely on the rear drum.

I dont have any tools to hone the bushing what do I use?

maybe it's cheaper to buy another bushing kit or is this common thing to need to hone bushings if to tight
 
If it goes on, but is hard to turn it's not likely a size issue. Wipe the bushing down well and look at it closely. Looking for a high spot, it will appear shiny. Usually caused by something behind the bushing when it went in. Got a little crooked and scrapped the back a bit and the tiny scrapings causes a bulge in the bushing. So, if you can see a bump like that you can take a little flapper wheel on your die grinder and just touch up that spot. If it's tight it's entire length, evenly all around, you can take a brake cyl hone and run it through a couple of times. If it's goes on okay and just a little tight it you won't have to remove much material.

Alternately, get a new bushing and try again.
 
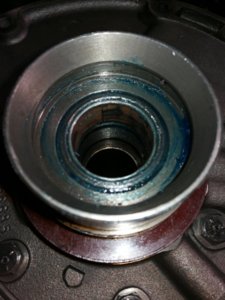
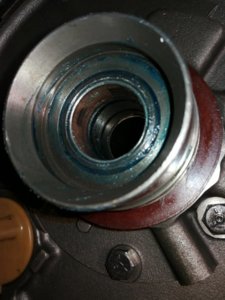
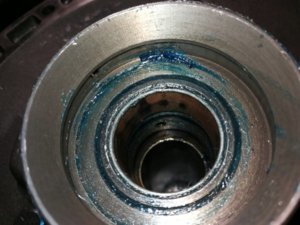
i took some pictures of the bushing you can see the black parts i guess where it was wearing out from me trying to turn it several times

IMG_20171206_124340.jpg IMG_20171206_124345.jpg IMG_20171206_124350.jpg
 
Yes, those are your high spot. Notice how they are in a line on one side. Bushing got a little cockeyed going in. I'd be inclined to put a new one in. Use an appropriate driver and a press. The proper driver is stepped so that a portion goes inside the bushing with little play. The step that sits on the end of the bushing, where the force goes, is parallel to the business end of the driver so that when it's in the press everything stays square. Very difficult to get them in properly with a hammer.
 
yea i didnt use a proper driver the first time, thankfully my other bushings went in ok.

but looking from the edge of it the bushing looks straight so thats very odd

i have a new driver kit when my new bushings come in ill do it over

thanks alot
 
It is straight, now. It got cockeyed going in, right where those marks are all in a line. It straightened out after that, but the damage was done.
 
If you want to go that far, it's possible to save the bearing, using a bearing 'scraper'. Cheap enough, it's a tool made exactly for that, to scrape out high spots.
Your call...
 
i ordered the kit already but ill check out the bearing scraper also just in case i need it in the future

never used one before
 
i installed my new bushing after i cleaned up the stator. looks like i knicked it when i was driving out the old bushing, this one was a huge pain to get out I remember. no easy way to drive it out so i used my chisel to cut it.

i dremeled where the bushing will sit to try to flatten any knicks before putting the new bushing. felt very smooth to me. used my press to drive the new bushing in and it was tighter than the first one.

driving me bananas.

so i used my dremmel and shaved the bushing a bit around and now it moves freely

was i ok to do this?
 
quite often you will have to scrape the #4 cam bearing on a BBM
The spec in the factory manual is actually off
so you get a tight bearing
In addition the factory line bores the cam bearings AFTER installation
no way to do that with replacement bearings- they will be concentric with the block but not necessarily with each other
and you do have to remove them when rebuilding as crud can be trapped in the oil feed system
just another reason to plan on doing a test build when doing a MOPAR
 
hmm this is for my 727 transmission not my motor. I hope I dont need to scrap the bearing haha.

thanks for the info.
 
Auto Transport Service
Back
Top