• When you click on links to various merchants on this site and make a purchase, this can result in this site earning a commission. Affiliate programs and affiliations include, but are not limited to, the eBay Partner Network.

'64 Fury Pro-Touring

Looks great bob! I haven't seen any brakes like that before kinda neat! We need to get together soon and hang out again. I've been so busy with my new job at Sahara Chrysler Jeep Dodge Ram, But also been having fun with those hellcats if you know what I mean :p. Keep up the good work on the car!
 
Looks great bob! I haven't seen any brakes like that before kinda neat! We need to get together soon and hang out again. I've been so busy with my new job at Sahara Chrysler Jeep Dodge Ram, But also been having fun with those hellcats if you know what I mean :p. Keep up the good work on the car!

Good morning Josh,

Hope you had a wonderful holiday weekend; I actually got a bit of time in the shop over the holiday.
I didn't know you'd gone to work for Sahara, that's terrific news; I hope it's going well for you. What do they have you doing?

Work on the Fury has been really sporadic for me over the past couple of months; I've been traveling for work and just haven't had much time to spend on the car but the little time I've had has been productive. I'll post a couple pix later but I decided to remove the cowl vents to give a smoother look, and have the area all ready for primer, so I decided to get the remainder of the firewall and cowl area ready for primer/Lizard-Skin.

Shoot me a message whenever you have some time to spend at the shop or at your place and we'll get together.

Take care buddy,

BW
 
Wow, it's been over a month since I checked the site and alot longer than that since I posted any progress reports, but I've been diligently (though slowly) working away. My goal at this point is to get the car to a point I can make it a "roller" and get it out of my shop if need be; I might have to give up my space. Regardless, here's what I've been up to.

For whatever reason I've never liked the vented cowl on the Fury, and since I no longer need it for the factory heater (not going to use it) I thought I'd fill it in and smooth the appearance of the cowl. Once the initial metal and fill work was done I used heavy build primer and blocked the area nice and straight, and the results came out just as I'd hoped.

IMG_1089.JPG

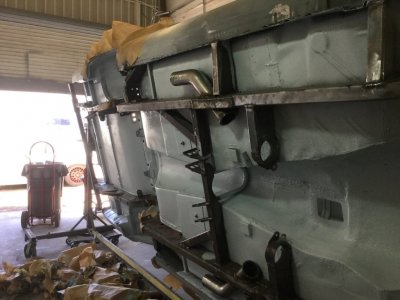
After I'd finished up the cowl I wanted to get started sealing up the entire car so I began by using seam sealer on every welded seam I could find (and there are LOTS of them), then scuffed the entire interior and exterior. Once that was completed (did I mention I HATE body-work of any kind?) I laid down Lizard Skin Ceramic Heat Shield on the underside and Lizard Skin Sound Suppressant on the interior.

IMG_1362.JPG


IMG_1363.JPG


IMG_1365.JPG


IMG_1364.JPG

I bought a kit that that includes Lizard Skin's proprietary gun, 2 gallons of heat barrier material, and 4 cans of under-coating (later I used 2 cans on the rear wheel wells), as well as a 2 gallon bucket of the sound suppressant and was able to get a couple of good coats on both surfaces, so I'm really hopeful the interior of the car will be solid sounding (as opposed to sounding like a drum) and the engine/exhaust heat will be kept out. I do plan on using a number of DEI heat insulating products to help control the heat, especially on the exhaust tubing itself.

I let the Lizard Skin products thoroughly cure then covered all the surfaces with an off-white acrylic enamel, then went after the frame with some POR 15 chassis black (semi-gloss). I've got a couple of spots to touch up but overall I'm really happy with the results and can now rest easy knowing if I have to move the car from the shop I can turn it into a roller and not have to worry about sealing the car up from the elements.

IMG_1367.JPG


IMG_1368.JPG


IMG_1370.JPG

My NRG steering wheel and mount showed up so I'll get those mounted on the ididit column. The wheel is 13", suede covered, and comfortable as can be. Yea, I know it's not stock but I didn't want some 16-18" wheel with a paper-clip thin rim.

NRG Wheel.jpg

Next on the schedule is:
  • Shoot the trunk with a dark grey spatter paint (decidedly not factory)
  • Get the steering column finished; the intermediate shaft and u-joints are all on their way
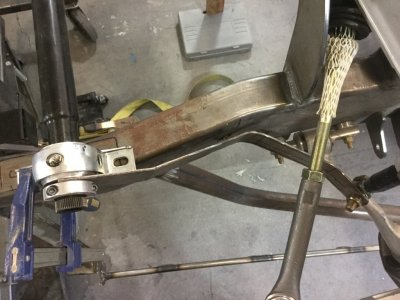
  • Get the sway bar mounts fabbed into the frame. This should have happened months ago but I couldn't fab the mounts without the sway bar arms and my dear friend Jimmy (master fabricator) has completely let me down. First, he lost my original pair of sway bar arms, so he bought a replacement set, bent them as promised, but for whatever reason has not sent them to me, so I've waited months for nothing and this morning decided to buy another set and have them bent locally. What a pain in the *** AND a waste of money.
  • Once the sway bar mounts are in I'll go ahead and finish off the front frame rails with the POR-15 chassis black.
  • I've decided I'm going to go ahead and "jam" the car and get that part of the painting process finished, that way all I'm left with is the actual visible body panels to paint
  • I've got to touch up some of the quarter panel body-work; it's gotten nicked and dinged over time so I'll get that cleaned up.
  • I'm going to look into using the rear seats I bought (they came with the CTS-V fronts) but I'm not overly hopeful about making them fit, and besides, with the roll-bar there's no way anyone could/would sit back there so they'd be for nothing more than looks.
  • After I finish off the list above I'll start doing the body work on the doors, fenders, hood, and trunk.
That's it for now but I am making progress! IMG_1369.JPG
 
Last edited:
Glad to see you back at it, looks great with some paint on it. Congrats on the progress.
 
Thanks fella's, I appreciate the support.
Work has been a real bitch since I got sick at the beginning of the year so I've been spending all my time trying to keep the doors open, which has left me little time to work on the car, but I realize I have to get it to the point of being a roller in case things go sideways and I have to abandon my work space, so the push is on for the next couple months to get things finished up, save for the engine, which can be built at any time.
 
I'm going to be in town for SEMA next week. Would it be possible to hook up one evening to check out your ride? If so, pm me with contact info. Will be there tueday to friday.
 
I've been plenty busy since my last post, just haven't had time to take/post pictures of the progress, but I'm definitely moving forward.
One disappointing note: my buddy Jim (the awesome fabricator) finally finished my sway bar arms and sent them out via UPS, but UPS lost the friggin box! Can you believe it, Jimmy finally ships the arms and UPS loses them within a day. No answers, no ideas, no nothing. I use UPS daily but damn I hate their lack of service. OK, enough of my rant, I got another set of arms and sent them to Jimmy so hopefully he'll have them back to me quickly.

As for the work I've been doing, I prepped and painted the dash and steering column, then assembled the dash and installed it, and while I'm happy with the color I chose (a matte black) I am really concerned about the actual finish; it's as if this paint attracts dust and you can't actually get it to clean up. I'm going to try some mild soapy water and once I get it clean I'm going to shoot it with some satin clear to seal it.

In the second shot you'll see I mocked up the interior with the pedals, seat, dash, column, and NRG wheel; I wanted to get the column/wheel/seat/pedal relationship to match my CTS-V as closely as possible, so I took measurements and angles from the Caddy and used them to mock up the Fury. It worked out terrific, the seating position is really comfortable and roomy; I couldn't be happier. I'll get some shots of the column-rack assembly I put together and add those later.

IMG_1375.JPG

IMG_1371.JPG

Since I'm still waiting on the sway bar arms I moved on to the doors, which I had roughly mocked up earlier in the build. It was during the earlier mock-up I realized I would need to shim the doors quite a bit (to the rear) to close B-pillar gap. Not sure why the doors appear to be so "short" (lengthwise) but I came up with a solution that seems to work really well; I fabbed up two sets of shims, bonded one set to the doors using body panel adhesive, and left the second set "lose" so I could insert or remove them as needed. The end results came out really well as shown in the B-pillar gap below:

IMG_1373.JPG


IMG_1372.JPG


IMG_1376.JPG

Knowing I'd be moving on to the fenders next I decided to dissect my original (ROTTED) fenders and use parts of them as templates to drill all the mounting holes for the headlight buckets. I am SO glad I chose not to throw any of my old/original/ROTTED parts away, some of them have really come in handy. Here's a shot of the type of hacking/cutting/dissecting I've been doing to the original parts:

IMG_1374.JPG

I used a similar method and cut out the inner door panels, but instead of using them as templates I actually bonded them to the inside of the fiberglass doors. Weight isn't a concern so I thought the added strength and solidity in the doors would be helpful as well as cutting down the fabricating time.

I'll have more shots and updates soon.
 
The Lizard skin looks like it went on really nice! Digging your choice in steering wheel too! It's similar to the MoMo Gotham that I'm leaning towards
 
Hey Goon,

Yea, both the sound deadener and the heat shield went on really easy with the gun they make for it, so no problems at all. Coverage is pretty decent too, I used a 2 gallon bucket of each and there's a pretty decent layer of both.

As for progress, I can't believe my luck! I go on a rant about UPS being so screwed up and losing my box, and what happens? The next day the box with my rear coils and sway bar arms shows up! I didn't waste any time mocking up the sway bar and arm locations, which are shown below. Next I'll be fabbing up the links and the sway bar mounts, so I'll get some shots of that in the next day or two.

IMG_1379.JPG


IMG_1380.JPG

The plan is to cut a rectangular hole, just larger than the pillow-block mount, in the frame then weld some Grade-8 nuts to inside surface, then weld the rectangular piece back in place, giving me blind nuts to bolt the pillow blocks to. I've been desperately waiting on this last step in the suspension build so I can turn the car into a "roller" if need be, so you can imagine how stoked I am about this.
 
Holy cwap Bob . . . you've been on a terror and making some great progress on the car - got to say that it's all looking fantastic and it's got to feel great to see all the progress on the car too ! ! Keep at it, hopefully the heat of the summer is past and you're into some nice weather to work . . . keep plugging away at it and I'll be following your progress . . .
 
Holy cwap Bob . . . you've been on a terror and making some great progress on the car - got to say that it's all looking fantastic and it's got to feel great to see all the progress on the car too ! ! Keep at it, hopefully the heat of the summer is past and you're into some nice weather to work . . . keep plugging away at it and I'll be following your progress . . .
Hey Larry,

How the hell are you; hope all is well.
Yea, I've really been pushing to get more done, I want to make sure I can take it to the MATS show in April 2017. My hope is to have a bunch of work done so I can put a "for sale" sign on it and see if I can move it on. Life has changed quite a bit over the last year and I just don't know if I'm going to be in a position to finish it, so I figure the MATS show will be a good place to see if I can sell it. We'll see.

Take care,

BW
 
Been plenty busy on the Fury and at work so I haven't had time to update the blog in a couple weeks so here goes.

Well, yes, I did get the sway bar arms back from Jimmy/UPS, and yes, they would work, but honestly, I don't think the template I gave Jimmy allow for enough room for the tires to turn fully without rubbing, so Jimmy is now bending me up a new set. The new set will be bent inwards so they follow the frame quite a bit more than the current set shown above. Here are a some shots of the new template I made up:

IMG_1386.JPG


IMG_1384.JPG


IMG_1385.JPG

I also fabbed up some 1/2" spherical rod ends, which may be a bit of overkill in terms of their size but I figure the car combines a lot of tire, weight, and sway bar and I'd rather have the beefier 1/2" links as an added margin of safety. These puppies aren't going anywhere!

IMG_1381.JPG

As I mentioned a couple weeks ago, while waiting for the new sway bar arms to arrive I decided to begin working on the doors, fenders, and hood, all of which are made to be race car parts, not a street car, which means the fitment isn't going to be at a standard I can live with, so I got down to aligning the doors then fixing the gaps. Here are some shots of what I did and how the doors came out.

I got an idea off the web about using foam insulation "tape" as a backer to keep the fiberglass from pushing into areas so I picked some up, filled in the areas behind the door gaps, taped off the other areas with wax paper, and got to glassing:

IMG_1395.JPG

This closeup shows the foam insulation tape and the size of the gap really clearly; there was probably 3/4" between the bottom of the door and the top of the rocker panel.
IMG_1394.JPG

On my first attempt I used resin and actual fiberglass mat but found it to be a real pain in the *** to work with, so I changed course and used coarse "Kitty Hair" (glass impregnated body filler) and the results were AWESOME! OK, so it looks messy below but that's what the wax paper is for; nothing sticks to it.
IMG_1393.JPG
I'll follow this post up with some "after" shots showing the results.

As usual, I'm having problems with an attachment showing up when it's not supposed to so please excuse this last pix.

IMG_1387.JPG
 
Last edited:
Here are the results of my door gap "adjustments" using the "Kitty Hair".

The Kitty Hair is vigorously pushed into the gap between the door bottom and the rocker panel, trying to eliminate as much air as possible (impossible to eliminate but easily filled where necessary), and here's what it looks like after unmasking and sanding away enough Kitty Hair to open the doors:

IMG_1397.JPG


IMG_1396.JPG

Here are a couple shots after I did more sanding and you can clearly see just how much was added to the bottom of the door.

IMG_1399.JPG


IMG_1398.JPG

Here are some shots after more sanding; my goal was to get about a 4mm gap (used a paint stir stick for consistency) all the way around.

IMG_1401.JPG


IMG_1400.JPG


IMG_1402.JPG

I am absolutely stoked with the results; the Kitty Hair, wax paper, and insulation tape worked perfectly.

I took a few minutes to hang the fenders then remembered I hadn't pulled off the inner fender braces (from the original fenders) and bonded them to the inside of the fiberglass fenders, so I ended up pulling the glass fenders back off and spent the next couple hours removing the braces from the original fenders and they've been soaking in rust eraser ever since. Once I get the rust cleaned I'll bond the braces to the inside of the glass fenders and that should make a huge difference in how the fenders fit; the glass fenders are too flat so I'm hoping the braces will force the fenders to have a more convex shape (like a factory fender). I'll get some pix to show what I'm up to much more clearly.
 
A short time ago I mentioned I was going to bond the inner fender brace from the rotted original fenders to the Sled City fiberglass fenders, which I did using automotive panel adhesive, and while the results looked good they actually weren't. As soon as I began installing the fenders I could hear the adhesive "popping"; it hadn't adhered to the braces and I literally just popped the braces back off :wtf:. I don't know if my surface prep was bad or what, but I was way disappointed; I've used the adhesive before with terrific results so this was kind of surprising. Maybe it was the cold temps (in the low 40's) that did it? Regardless, I've decided to go a bit different route shortly, which I'll show in some pix in a later post.

After the brace debacle I got back to gapping the doors and fenders, so here are some shots of what I've been up to.

The gap between the door and the fender has been a BITCH to get right so like the other door gaps I used Evercoat Kitty Hair to build up the leading edge of the door:

IMG_1406.JPG

After building up the edge I cleaned it up, leaving extra material so I could final trim it once the fender was mounted, but once the fender was mounted another issue came up: the body lines were WAY screwed up! I had noticed this in one of my earlier mockups a year or so ago but now I'm finally having to deal with it. I'm not sure where the problem came from, but I do believe it was during some part of the fender fabrication (sorry, don't mean to throw Sled City under the bus) because the fenders and doors are mounting to stock factory locations. Here's what I'm talking about:

IMG_1143.JPG

See how far down the body line is compared to the door, and the slight droop in the fender line? Regardless, I've got Kitty Hair and we can fix it!

IMG_1144.JPG

Yea, it looks like somebody threw a pile of horse crap on my fender but the build up was necessary to allow me to adjust the line, which now looks like this:

IMG_1147.JPG

The shot above shows the results after just one round of adjusting using the Kitty Hair and various grits of sand paper. I ran the string along the body line for comparison. The body line will get even better with some more refinement but so far I'm really pleased with the results.

One other adjustment I had to make on each fender was to move the bottom mounting hole forward a quarter inch. The mounting tab fits into a small recess so elongating the hole in the fender wouldn't give me the adjustment I need so I cut out the section, slid it forward, re-glassed the area, then built it up to push the fender outwards. Like I said, I'm not sure what kind of fender was used for the mold.

IMG_1407.JPG

One other change I've made is to the fender mounting (shown below). The four mounting tabs shown are for the fender bolts; the bolts would pass through the tabs and into the fender, but I decided I didn't like the tabs being visible so I cut off the mounting arms (and tabs) and will replace them so they are hidden behind the fender, the bolts will pass through the fender and into the tabs. The mounting will look virtually identical but its location will be moved outward from what you see below.

IMG_1405.JPG
 
Bob, see if you can score some panel bond adhesive from one of the body shops around you. Its made just for what you are doing in regards to the skin to the shell. Vipers and Vettes have similar stuff going on requiring adhesives.
 
Bob, see if you can score some panel bond adhesive from one of the body shops around you. Its made just for what you are doing in regards to the skin to the shell. Vipers and Vettes have similar stuff going on requiring adhesives.
The adhesive I used IS for automotive panel bonding; just didn't set correctly.
 
Time for a do over then. Good luck!
Thanks!

I'm headed in the same direction but going to try something a bit different. Instead of trying to adhere the entire inner brace to the fender I am going to use just a small portion of it, then use adjustable braces to push/pull the fender in/out to match the contour I want, and to bond the brace(s) to the fender I'm going to use more Kitty Hair. The bond between the fiberglass fender and the Kitty Hair has proven to be amazingly strong so I feel confident this method will work just fine. Pix to follow1
 
Auto Transport Service
Back
Top