• When you click on links to various merchants on this site and make a purchase, this can result in this site earning a commission. Affiliate programs and affiliations include, but are not limited to, the eBay Partner Network.

67 Dodge Charger Front Windshield Trim Clips

mr carl

Well-Known Member
Local time
8:55 PM
Joined
May 15, 2016
Messages
104
Reaction score
44
Location
46933
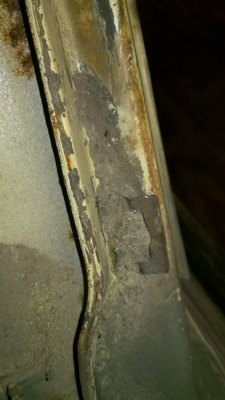
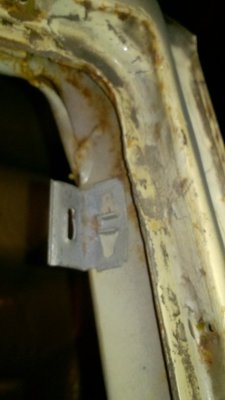
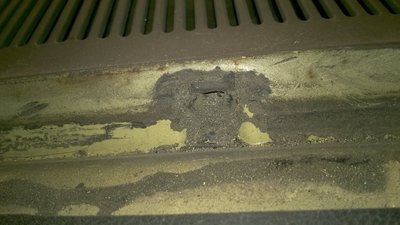
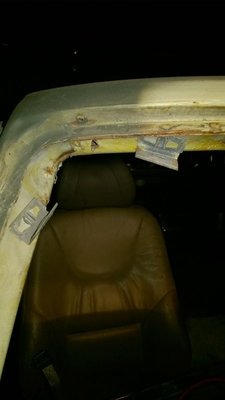
My windshield trim is out being cleaned/polished and I want to get ready for the windshield install. The trim fasteners which hold the trim are located in the slots in the opening I believe. I have the fasteners, but I need to know how these are attached to the body. It looks like rivets but it may also be broken off screws. To many years and cannot remember. Pictures attached. Help is appreciated.

Carl
InkedDSCN3015_LI.jpg
InkedDSCN3014_LI.jpg
 
Screws.
Do you have new clips already.
They should have come with the little short screws.
Be sure the clips are for a 67 Body which are longer.
The cowl top is the same for later B bodies but those recesses are at 90 degrees and use a shorter clip.
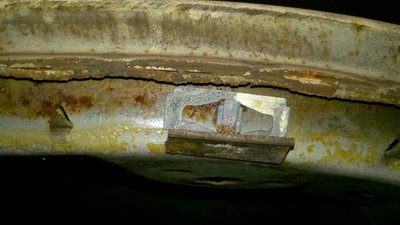
First picture is of an AMD replacement cowl top.
Long clips don't work.
Second picture is original 67 cowl.

20150718_185759 (Large).jpg
20150718_190044 (Large).jpg
 
I would suggesting using new clips.
They have a anti corrosion coating.
Probably phosphate.
Wait till you try and put the windshield in.
That's the real fun.
 
I have the fasteners/clips and screws. The kit I have has two parts plus the screw, if I am looking at the parts correctly. Do both of the parts get screwed to the cowl. Sorry for the questions, just want to make sure I do this correctly. And sorry the picture is a little blurry...old camera.

Carl
DSCN3028.JPG
 
IIRC the long ones go on the cowl just like in the pictures of mine.
I'm sure.
The short ones go up the A pillars and across the top.
Count them and see and use the old screw locations to check.
Use the old holes to locate them.
You will need to drill the heads off those rusted screws probably.
I think the new screws have some goo for sealant on the tips.
I might put a little something more on the holes before I put them in on the A pillars and across the top just to be sure.
The cowl doesn't matter since it just goes into the cowl area.
Careful on the holes.
If they get too big for the new screws......
That's going to be tricky if there is nothing but the old screw shank there.
Maybe back it out someway?
Probably not.
You MIGHT be able to just tap the old screw shank on into the hole with a center punch and clear the holes.
 
Last edited:
Those are broken off screws. The OEM clips are all still on my 67 Coronet if it helps i'll go get some pics....
 
I will try to drill out one or two of the screws tomorrow, starting small and working my way up. Will count the fasteners and see if I can determine where they go on the pillars and on top. More pictures Ghostrider67 would be great.

So...same question for the rear window trim. I have the fasteners and screws, but I do not see where any of the fasteners were mounted. Pictures would also help.

Thanks Guys.....

Carl
 
Got them on the back too, I think. I'll take 'em in the morning. Hell wait, i'll go out there now....
 
Back window ones are all off, they were rusty so I ditched them, I had broken screws too. Drilled them all out. Some are off on the front but here's what are still there.

WP_20170710_21_28_46_Pro.jpg WP_20170710_21_28_53_Pro.jpg WP_20170710_21_29_01_Pro.jpg WP_20170710_21_29_12_Pro.jpg WP_20170710_21_29_40_Pro.jpg WP_20170710_21_29_50_Pro.jpg
 
looks like the smaller ones go on the bottom lip and bottom of the A pillar, the larger ones at the top of the pillar and across the top. Don't know if the back is the same, but, why wouldn't it be?
 
On the front glass he uses the long ones across the cowl like I've shown in the pictures.
The short ones go up the A pillar and across the roof.
The back are different.
I'm sure they are all the same size on the back glass.
But they are different from the front clip, I noticed.
For one thing they don't have a little curve in them for a removal tool to get in them like the front glass does.
I don't think Chrysler ever intended the rear glass to come out.
The factory service manual DOES give instruction for replacing the back glass though.
Also notice there is almost no gap between the rubber and the body.
The repo rubber I got had gaps at the bottom corners.
You could see light through it.
The people that made it told me they almost gave up on reproducing the rubber.
(I forget exactly who that was so I'll not try and say a name).
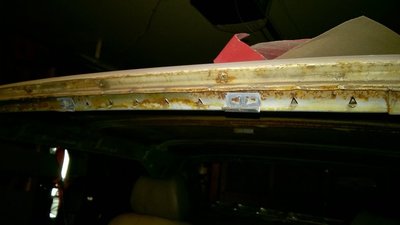
I'm getting ready to go in with the trim and I saved this so we would know where the clips are located if the trim ever needs to come off.
These are factory positions.

Edit.
I need to put a disclaimer.
I MAY have moved some one or two millimeters due to enlarged holes or thin metal.
I can't remember.
Particularly the two on the bottom corners that are close together.
But I'm pretty sure that they are very close to where Chrysler put them.
Probably the factory didn't even get them all in the same on every car.

20170616_141146 (Large).jpg
20170616_141324 (Large).jpg
20170616_141333 (Large).jpg
20170616_141549 (Large).jpg
 
Last edited:
Started on the cowl....tried to drill the screws and the bit would not even make a mark....and I do have very good drill bits....so took the next advice and used a small punch and removed all the broken screws. I ended up with one enlarged hole which I will need to fill and re-drill.

The kit contained 10 of the longer fasteners and the cowl has positions for 8...unless there are one at each end on each side that I cannot see where there were screw holes. Is there a photo that show the end on each side of the cowl?

I have looked at the rear glass opening and where the fasteners screw based on the pictures, the sides/top/bottom of my car are as smooth as if nothing was ever there. So based on the pictures I will work toward getting the fasteners in place.

Windshield and rear glass gaskets....I have heard horror stories of them not fitting correctly. I was looking over a company called Steel Rubber Products. I have bought several items from them and they seem to be dead on. Any inputs?

Carl

DSCN3029.JPG
 
Started on the cowl....tried to drill the screws and the bit would not even make a mark....and I do have very good drill bits....so took the next advice and used a small punch and removed all the broken screws. I ended up with one enlarged hole which I will need to fill and re-drill.

The kit contained 10 of the longer fasteners and the cowl has positions for 8...unless there are one at each end on each side that I cannot see where there were screw holes. Is there a photo that show the end on each side of the cowl?

I have looked at the rear glass opening and where the fasteners screw based on the pictures, the sides/top/bottom of my car are as smooth as if nothing was ever there. So based on the pictures I will work toward getting the fasteners in place.

Windshield and rear glass gaskets....I have heard horror stories of them not fitting correctly. I was looking over a company called Steel Rubber Products. I have bought several items from them and they seem to be dead on. Any inputs?

Carl

View attachment 445745
Bottom of the windshield posts on both sides.
 
OK...got it...will look this evening.

I did some looking on the internet for the windshield gaskets, both front and rear. Finding the price range pretty large...from $75 up to $192 for the front. The advertised gasket for Steel Rubber products is the highest priced at $192. Any other inputs from the Charger owners who have replaced this gasket?

I am ready to order.

Carl
 
I still can't remember who I got the rear from.
But I remember calling them about with a question before I put it in.
So It must have been a US supplier.


Now, don't freak out.
Just be warned this MAY happen.
I don't know if this is common.
I bought a less expensive windshield gasket.
This is how the first one looked before I put it in.
I called the vendor and they sent me another one.
(It shows as made in Thailand.)
It was a little better but still had the puckers.
I went ahead and put it in.
It has a little pucker which I think I'll be able to stick down and let the sun work on it.
I THINK the factory manual says to start at the top.
Which I did, much to my regret.
Common sense tells me to start at the bottom and let gravity work with you.
We couldn't use the rope trick because the rubber goes in the car first.
Then the glass.
You can use the rope trick on the back glass.


gasket.jpg
 
I have all the front trim fasteners screwed in place and I sure hope I put them on correctly. Will be starting on the rear tomorrow. I beefed up the number of fasteners versus your layout, adding three additional. I have the extra fasteners, but wondering if to many is to much. Ordering the gaskets from Steel Rubber Products. They state their product is an exact duplicate to the original and if any problems they will refund. Let me know if there will be an issue with to many fasteners. Lastly, a few weeks ago there was a post for the end fasteners on the lower front windshield. I took this car apart and if there was a fastener I would have it, so I believe they were either removed by the original owner or were never attached. I have tried searching for them with no luck. Are they necessary to keep the trim from flying off while going down the road.

Carl
DSCN3036.JPG
DSCN3037.JPG
 
I have all the front trim fasteners screwed in place and I sure hope I put them on correctly. Will be starting on the rear tomorrow. I beefed up the number of fasteners versus your layout, adding three additional. I have the extra fasteners, but wondering if to many is to much. Ordering the gaskets from Steel Rubber Products. They state their product is an exact duplicate to the original and if any problems they will refund. Let me know if there will be an issue with to many fasteners. Lastly, a few weeks ago there was a post for the end fasteners on the lower front windshield. I took this car apart and if there was a fastener I would have it, so I believe they were either removed by the original owner or were never attached. I have tried searching for them with no luck. Are they necessary to keep the trim from flying off while going down the road.

Carl
View attachment 482054 View attachment 482055

You are talking about the little stainless "L" trim that goes from below the end of the door seal and around the "A" pillar?
I just got to that point on my car.
It slips inside the ends of the bottom windshield trim to stabilize them.
I guess they could have left them off at the factory.
It wouldn't surprise me.
With all the cars being parted out, I would think someone has some.
I also THINK they were used across B body car line to at least 69 because my RR has them.
I'm planning on putting some padding under mine so they won't have any chance of touching the paint on the A pillar when the trim gets put on them.
Perhaps thick white Teflon tape.


DSCN3036.JPG
 
I have not had time to get everything done I wanted to due to other family needs, but I now do have the rear trim clips installed on the top and the bottom. I have not drilled and installed the side ones yet because I want to make certain they mount at the same height as the top/bottom.

Onlyone...your picture show the clips on the side but I want to make sure I match what you have. Do the clips mount at the same height as the top and bottom?

If I can get this done this week I am hopeful to get the glass back in the car next week.

Carl

DSCN3068.JPG
DSCN3072.JPG
 
Auto Transport Service
Back
Top