• When you click on links to various merchants on this site and make a purchase, this can result in this site earning a commission. Affiliate programs and affiliations include, but are not limited to, the eBay Partner Network.

70 Coronet Wagon Driver

When cleaning up everything for dash I found I had to rebuild the headlight and dimmer switches. I was nervous of getting in over my head before tearing them apart, but it was easier than I thought it would be. Switches work much better now.

image.jpeg


image.jpeg


I also went out on a limb and tried my hand at recovering the seats. I bought new vinyl from a member here and figured I'd give it a try. The vinyl is actually for a two door car and a front split bench, but even if it doesn't fit perfect it'll be better than a Walmart seat cover. Here's a pic of the lower rear seat.

image.jpeg


image.jpeg


I'll post more pics of the seats once I get them in the car.

This past week I was at my brothers engine shop putting my engine together. Been about 17 years since I've put an engine together so needless to say I needed my brother to provide step by step instructions.

image.jpeg


image.jpeg


I'm waiting on push rods to come in and a few other misc items before finishing it up.

I'll try and keep the updates coming more often.
 
What paint did you use for inside the tail lights?
 
The Rallye wheels work perfect. Shame on me for parting out a couple of these. I'm really liking it.
 
I'm liking the build and how much attention your paying to the details so far . There's not a lot of people who do wagon's , four doors or trucks like this . Keep up the good work . :thumbsup:
 
What paint did you use for inside the tail lights?

I just used a "chrome" colored spray paint from Lowe's or Ace Hardware. The paint doesn't match the chrome cap on the can of course, but it has a decent silver finish that was close to the original finish.

The Rallye wheels work perfect.

Thanks, I like how they look on the car as well. I also debated on whether or not to go with steel wheels or a fancier rim, but these are subtle enough to give some bling without over doing it.

I'm liking the build and how much attention your paying to the details so far

Thanks bigbear. I want to make things right as I go, but it is a constant battle as to how far I should dig into it. It seems that one thing always leads to another and I find that I could have the whole car tore down if I'm not careful. Had a friend knock me putting on all the new suspension components when the underside of the car still looked dirty. Well, the only way to fix that would be strip everything down and repaint, which I'm not willing to do at this point.
 
Thanks bigbear. I want to make things right as I go, but it is a constant battle as to how far I should dig into it. It seems that one thing always leads to another and I find that I could have the whole car tore down if I'm not careful. Had a friend knock me putting on all the new suspension components when the underside of the car still looked dirty. Well, the only way to fix that would be strip everything down and repaint, which I'm not willing to do at this point.
It's just my two cents , but I say continue the way your going . When I first started working on my Warlock , I was all set to start going thru the body for fresh paint and everything . But I also wanted to start driving and racing it as soon as possible . It was driving me nut's , asking my self " how am I going to do this? " . Then one day a friend of mine said to leave the original paint alone , It's only original once . So I built the 440 ( as well as a bunch of other stuff ) , got it running half way thru the season and I'm still enjoying the truck while I build it and when I get everything the way I want it to stay , then and only then will I think about starting the restoration on the body . In my case , I'm not calling it a build , I call it evolving . It started out as a solid barely running project and it'll evolve into what I want eventually and I'll be having fun and making memories in between . lol
 
Really enjoying your project, real unique cruiser. Of course I am somewhat biased towards Coronets. :popcorn:
 
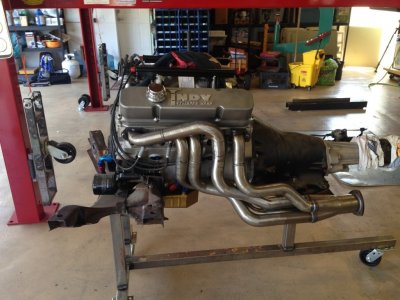
I can't believe how much space this takes up. Now I'm wondering if I need to remove the booster and master cylinder just to make it easier to drop the engine in.


Put the engine & transmission together on the K-frame from underneath. Piece 'o cake.
 
This is a very cool project and I am impressed with the work so far.
Really enjoying your project, real unique cruiser.

Thanks Kiwi & Boise, I appreciate the positive feedback.

Put the engine & transmission together on the K-frame from underneath. Piece 'o cake.
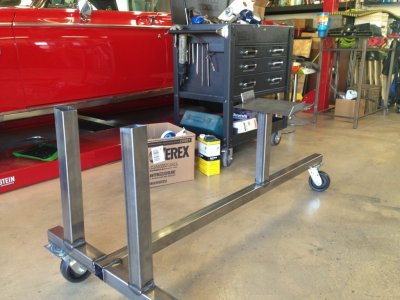
You could make up an easy cart like this.

This thought had crossed my mind as I helped my brother build a similar cart for his restoration. He's planning on installing engine/tranny and front suspension all at one time from underneath the car just like the factory did. In my case though, I already mounted the K member and front suspension back in the car. Oh well, short term I just removed the booster and master cylinder to allow more room. I figured I could easily remount those once engine is back in car.
 
You just need to decide the route you want to go . . . and do what you planned . . .

I was going to get a 5.7 Hemi and put it in my Belvedere convertible - and drive it . . . then I found out how bad the body really was, and I wanted big tires ( mini tubs - narrowed axle ), and I "really wanted" a 6-speed . . . and I wanted it to be a cruiser so that I could enjoy it . . . 2 1/2 years later I'm still working on it, but there is NO RUST in the car now, and I've just started the bodywork ( which is going pretty well as far as I can tell ) . . . I didn't want to get it all together an know that I'd have to tear it all apart and "fix" all kinds of things . . .

Fix it and drive it ( and have fun ) . . . or spend more time and delay your driving and fun . . . make you choice and have fun doing it.

Great work so far on the car . . . very nicely done ! ! Keep at it and please keep us posted on your progress too ( that means LOTS of pictures ).
 
Been a while since I posted any progress so I figured I'd show what I've been able to accomplish.

This is what the back of the wagon looked like before I started cleaning and painting plastic panels.

View attachment 384455

This shows the amount of dirt that covered the entire car leading me to believe it was in a flood at some point. I gutted the parts and started to hand washed everything three times.

View attachment 384457

Still looks like there is some spots that need cleaned with a toothbrush, but it's a huge improvement. Here's a few shots with the plastic panels back in after cleaning and painting.

View attachment 384458

View attachment 384459

I looked numerous places for some material to replace the vinyl that covered the rear floor panels. Finally found some that I think will look good. It's the top sample in the pic below. Has decent color to compliment the interior color and a pattern to break things up a bit. I need to get it ordered and installed.

View attachment 384460

I also wanted to convert all the lights except the headlights to LED. Had to clean some of the housings first, but the finished product looks pretty good I think.

View attachment 384461

View attachment 384462

View attachment 384463

View attachment 384464

Also changed out bulbs in dash. Waiting on flasher relays with ground wires to show up to get hooked up and confirm the turn signals work on their own.

View attachment 384465
Do you have brand and part #'s for the LED lights?
I've been researching but have yet to buy any.
 
You are doing a great job. Long roofs with bigger than stock wheels look cool.
 
Fix it and drive it ( and have fun ) . . . or spend more time and delay your driving and fun . . . make you choice and have fun doing it.

Great work so far on the car . . . very nicely done ! ! Keep at it and please keep us posted on your progress too ( that means LOTS of pictures ).

Thanks, I've basically decided to leave the outside of the car alone and just replace the interior and drive train to make it road worthy. I already have another full restoration job in the works with my brother anyway. I don't need two cars completely apart at this point.

Do you have brand and part #'s for the LED lights?
I've been researching but have yet to buy any.

I bought Luyed LED's off of Amazon. Red ones for tail lights and amber ones for marker lights. Also picked up smaller white ones for dome and dash lights. Here's a link to them.

https://www.amazon.com/gp/product/B01F6O3G2S/ref=oh_aui_detailpage_o03_s01?ie=UTF8&psc=1

You are doing a great job. Long roofs with bigger than stock wheels look cool.

Thanks super freak. I guess only some of us see this in these wagons.
 
Excellent build! Thank you for sharing with us...
 
Excellent build! Thank you for sharing with us...

Thanks 440. I enjoy viewing everyone else's builds so it's only fair I do the same. So much to learn from seeing all the different projects.

I've made a little progress recently. I finished recovering my rear seats and got them installed with the belts hand cleaned in the sink.

image.jpeg


My brother was concerned about clearance between air cleaner and hood with the intake I bought for the new engine we're putting together so we temporarily installed tranny with bare block, heads, intake and carb. He was right, not enough room. I don't want to cut hood up as I want the "stock" appearance on the outside for sleeper mode. Ended up buying moroso low profile/drop down air cleaner, but it's still a little tight. I'm going to look for a 2.5" filter to replace the 3" and see if that gets what I need. Otherwise we'll need to machine the intake a bit too.

image.jpeg


Found that one of my horns didn't work so my brother talked me into rebuilding it along with the horns out of my superbee clone we're building. Not too much to them once you figure out how to get it apart. Once I bead blasted the guts it tested fine. My brother ordered some rivets to aid in getting it put back together so I'm just waiting on those to come in before finishing them up.

image.jpeg


Since I like to bounce around on multiple items on the wagon, I started researching to find the plastic clips that hold the exterior trim on the car. All the trim on the exterior is intact except for the driver front door. I need six new clips to get the trim back on and for the life of me I can't find them. I called RT Specialties and talked to Tom twice and sent him pics of the original clips, or what is left of them, but he hasn't responded yet. It's been almost two weeks since I've contacted him and patience is not a friend of mine. If anyone knows of other places or people who might have these, please let me know. I suspect there is at least one plastic finger missing as it broke off, but not 100% sure.

image.jpeg


I happened to run across the picture I took of my original muscle car, 70 Charger R/T, just after I got it all back together. Bought it from my brother and of course he helped me partially restore it. Didn't have it on the road 3 months and someone offered to buy it. I regret selling it, but we all make dumb mistakes.

image.jpeg
 
Thanks 440. I enjoy viewing everyone else's builds so it's only fair I do the same. So much to learn from seeing all the different projects.

I've made a little progress recently. I finished recovering my rear seats and got them installed with the belts hand cleaned in the sink.

View attachment 388967

My brother was concerned about clearance between air cleaner and hood with the intake I bought for the new engine we're putting together so we temporarily installed tranny with bare block, heads, intake and carb. He was right, not enough room. I don't want to cut hood up as I want the "stock" appearance on the outside for sleeper mode. Ended up buying moroso low profile/drop down air cleaner, but it's still a little tight. I'm going to look for a 2.5" filter to replace the 3" and see if that gets what I need. Otherwise we'll need to machine the intake a bit too.

View attachment 388968

Found that one of my horns didn't work so my brother talked me into rebuilding it along with the horns out of my superbee clone we're building. Not too much to them once you figure out how to get it apart. Once I bead blasted the guts it tested fine. My brother ordered some rivets to aid in getting it put back together so I'm just waiting on those to come in before finishing them up.

View attachment 388969

Since I like to bounce around on multiple items on the wagon, I started researching to find the plastic clips that hold the exterior trim on the car. All the trim on the exterior is intact except for the driver front door. I need six new clips to get the trim back on and for the life of me I can't find them. I called RT Specialties and talked to Tom twice and sent him pics of the original clips, or what is left of them, but he hasn't responded yet. It's been almost two weeks since I've contacted him and patience is not a friend of mine. If anyone knows of other places or people who might have these, please let me know. I suspect there is at least one plastic finger missing as it broke off, but not 100% sure.

View attachment 388970

I happened to run across the picture I took of my original muscle car, 70 Charger R/T, just after I got it all back together. Bought it from my brother and of course he helped me partially restore it. Didn't have it on the road 3 months and someone offered to buy it. I regret selling it, but we all make dumb mistakes.

View attachment 388971
Try a company called Aveco; they have a catalog that lists almost every clip ever made...
 
Auto Transport Service
Back
Top