Thanks Justin.......... looks pretty good outside too!
View attachment 541181
View attachment 541182
Beautiful. Curious as to paint and clear brand you use.
Thanks Justin.......... looks pretty good outside too!
View attachment 541181
View attachment 541182
Beautiful. Curious as to paint and clear brand you use.
Good to know. It looks deep and glass clear. Does that clear flow out smooth? I always find that clear has such a fine line between laying smooth and runs. You seem to have it down pat though. Nice!Nick supplied the paint........ ppg basecoat with Southern Polyurethanes clear........ the ppg base is some of the nicest I've used
Nick supplied the paint........ ppg basecoat with Southern Polyurethanes clear........ the ppg base is some of the nicest I've used
Thanks for the info on the products you used. I have not previously heard of that clear coat but I see that there is a SPI dealer north of the border. I've been using Glasurit Univesal clear. Actually just sprayed this hood a couple of days ago using Glasurit products. That clear on the silver sure looks good!
View attachment 541612
View attachment 541613
That hood sure looks good. I like the two tone it breaks it up nicely. SPI can be ordered over the phone and shipped to you, no need to find a dealer and their tech line is great. You can call or better yet Text Barry even on a Sunday at 5pm and he will answer your questions.Thanks for the info on the products you used. I have not previously heard of that clear coat but I see that there is a SPI dealer north of the border. I've been using Glasurit Univesal clear. Actually just sprayed this hood a couple of days ago using Glasurit products. That clear on the silver sure looks good!
View attachment 541612
View attachment 541613
View attachment 553012 Got a new copilot for Christmas, A dachshund puppy. Kids love him. View attachment 553013 View attachment 553014
![IMG_3587[1].JPG IMG_3587[1].JPG](https://www.forbbodiesonly.com/moparforum/data/attachments/485/485692-d9475f162da0f7cb6d9179ddf81ee677.jpg)
![IMG_3588[1].JPG IMG_3588[1].JPG](https://www.forbbodiesonly.com/moparforum/data/attachments/485/485693-db168639c0b8eb789e3b9276ded96461.jpg)


I really like ho you did the wheel arches ive got to fix mine the lip was cut off for the slicks and never needed to be great jobSo after stripping the paint from the pass qtr I found the car had been hit and pretty good. After some measurements from left to right I realized the previous repair had about an inch of bondo. I hammered and pulled it out as best i could and while it still needed filler its very thin.
View attachment 218642
- - - Updated - - -
Also some rust around the wheel house and lower qtr.
View attachment 218644View attachment 218645View attachment 218646View attachment 218647View attachment 218648
- - - Updated - - -
Pics are mid way through repair, so some of area had already been replaced at time of photo.
As most anyone who's ever tried to fix a 66-67 b-body will know, the Sherman replacement wheel house patches are garbage. I decided to cut away as little as possible and needed to hand form a replacement lip using the sherman part as a starting point. I've put the cutout part against the sherman part to show how bad they are off. Edges are not as crisp and corners are round.
View attachment 218649View attachment 218650View attachment 218651View attachment 218652View attachment 218653View attachment 218654View attachment 218655View attachment 218656View attachment 218657
- - - Updated - - -
Some shrinker / Stretcher action and a cool backing tool I made out a old set of vise grip clamps to back the weld.
View attachment 218658View attachment 218659View attachment 218660View attachment 218661
- - - Updated - - -
Some welding and grinding
View attachment 218662View attachment 218663View attachment 218664View attachment 218665
- - - Updated - - -
View attachment 218668
- - - Updated - - -
66-67 body lines are a total bitch to get straight.
View attachment 218667
- - - Updated - - -
2 wet coats of SPI epoxy, 4 coats of SPI 2K high build
View attachment 218669View attachment 218670
- - - Updated - - -
Right fender was a total loss. So found a solid replacement. Left fender needed a lower patch but was usable.
- - - Updated - - -
Doors in good shape, lots of work in the cowl to windshield area.
- - - Updated - - -
Roof getting done.
View attachment 218685View attachment 218686View attachment 218687View attachment 218688View attachment 218689View attachment 218690View attachment 218691View attachment 218692View attachment 218693
Roof, sail and cowl blocked out.
View attachment 218680View attachment 218681View attachment 218682View attachment 218683
- - - Updated - - -
Interior was done a few years ago so i'm trying to be careful not to screw it up.
View attachment 218684
View attachment 218642 View attachment 218644 View attachment 218645 View attachment 218646 View attachment 218647 View attachment 218648 View attachment 218649 View attachment 218650 View attachment 218651 View attachment 218652 View attachment 218653 View attachment 218654 View attachment 218655 View attachment 218656 View attachment 218657 View attachment 218658 View attachment 218659 View attachment 218660 View attachment 218661 View attachment 218662 View attachment 218663 View attachment 218664 View attachment 218665 View attachment 218667 View attachment 218668 View attachment 218669 View attachment 218670 View attachment 218680 View attachment 218681 View attachment 218682 View attachment 218683 View attachment 218684 View attachment 218685 View attachment 218686 View attachment 218687 View attachment 218688 View attachment 218689 View attachment 218690 View attachment 218691 View attachment 218692 View attachment 218693


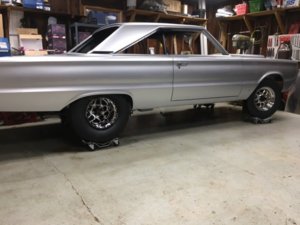
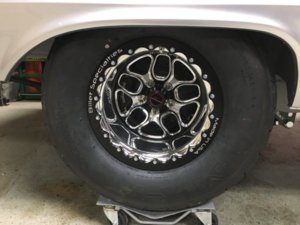
Got wheels on yesterday and they fit. Amazing! Of coarse in my excited (Joe Joe the circus clown) haste, I installed the entire bead lock ring before I realized I forgot the valve stem. WTF, off it came for round 2. I like it and the car should come down a bit once the interior, battery, Motor, trans go in. But at the end of the day I'm tuckin 390's (15 1/4" wide), 30" tall, on a 12" wheel, with a stock inner wheelhouse.
View attachment 561928 View attachment 561929[/QUOT Those wheels are awesome been looking at the billet specialties for my car hows the quality
Got the vent window door pillars back from the chrome shop today. Looks good except for one small pit mark they left behind, it's small and I guess I'll deal with it. also got the trunk emblem done.
View attachment 559074 View attachment 559077 View attachment 559078
Have you had the fun of wrestling the rubbers back in these?
