• When you click on links to various merchants on this site and make a purchase, this can result in this site earning a commission. Affiliate programs and affiliations include, but are not limited to, the eBay Partner Network.

68 Coronet Street Machine

Robking

FBBO Gold Member
FBBO Gold Member
Local time
3:23 AM
Joined
Sep 22, 2013
Messages
143
Reaction score
84
Location
Raleigh, nc
I've been getting great advice here for too long, and have put off starting a build thread but I suddenly have a little extra free time on my hands. :drama: My apologies in advance as I catch up from too long ago to remember.

This all started due to me wanting to build some sort of ground pounding street ride. My family have always been Mopar people, so I was keeping an eye out for something. The challenge was to find a car I liked that I wouldn't feel guilty cutting up. Luckily my cousin stumbled on my Coronet, a guy he knows had already started making a drag car out of it. He had already tubbed the fenderwells, narrowed a dana 60 housing (axles but no guts), and added subframe connectors. Also invested in some nice rims, some home it came.

Got it home and tried to inventory what I had to start with. Front and rear seats, bags of bolts (none of them labeled), bumpers, few other things. Turns out it also had a few rodents living in the dash. In the end it worked out well for both of us; the little bastard found a not quite empty Budweiser bottle and somehow crawled inside. Took a couple days to find him, but he died happy and I was rid of him.

I wouldn't change a thing, but after that raising a son sort of got in the way for a few years.

P0001136.JPG
P0001137.JPG
P0001138.JPG
 
I've been getting great advice here for too long, and have put off starting a build thread but I suddenly have a little extra free time on my hands. :drama: My apologies in advance as I catch up from too long ago to remember.

This all started due to me wanting to build some sort of ground pounding street ride. My family have always been Mopar people, so I was keeping an eye out for something. The challenge was to find a car I liked that I wouldn't feel guilty cutting up. Luckily my cousin stumbled on my Coronet, a guy he knows had already started making a drag car out of it. He had already tubbed the fenderwells, narrowed a dana 60 housing (axles but no guts), and added subframe connectors. Also invested in some nice rims, some home it came.

Got it home and tried to inventory what I had to start with. Front and rear seats, bags of bolts (none of them labeled), bumpers, few other things. Turns out it also had a few rodents living in the dash. In the end it worked out well for both of us; the little bastard found a not quite empty Budweiser bottle and somehow crawled inside. Took a couple days to find him, but he died happy and I was rid of him.

I wouldn't change a thing, but after that raising a son sort of got in the way for a few years.

View attachment 926928 View attachment 926930 View attachment 926931
Looks like a lot of the hard stuff is done. All you have to do is make her rumble.
 
I messed with it periodically, pulling the entire front and rear suspension out from under it and put it up on big truck jack stands The reality of how much work it was going to be started to really sink in. And (un)fortunately, someone had already tackled the undercoating with a screwdriver (realized how big a PITA that would be later) . Not to mention a little surface rust. I think that MIGHT have a little to do with why it sat so long. :)

img101.jpg
IMG_20120501_213343.jpg
20141211_082931.jpg
IMG_20190103_081955_01.jpg
IMG_20200323_184435.jpg
 
Last edited:
I did luck up and find a 73 steel crank motor home 440 on craigslist. Didn't take long to realize I would need a beefier engine stand.
Also along with way I had the Dana built up with a Detroit locker and 3.54 ring gear by East Coast Gear Supply (highly recommend
those folks). In addition, picked up a fresh 727 at Charlotte AutoFair from Performance Automatic (show special was 10% off).

sag.jpg
IMG_20170708_101405.jpg
IMG_20170708_101414.jpg
IMG_20170708_101419.jpg
IMG_20170708_101424.jpg
 
Looks like a lot of the hard stuff is done. All you have to do is make her rumble.
Jerry's right!! That rear end has a few bucks and a lot of work already done!!
 
Love 68's ! If we lived closer, i'd make you a hec of a deal on a repop amd rear bumper.
 
I love the look...gonna be an awesome machine. I love it !! way to go!!
HotRod20
 
Fast forward to the summer of 2017, and several of the boys (and their parents) in our scout troop wanted to get the automotive merit badge. I saw a great opportunity to justify spending money buy telling my wife "fine I'll teach automotive merit badge but we're rebuilding the motor in the dodge while we do it". I figured that might get me motivated (and get my son interested) since I was always more comfortable making them run versus doing body work. They got to learn all about internal combustion engines while we tore it down, and then off to the machine shop she went.

One cylinder had a little too much rust damage, so in the end had to bore it 30 over. Had to shop drill it out for 1/2" oil pick up, and balance the rotating assembly (Eagle rods and Wiseco pistons).
IMG_20170708_131802.jpg
IMG_20170922_070542.jpg
IMG_20170922_070529.jpg
 
Start assembling the motor, rotating assembly is in and girdle plate is on. It's starting to come together! Time to get the oil pickup to work with the 7 qt oil pan, how hard can that be?
Got a little too heavy handed while putting the pickup in, broke a chunk out of the block. :mad: I think I may have invented a couple new curse words.

Long story short, pull it all back apart, back to the machine shop to clean it up and drill it deeper. Back home and back together one more time.
IMG_20180203_152922.jpg
IMG_20180206_064125.jpg
IMG_20180224_153248.jpg
IMG_20180224_153021.jpg
IMG_20180610_182553.jpg
 
Last edited:
Nice the 68 Coronet R/T is my all time favorite. My dad bought one new in 68.
We did the same with the local boy scout troop rebuilding a 70 Duster 340.They also sold raffle tickets for charity and the car was given away at the MATS Las Vegas show a few years ago.:usflag:Way to go !
 
Nice the 68 Coronet R/T is my all time favorite. My dad bought one new in 68.
We did the same with the local boy scout troop rebuilding a 70 Duster 340.They also sold raffle tickets for charity and the car was given away at the MATS Las Vegas show a few years ago.:usflag:Way to go !
That is very cool. Most of the boys in our troop seemed to view cars as just a way to get from A to B.
 
(Folks if these individual posts are poor etiquette please someone let me know).

Took another break, this time mostly to save up some cash (and give my wife time to forget how much I spent last time).
Forgot to mention which cam I ended up running, after talking to competition I decided on running the Xtreme Energy .488/.491"

Finally ordered and bolted on 440 source stealth heads, came to the conclusion pretty quickly that my old/stock rocker arm
assemblies were just to ragged out to use. So instead of spending the money just to go back stock, decided to throw more
money at it and picked up Harland Sharp rollers instead, complete with custom Smith pushrods. Drive train geometry
wasn't perfect (roller to valve stem tip alignment) but after consulting with Harland they convinced me it wouldn't be an issue.

Absolutely bleeding money at this point...

IMG_20180617_200641.jpg
IMG_20181103_082342.jpg
IMG_20180903_144305.jpg
IMG_20180903_145248.jpg
IMG_20180903_145144.jpg
IMG_20180903_150756.jpg
IMG_20181201_204439 (1).jpg
 
Last edited:
After having spent all this time and money putting the engine together, it occurred to me that it would
probably be a bad idea to then let it sit for years while I continued to put off dealing with the body work.
So over Christmas shutdown in 2018 I finally decided I'd put off dealing with the floor pans long enough.
I'm gonna be honest, the reason there aren't many pictures is that a) I suck at welding and b) I was not
going to try and do some concourse quality repair on this thing. Just fixing these with lap welds was
an unbelievable pain in the a$$, I can't imagine trying to do it and make it pretty. So if you only see
19 bad ideas here, you probably missed a few.

Anyway, you can sort of see the passenger side after it went in along with a couple of shots of the driver.
Both sides have weld through primer everywhere and a boat load of seam sealer. Hoping that the amount
of time on the road in the rain that it will see will keep the rust mites from coming back.

IMG_20190103_082401_01.jpg
IMG_20190103_111915_01.jpg
IMG_20190103_181733.jpg
 
After finally getting the floor pans behind me, I decided that in order to fire the engine up
any time soon I would need to drop it in the car. And if I was going to all that trouble I
figured I should at least paint the engine bay. I will be the first to admit that this is
absolutely bass-ackwards from any sane way of thinking. Hindsight being what it is I would
have gotten the entire car ready to go I guess but that ship has sailed.

To start with, the firewall was covered in cheap black spray bomb paint. Fortunately got some
good advice on FBBO and used oven cleaner to at least get rid of that fairly quickly. Here's a
quick before/after, I was surprised how well the paint underneath held up as long as you didn't
let it sit very long.
IMG_20190105_175908.jpg
IMG_20190120_181306.jpg


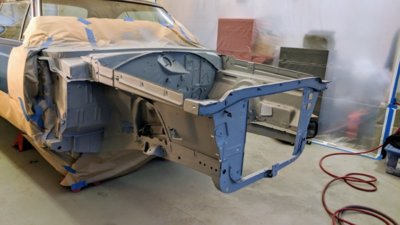
After that came a LOT of sanding. Golfer's and/or tennis elbow on both arms kind of sanding. I mentioned
earlier that someone had scraped all the undercoating off with a screwdriver, leaving a bunch of bare metal
exposed. I started out thinking I was going to sand a few spots, hit them with some etch primer, then
paint the whole thing with urethane primer. When it was all said and done, I think I would have been better off
using epoxy primer and skipping the etch. These are some "along the way pictures".

IMG_20190209_203052.jpg
IMG_20190210_170120.jpg
IMG_20190211_174644.jpg


I probably agonized over the areas around the upper control arm mounts. There was a lot of rust in there that I wasn't going to be able
to get to without a sand blaster. And in the end I probably should have used my little spot blaster, but I couldn't exactly roll it outside.
Anyway, I finally decided to try POR 15, which people either love or hate. It turned out OK for me, once that crap sets up it is
hard to get off. I hit a run with a flap wheel, went to the metal on both sides of the run and it was still there. I also used PORs etch primer
which they guarantee will stick to POR if you spray it before the 15 fully sets up. The timing is tricky (too soon and it cracks) but it does
seem to stick pretty well.

IMG_20190218_161747.jpg
IMG_20190218_175526.jpg


After even more sanding, it was finally time to paint the floor pans (inside and out) and then the engine
bay.

IMG_20190329_171442_01.jpg


You have never lived until you've laid on a creeper with a paint gun and tried
to spray something 12 inches away from our nose. I will say the Devilbiss
Dekups worked flawlessly (I bought a starter kit). But that was one nasty
job. I sprayed the floor boards first with Eastwood rust encapsulater and
then satin chassis black.

IMG_20190403_140543.jpg
IMG_20190403_231708.jpg
 
Another day and more progress!! youre doing great.. two thumbs up!!
HR20
 
After I got the floor pans top and bottom I finally got to put the color on. Basically
the surface was either bare metal (sanded up to 240 I think) with etch primer else
was factory paint with 320 then a once over everything with red scotchbrite. The
paint was Nason urethane with the color being single stage. Took (me) three coat
but I was happy that I had no runs, etc.

IMG_20190404_153926.jpg

IMG_20190404_170100.jpg
IMG_20190405_192726.jpg
IMG_20190417_175725 (1).jpg
IMG_20190404_191850.jpg
 
Auto Transport Service
Back
Top