• When you click on links to various merchants on this site and make a purchase, this can result in this site earning a commission. Affiliate programs and affiliations include, but are not limited to, the eBay Partner Network.

$500- 68 charger

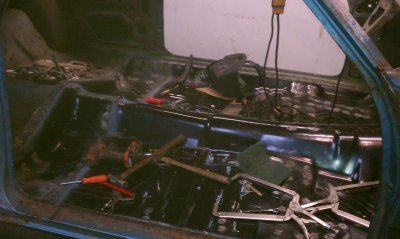
Finally!, I finished installing & welding in the floor pans! That was the most I've sweated since I've been working on the car. The welds aren't super pretty (I'll grind them smooth), but they are super strong and as close to factory placement as could be. It all came together very nice... I have found a method that helped me make the pans fit perfect. I use sheet metal screws where I can't get a clamp. And I use the weld and tap, weld and tap method. For anyone doing an interior floor or trunk floor with welds like the factory, this method works great, but I spent weeks prepping for just the interior floor. I bet I had it in and out 5 times just test fitting and tweaking., a couple different size ball peen hammers were used a lot before, during, and in between spot welds. I can honestly say that this floor is perfect, not a single gap anywhere and every weld is strong and located exactly where it should be. And easily removable main roll bar mounts.
WARNING> All sheetmetal is sharp and the floor is a big heavy piece, hard to handle for 1 person... I used my big thick welding gloves when handling and moving it.
I am stoked...:headbang:
Time for an "Old Millwater"!
 

Attachments

  • IMAG1128.jpg
    IMAG1128.jpg
    48 KB · Views: 635
Floor looks good sitting in there. All your thinking and trial/error test fitting has paid off.
 
Thanks RR.
Looking back, I guess I was more worried about it than I should have been. It was the "fear of the unknown", a job I have never done. Now I can say it was a piece of cake. Those pans had sat around here in the way since November.
Now the next big step is the quarter skins. I am going to do them one at a time. I will do the rustiest side first leaving the stronger one intact til I'm thru with the first one.
 
Thanks RR.
Looking back, I guess I was more worried about it than I should have been. It was the "fear of the unknown", a job I have never done. Now I can say it was a piece of cake. Those pans had sat around here since November.

Been down that road myself as we all have. Still learning new things on mine.
 
Thanks RR.
Looking back, I guess I was more worried about it than I should have been. It was the "fear of the unknown", a job I have never done. Now I can say it was a piece of cake


There's the magic words right there! It's not rocket science...a guy just needs to roll up his sleeves, put in the work and get it done like you did. Good work!!
 
Looking good Kid. We used the weld and tap method also on the floor and trunk pans. If you blast the area afterwards, the spot will pretty much disappear. Saves a lot of finish grinding, sanding, and filling time.
 
That was BADA$$ BAD TO THE BONE. Watched both video's, you're like a TOP GUN with that.
 
Back to the new toy/project.. I'm preparing to replace the side quarter skins, and I have to repair the outer wheel well halves where they are rusted out. I don't really want to replace them since that looks pretty hard, and I think I can patch them to look decent and hide the welds with undercoating. A bud told me that while I am at it I should modify the outer half of the wells to remove the "hump" for better big tire clearance. I kinda like the idea of "dehumping" since I am probably going with some big tires but don't want the car's rear to high. I think the hump is there for strength but I bet it want lose much if I do it right.
What do you guys think about the dehumping?
 

Attachments

  • IMAG1133.jpg
    IMAG1133.jpg
    43.6 KB · Views: 594
It makes me think that you guys don't approve of the de-humping mod since nobody said anything. Don't worry about hurting my feelings, give me your opinions,. I can take it.. If there is a good enough reason not to do it I might not..
 
Thanks, It is a lot of fun and challenging. Those vids are old and flown at about half throttle and half speed. Sry, no vids of top speed passes. I also made an afterburner for it. Here are some pics of my 1st jet with the AB going.
 

Attachments

  • fire---008.jpg
    fire---008.jpg
    65.4 KB · Views: 550
  • mmille005.jpg
    mmille005.jpg
    26.7 KB · Views: 545
Great Airplane!!!
Here's one of mine....
 

Attachments

  • Jim-2.jpg
    Jim-2.jpg
    105.7 KB · Views: 532
Sorry I got your restoration thread off topic... But that's too freaken' cool... sorry for my ignorance, my curiosity or engineering background thoughts, kind of takes over sometimes... But how much & what type of fuel does it run on ??, how long can you stay up??, how far away can you fly & still receive a remote signal ??, are they expensive to build ??, it looks like they pull some serous G-forces.... can you turn too fast & break wings or something, or are they too light for that kind of forces to be applied ?? they looks like a blast to fly... I have a couple friend Rob & Dee that live in the Reno area, that are into some prop style larger remote control planes, with like 6-ft wing spans, that look like Mustang P-51's, I'm clueless on that stuff, beyond that...
 
I like talking about it, I brought it up, so I can't complain. It burns kerosene, or jet fuel which is just kerosene with anti mold and anti freeze additives and to expensive to be practical. It holds about a gallon and flys from 5 to 10 minutes depending on throttle usage. It can also burn diesel but I don't care for the mess, but I do use about a quart of diesel or scented oil in the smoke system. The controller range is way more than you can see, about 5 miles. The mini jet engine is about $4000 by itself and the rest of the gear is about $4000 also. So I have about $8000 total in this latest one and it's support equipment. They can be built a lot cheaper and a lot more expensive to depending on how much gadgetry you want. I modified my wings to be over twice as strong as stock but I haven't ever turned it that hard on purpose. I have done quick turns accidentally in the past that would kill a pilot. Ruff guess I figure this one could handle 15-20gs. Most rc jets can handle 10 or less. With my thrust vectoring I could make it turn so hard it would explode at hi speed even with the wing mods. It can spin like a 4th of July pinwheel but I don't do it fast anymore because the centrifugal forces do bad stuff to the motor and fuel supply.
 
Auto Transport Service
Back
Top