Gauge Cluster
B body gauge cluster restore:
The detail work in the preparation of these show quality gauge clusters was and is performed by OCD Restoration out of Casper Wyoming. Builder of the 1970 Challenger R/T, First Place winner in “Restored Modified” at Mopars at the Strip in LasVegas 2012. My name is Steve Cutler and I have been a Mopar enthusiast for 32 years. I am a firm believer in bringing Mopar “sub-assemblies” back to life with the intent of correct appearance and “as engineered” or as in most cases, BETTER then originally engineered condition. Each piece that I purchase is carefully inspected and set in motion to receive the appropriate attention for restoration. In saying that, I believe the “definition” of restoration is broad and is the perception of each individual person. For example, one could say that painting a car, purchasing a few repop pieces, and installing re-chromed bumpers is a restored car. This may be the case and perfect for that person and that car. Others may perceive it different and view a restored car as “complete disassembly” using original pieces and factory specs to bring it back to life. Again, it can be argued what “complete disassembly” means. I want to make it clear that my passion is Mopars and I enjoy the challenge of bringing the “look” and “function” of these incredible pieces back to life. I am, in no way, an expert in the field and willing to learn each and every time that I am engaged in the restoration process. If you have ideas for an improved process or piece, please let me know.
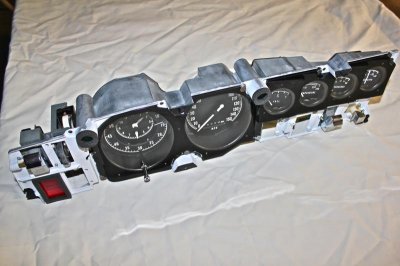
1968 through 1970 B body Rally Gauge Cluster Restoration
Disassembly: The gauge cluster is carefully disassembled with the removal of gauge lens, “Brake System” lens, “R” “L” turn signal lens’s, all switches, all gauges, volt limiter, bulb housings, circuit board and depending on condition of the factory white reflective paint, blue filters may be removed.
Gauge housing: The gauge housing has specific factory stampings inside and outside. Every effort is made to maintain these markings during the cleaning process. You will find other gauge restoration companies simply media blast all of the housing and paint the outside with the “look” of aluminum as well as white inside. All original markings are destroyed as well as the awesome original look of the pot metal. During cleaning, every nook and crevice is cleaned using appropriate tools, chemicals and supplies. I try to maintain the original factory overspray. It is also important to note that each screw hole that is used for attaching the cluster to the dash frame is touched up with flat black. This is essential in that if not done, you will see white around the screw heads when your cluster/bezel is installed. Each mounting point on the dash frame is typically bent. This is addressed by heating and using squeezers to bring each mounting point back to the closest factory position as possible. This is essential for spot-on alignment when finalizing installment on your finished project. Turn signal lenses are prepped and installed with new gaskets. On occasion, there will be new repop lenses used which I have found to be very close to original color and texture. The “Brake System” original lens is cleaned and a clear sticker overlay is attached. The lens is attached with new gasket. Last but not least, each screw hole is cleaned using tap. Important side note: There is a difference between 68 and 69/70 gauge housings. Each housing can be slightly and easily modified to interchange between years. The 69/70 housing has a “stand off” where the medallion is placed. If you have a 68, simply shave off the “stand off” and your medallion will rest on the bezel correctly. If you have a 69/70, it will work with no problems, however, the cluster mounting screw head height will be “deeper” where the medallion goes. This is easily corrected by placing a spacer to adjust for the same height.
Switches: Please note! As with other “professional” restoration companies, switches are simply “cleaned” and “Tested”. OCD Restorations takes it many steps further. It has been observed, that, 40+ years of use, abuse, storage, heat, cold, dust, etc. to the switches takes a significant toll on their ability to operate as originally engineered. My process revolves around the detail work of disassembly, cleaning, fixing, re-lubing, reassembling and testing each switch for trouble free and predictable duty.
Rockers, Thumbwheel, push button chrome switches. Again, I will utilize the original chrome switches if they present well. If there are any blemishes, they will be minimal. My goal is a beautiful shine and super appearance. I have used re-popped chrome switch kits when needed.
Gauges:
Function: The gauges are a very high priority in regards to look and function. Each gauge is meticulously disassembled including the removal of the semi-tubular rivets and gauge face. Each gauge housing and electrical “system” is thoroughly cleaned. The gauge is then inspected and tested for movement. (Calibration after assembly).
Aesthetics: The Mopar design department provided excellent aesthetics for gauge appearance to include clarity and readability. This is duplicated using the original silk screened faces (very few gauge faces can be preserved with clarity and brightness) or with the incredible accuracy of computer generated 3M vinyl overlays. Years ago, I was convinced that sending the gauges off to other companies for silk screening was the way to go, however, that is not always the best route to take. I have observed, in many cases, the restored silk screening detail to be less “crisp” compared to the factory look. If the gauge face is properly prepared to include prepping and painting, the computer generated 3M vinyl overlays are almost undetectable and the brightness and crispness are a much closer resemblance to factory appearance. They are stunning! Again, if I can preserve the original gauge face, I will. The rally clock face is an example of this as the clocks were sent out to different facilities and their method and materials have withstood the test of time. Most Rally clock faces will be the original factory silk screening. Each of the needles are carefully cleaned and show sharpness and bright white.
Calibration: Fuel, Temperature, and Oil Pressure. Each of these gauges are Calibrated using a solid 5 volts input with three resistance parameters for low/medium/high. This simulates the sending units based on factory specifications. Low= 73ohm, Medium= 23ohm, High= 10ohm. The Alternator gauge is tested with needle deflection using a positive and negative input. The speedometer is meticulously cleaned and relubed. With the needle adjusted to exact 0 and smooth operation using high speed flex drill. The odometer will show approximately 1.2 to 3.0 miles due to testing. The odometer re-numbering is almost always recommended and again accomplished using the computer generated 3M vinyl overlays. The numbers are precise and the color and clarity are brought back to life. The only draw back is the seam between the 1 and 0 may be more apparent then what I like; however to most observers, it will not be noticeable. The Rally clock is a great piece and only a few that I have inspected continue to operate. I elect to convert clocks to Quartz as the efficiency or draw on the battery is very low and the accuracy of correct time is consistent. All of the parts including gears are cleaned and relubed. I replace the clock-reset stem if necessary and install reset knob. As for the tic toc tach, if required, the clock will be converted to quartz and the the original electrical circuit replaced with updated electronics.
The circuit board is carefully cleaned with chemicals and appropriate tools. The pins are reset and board tested for continuity. It is very important that the fuel, temperature and oil pressure receive a constant and stable 5.0 volts. Each Gauge cluster receives a SOLID STATE voltage limiter with new 194 bulbs in the housings.
Hardware: Screws, nuts, clips and washers. I attempt to use the original hardware and actually media blast and replate with correct plating as necessary. I clean each piece of hardware and inspect for substantial blemishes. In some instances, after market hardware will be used, however, to most observers, this is not noticeable.
Gauge lens polishing: The gauge lens is carefully separated from the black metal visual deflectors for access to the interior side of the lens. This allows for proper polishing of entire lens. Depending on condition of lens, it may need wet sanded to rid deeper scratches and then polished or, a good polish for a crystal clear view. The black visual deflector is inspected and may require media blasting with a new coat of flat black. The deflectors are correctly aligned and securely reinstalled. The lens is then reinstalled using plated original clips.
I have attempted to add complete and descriptive information to assist you in making an informed decision as to purchase/bid-on this item. If you feel there is an error in description, please do not hesitate to point this out to me. PM me if interested: Thanks, Steve Cutler, OCD Restoration