• When you click on links to various merchants on this site and make a purchase, this can result in this site earning a commission. Affiliate programs and affiliations include, but are not limited to, the eBay Partner Network.

1969 Charger R/T resurrection

View attachment 170053


LOL! Ingenuity I tell ya.....They look great! Good to hear you're happy with them. Pretty black eh? The vinegar packs an extra punch to help permeate the material. I would imagine that does follow suite to retention as well. I haven't had no issue with dye bleed or rub out with the RIT.
 
Seatbelt webbing is usually a cotton/nylon mix. The website for Rit Dye suggests adding a cup of salt for cotton and a cup of vinegar for nylon, to increase the intensity of the colouring.

Adding salt to set the colour was usually part of the process when we dyed our jean black long ago...
 
Lol hell yeah, macguyver mopar restoration at it's best with that dying rack! Seatbelts are looking great! And cool tip with the RIT and vinegar, I might have to mess around and try dying my tan ones sometime even though I'm going with harnesses
 
Hey were your seat belts already black? I have a tan set and was thinking about dyeing them. Hoe did you dye them. Your car looks great!

They were an original black set, but were fading. I mixed the bottle of Rit, 1-2 cups of white vinegar, and about 3 gallons of hot water in a 5 gallon pail. Stirred for 20 minutes, rinsed, and hung them on my custom seatbelt drying jig.

- - - Updated - - -

Yeah it fits since you are a hunter .. even if it's not an elk antler (or is it?) hehehe

Yeah, an elk and mule deer shed I found on one of my escapades in the Missouri Breaks - Montana.

- - - Updated - - -

Glad to see you got fixed up, great bunch of guys here.

You are right about that. Someone is always willing to help out around here.
 
Thanks, I will give my tan ones a try, I was going to replace them, but no harm trying. Thanks again
 
Did you dip the entire belt in the mixture and then clean the chrome ends after? By the look of the belts, there can not come apart very much. Are there any other parts that can come off except the shrouds? What did you use to colour the shrouds and latch colours? Sorry for all the questions, I appreciate your help.
 
Did you dip the entire belt in the mixture and then clean the chrome ends after? By the look of the belts, there can not come apart very much. Are there any other parts that can come off except the shrouds? What did you use to colour the shrouds and latch colours? Sorry for all the questions, I appreciate your help.

What you see in the pictures is the way I dyed them. The dye doesn't adhere to the metal at all. I had an awful time trying to get the plastic shrouds off the retractors. I actually had 2 sets and experimented on one of them. I got one off, and spent an hour trying another before cracking the plastic and saying screw it. So the 2 I am putting in the car were dyed with the retractors on and they are fine. If yours are discolored, I would paint them with SEM after the dye process.

I need to update what I did somewhat. After posting the pics., Larry mentioned maybe salt should have been added to prevent bleeding. I originally just went be the instructions on the bottle, but after this checked out their website and decided to redye them. I found no mention of salt, so didn't use any. I presoaked the belts in hot water this time. Then put about 3 gallons of very hot water in my laundry tub, 2 bottles of dye, and 3 cups of white vinegar. We stirred this constantly with a wooden stake for 25 minutes (thank God for kids), and then rinsed in hot water. Next, I filled the tub with cold water and some Tide laundry detergent. We stirred this for 10-15 minutes and then rinsed with cold water and hung to dry. I was surprised how dark the water got after this step, but think this will prevent any of the dye coming off on lighter clothes later on. To sum it all up, the belts are darker than the first try and I feel better about bleed off in the future. The only thing that does happen of course is that the little white tags end up a dark purple instead of the original white but there is nothing that will prevent this.
 
The end result - you have a good looking set of belts! The vinegar should work fine, you probably don't need the salt but for future reference it's here http://www.ritdye.com/dyeing-techniques/tips-success.

For people who haven't readily found RIT dye in their stores, you can get some good dye online from Dharma Trading, some people prefer it:
http://www.dharmatrading.com/dyes/idye-for-natural-and-poly-fabrics.html

And also a good dye carrier to fix the colour:
http://www.dharmatrading.com/chemicals/industrial-polyester-dye-carrier.html

But your belts will look great for years to come. Nice job.
 
Thanks for the link Photon - that is the one I found too. I guess I thought the belts were nylon and used vinegar instead of salt because of this. Regardless, I think they look a heck of a lot better than they did.
 
Sounds like round two of the belt dying project went pretty well for you...Hopefully not too bad of a mess. I know when I boiled mine up on the stove, she bubbled up a little more vigorous than anticipated and gave the wife's oven mitt and towel some pretty serious freckles. You know, when you can easily hear your name from across the house, and your name is pronounced twice as loud at the end of it vs. the beginning, you're in trouble. I really thought I disposed of all evidence, but my wife (gotta give her credit) is like a one person CSI lab.
 
You've got bigger balls than me Will. I wouldn't dream of using this stuff in her kitchen. You must have got it cleaned up fairly decent because you haven't mentioned any divorce proceedings lol.
 
Glad I checked this thread out Elk, just got finished scrubbing 45 yrs of crap out of mine and they look pretty faded, now I just need to find the Dye your using up here in the north so I am on the hunt-- love the hanger setup right up my alley!! Great job on your build!!!
 
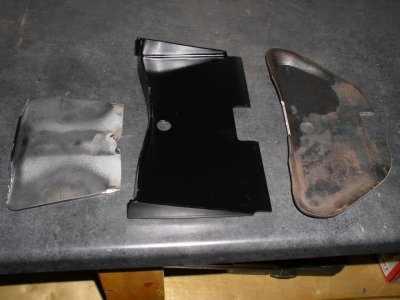
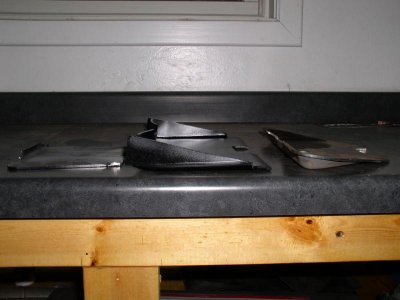
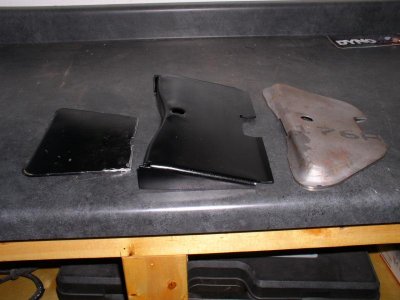
A very knowledgeable Mopar buddy of mine stopped over a couple of months ago to check out the car, and thought everything looked great except the skid plate I had welded on the k-frame. He thought it looked quite cheezy. This was part of the kit I bought from Firm Feel. I didn't know any better at the time as to what they were supposed to look like, so just put it on. Come to find out he has them made and gave me one for the car. The picture shows the one from Firm Feel, a 69 model, and a 70. I debated for the last 2 months on whether I should grind, weld, and paint on the nice new car. I finally decided to tear the old one off and got the new one installed and painted tonight. Now he can quit bothering me about this little flaw I had lol.
P2240027.jpgP2240028.jpgP2240029.jpg
 
Last edited:
You've got bigger balls than me Will. I wouldn't dream of using this stuff in her kitchen. You must have got it cleaned up fairly decent because you haven't mentioned any divorce proceedings lol.

I gave it my best shot Joel, my plans were still foiled. Never marry a woman smarter than you.....you can never get away with anything.
 
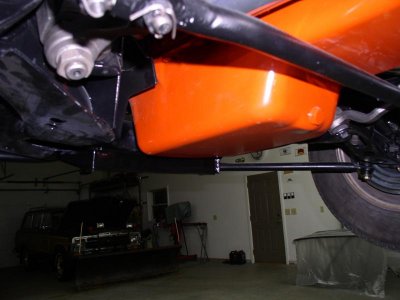
And the correct style installed. You can see how much more protection this on gives. The Firm Fell model only stuck down about .5 inch - not even enough to hang below the pan. So now I shouldn't have to worry about damaging my Hemi oil pan when doing my DOH jumps.

P2240033.jpg
 
A definite improvement with that deeper skid plate. Of course, you'd better test it out to make sure it really does the job. :)
 
Auto Transport Service
Back
Top