• When you click on links to various merchants on this site and make a purchase, this can result in this site earning a commission. Affiliate programs and affiliations include, but are not limited to, the eBay Partner Network.

What did you do to your Mopar today?

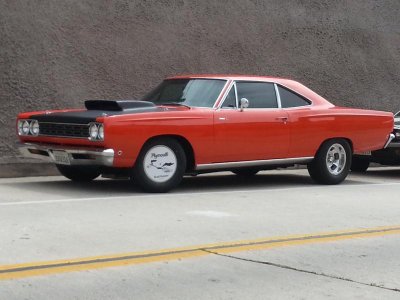
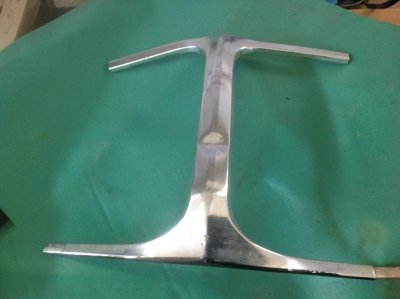
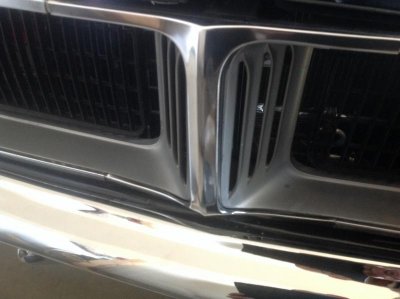
I finally tackled the I beam install. Wanted to do it without removing the entire grill and with frigging anything up! That's always a plus!

Pics of old one and new one installed. If anyone wants to know how I did it without removing grill, I'll be happy to help. Wasn't as bad as I thought.. Just a little planning..
 

Attachments

  • image.jpg
    image.jpg
    34.5 KB · Views: 307
  • image.jpg
    image.jpg
    43.9 KB · Views: 284
Nice! I swear these Chargers were used as battling rams (I've yet to see one without the whole front beat up).

- - - Updated - - -

I swapped in some 4:30s to compliment the Viper trannies .5 overdrive and add a little excitement to driving.
 
Thanks! I was pretty lucky with this one. This was the only piece of the front end that had issues. The rest of it is pretty darn good.
 
Finally tackled wiring up an A/F Ratio Gauge. Wanted it tidy so I ran the wiring inside the console and along the firewall. I forgot how much I dislike wiring and how uncomfortable it is when your 6'2" and your hands are the size of mits.
 
Hey SublimeSixpack, that blue and white really camouflage well in the second photo. Your car is hard to make out. :)
 
7pm~10pm manufacturing a puller to get a drum off of the Dart

DSC04146.jpgDSC04368.jpgDSC04372.jpg

---------------------------------------------------------------------------------
~10pm till present....sipped my Jack and looked at her lovingly...

Photo0502.jpgDSC04229.jpg

---------------------------------------------------------------------------------
Wed 4/29...possibly welcoming a new MoPar to the stable
Details to follow :icon_winkle:

Enrique's 69 Newport.jpg
 
I like those wheels on that car.

That's a good angle for the pic, too.
 
Rebuilt the carb on my '66 today. It's a Stromberg 2bbl on a 318 Poly. Since this is a U.S. car (and I'm in Ontario) it's hard to get parts for the U.S. only carb on this car. Anyway, I have to compliment Mike's Carburetor Parts (Rochester Wa.) for a great product. The kit had everything I needed and worked perfectly. I had purchased the vacuum pull off a couple of years ago, also from Mike's, and it was an exact fit. Only bad part is the price of shipping - cost as much or more than the parts! Anyway, I fired up the old girl, took it for a spin (1st time this year!!) and it's running like a champ, no more hesitation off idle. I should also mention that I installed the Pertronix Ignitor II coil, in March to, compliment the Pertronix II ignition and power relay I installed last year.

Sure felt good to go for my first drive.

IMG_4356.jpg
 
Attached the brake valve to the inner fenderwell. Connected the front to rear brakeline to it. Got the hardware mounting kit for the brakeline to attach to inner rocker floor.

001.JPG006.JPG007.JPG
 
Went through the drum stuck on the hub thing on my cuda and ended up taking the hub and drum off and pressing the hub from the drum
7pm~10pm manufacturing a puller to get a drum off of the Dart

View attachment 254736View attachment 254732View attachment 254734

---------------------------------------------------------------------------------
~10pm till present....sipped my Jack and looked at her lovingly...

View attachment 254731View attachment 254737

---------------------------------------------------------------------------------
Wed 4/29...possibly welcoming a new MoPar to the stable
Details to follow :icon_winkle:

View attachment 254735
 
Adding a new seat back brace to support the 2014 Dodge Challenger seats

Got a set of bucket seats, and rear bench seat, from a 2014 Dodge Challenger ( that has a little pyro assistance ) and I needed to build a new seat back support to lock the seats in place and support the seats - it hods a lock to lock them in place too . . . .

After the seat back support went into place, a slight wedge was needed to position the locking clops properly to the seat backs.

sm_seatbackbar-08.jpg

Then with them in place, and some nut plates to allow screwing them in place . . .

sm_seatbackbar-13.jpg

The final product - I'll be sporting a new set of 2014 seats in my 1967 Belvedere Convertible

sm_seatsinstalled.jpg

and YES - the seats will be recovered later when all the work is done ! !
 
Had a busy week, finally got tires and dropped it off for a much needed alignment.........had to get a pic with a cool 72 Charger in for some work also.

Re-worked the spindle offsets and mounted my wheel discs from 98 Snake Eater. Hit the local cruise last night and took home my first sponsor award for my Roadrunner which was totally un-expected.

Today I met the San Diego Mopar club for a club photo followed by a fun cruise up the coast along the beach communities, so it was definitely a good week.
 

Attachments

  • image.jpg
    image.jpg
    58.7 KB · Views: 211
  • image.jpg
    image.jpg
    58.8 KB · Views: 213
  • image.jpg
    image.jpg
    45.7 KB · Views: 207
  • image.jpg
    image.jpg
    66.3 KB · Views: 204
  • image.jpg
    image.jpg
    43.7 KB · Views: 203
Re-dyed the kick panels and A pillar trim. Also did the horn pad. While I was at it I made the mistake of cleaning the center button with alcohol. I did that because I wanted to touch up the silver around the edge. Ended up redoing the entire piece.

PITA!!

20150503_204534.jpg
 
Last edited:
Auto Transport Service
Back
Top