• When you click on links to various merchants on this site and make a purchase, this can result in this site earning a commission. Affiliate programs and affiliations include, but are not limited to, the eBay Partner Network.

1964 Rusty Bucket transformation

Well, the needed part is back in MN, I laugh to keep from crying. Hopefully, it will get turned around in MN and delivered back south. If not it will be back to cutting, shaping and welding....

So in the meantime, I have managed to scrape all of the under coating out of both doors and currently removing undercoating in the trunk and tail panel area. For the picture hounds out there:
upload_2016-4-11_20-8-41.png


upload_2016-4-11_20-9-4.png
 
Received a call today from the international shipper that the cowl will be delivered tomorrow evening...lets keep the figures crossed and hope they make good on their claim.....this part has made a couple of trips between Georgia and Minnesota...it has logged quite a few miles....we'll see.
 
Ken I know the part had a wild ride and many miles to get to you. I hope all parts have a easier time then the cowl you received. I do wish it helps with your restoration. Keep the pictures coming. Interesting project and a very nice job.
 
Jay, Yes after a letter to the President of the company, the international shipper came thru.
The cowl is in a lot better shape than the one that was taken off the car.
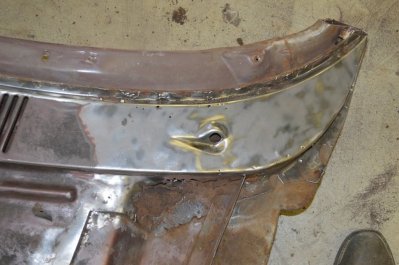
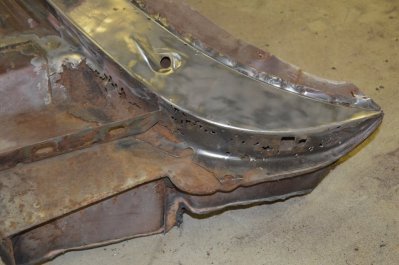
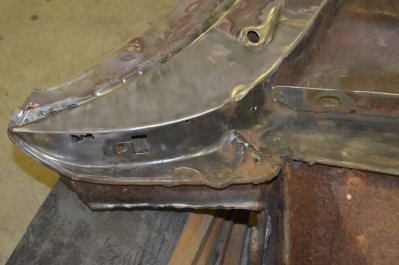
An update on the build. The cowl came in 04/15/16 in the afternoon. I didn’t have time to work on it until yesterday after work. I wire brushed the flanges where it is tacked to the lower cowl. I also wire brushed upper cowl corners. There is some rust thru but at least there is something to work with.

There is a slot cut into the recessed panel at the RH windshield wiper hole. This slot looks like it was made by the windshield wiper arm? Maybe at some point in its history the windshield wiper arm was installed a little too far down on the shaft causing this cut.

DSC_0682.JPG DSC_0683.JPG DSC_0685.JPG DSC_0686.JPG
 
I had a little time to work on the Belvedere today. Spent most of that time drilling out 100 or so factory tack welds on the cowl that came from Jay in MN.
DSC_0687.JPG


The under side of the top cowl panel is pretty rusty. I will drop this into a white vinegar and water bath to remove the rust and hopefully save some metal.

DSC_0688.JPG

The lower panel is in better shape then the one that came off my Belvedere. The wiper mount area from Jay's cowl is in better condition. It will get transplanted onto my project Belvedere.

DSC_0691.JPG
DSC_0693.JPG

Everything is currently clamped into place to check fitment. A filler piece has been made to fill in the gap between the wiper mount and firewall. I just didn't have time to trim and fit it yet.
 
Last edited:
Maybe if the shipper had wrapped a burkha on it, it would have gotten there with no hassle.
 
Ckessel…lol, it would have been expressed shipped courtesy of the American tax payer…..lol.

All of the pieces have been trimmed to fit on the LH lower cowl. The wiper mount is soaking in a vinegar and water bath to de-rust.

The RH lower cowl area has been removed from the Belvedere.
DSC_0694.JPG


This area has been cleaned up. Next week POR 15 will be spread in the A pillar using the sewer snake/tampon brush and a paint brush on the other surfaces where ever it can be reached.
 
A little update on the work done on the Belvedere today. The LH side cowl has been metal prepped and POR 15’d for tacking. Lots of welding in my future.
The RH side A pillar has also been POPR 15'd. The lower cowl panel has been trimmed to fit and is soaking in a white vinegar/ water solution. Hopefully these panels will be tacked in by next weekend.
For the picture hounds out there:
DSC_0695.JPG

DSC_0696.JPG
DSC_0697.JPG

DSC_0698.JPG
 
Last edited:
Ken you are a very good metal worker. I would not take on a project that extensive. It looks like the parts you got from me are helping with your work. Jay
 
Jay, I have always wanted to tackle an extensive automobile sheet metal project. When I bought the Belvedere, I knew I was in over my head. But I jumped in anyway (what a heck of a way to learn). I have learned that automotive sheet metal work is like learning to weld or learning how to do anything for that matter. A person can read about it, watch videos about how to do it, even watch other people do it, but until you put the welding hood on, you haven’t a clue how to weld.

I am quite proficient at MIG, TIG, Stick and oxyacetylene welding and the car, after all, is just thin metal. The issue I run into, is metal shrinkage after welding and then trying to stretch it back so it doesn’t oil can.

Yes, many thanks for the cowl piece you sold me. I gives me something to work with and has saved a lot of fabrication time.

69 GTX thank you for the complement.

I did manage to do a little something to the 64 today. The LH lower cowl pieces are now tacked in.

Pictures:
DSC_0699.JPG

DSC_0700.JPG
 
The biggest need to do this type of repair is PATIENCE! If you don't have that, you are screwed. Tools, equipment and skills come after that. Crumley is kicking booty on his car and is an inspiration for me and I'm sure others too. Crumbly, the photos of the cowl above the firewall minus the upper wiper/grille unit are very helpful. On my 65, I'm going to do up an old school NASCAR style cowl induction. Those photos really show how big that plenum area is. Oh, and on getting your panel across the border quicker if it had a burkha on, it would have received an education, healthcare and a monthly stipend courtesy of the U.S. taxpayer too. LOL!
 
Ckessel, you are soooo correct about the patience, especially when a dumb mistake gets made…lol.

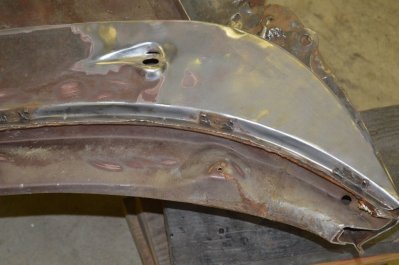
I did manage to work on the 64 some yesterday. The RH lower cowl is randomly tacked. The upper cowl section was clamped into place just to check fitment. It is looking good except the LH windshield wiper hole. The wiper post is really close to the RH side of the opening. Upon close inspection it looks like the hole has already been elongated from the factory. This opening needs a little more clearance. I hope to accomplish this with a rat tail file. I also welded up the rust thru holes. For the picture hounds out there:

DSC_0702.JPG

DSC_0703.JPG

DSC_0704.JPG

DSC_0705.JPG

DSC_0706.JPG
 
Man, when you have the top lid on you can see just how big that plenum area is below the grille. My car is fine in that area, as far as I know, but I think I'll squirt some material in that area when I have it opened up for the air cleaner ducting. I'm sooooo lucky my car is not swiss cheesed.
 
69 GTX, thank you for the encouragement.

Well, it is time to do some rust elimination. The (1 part) white vinegar and (4parts) water douche has done a good job eliminating rust on small parts. Let’s step it up a bit and see what it will do on the whole cowl cap. A 6’-0” collapsible kiddie pool was procured from a large retailer for about $13.00 and 6 gallons of distilled white vinegar was purchased from the same establishment for $2.50 a gallon. So the official Crumley De-Rusting Douche Factory is now open….lol. For the picture hounds out there:

DSC_0708.JPG

DSC_0711.JPG

Water and white vinegar mixed in kiddie pool.

DSC_0713.JPG

The day (05/11/16) the metal was dropped into water and vinegar douche....
Today (05/12/16) the douche is getting cloudy with air bubbles.....hopefully this means it is working. We will see...

DSC_0714.JPG


The rag in the picture, is wet with the douche to cover exposed metal.
 
I hope it works Crumley. I have to do the same thing on mine. I tried the POR metal prep/rust remover which had limited effect so far.
 
Ckessel, will not quite Massingill but close….lol

Well Gent’s, the white vinegar and water mix worked. The parts where put into the vinegar & water douche on Tuesday evening and taken out on Sunday morning. See attached before and after pictures:
DSC_0708.JPG

DSC_0715.JPG

Sunday morning, I took a scotch brite pad, using light pressure, and rubbed the rust away.
I then took a large tote and mixed backing soda (approximately 2 cups) and water (approx 3 gallons) douche neutralizer.
Using another scotch brite pad the parts got washed down with the neutralizing solution to stop the de rusting process.

I spent the rest of Sunday knocking dings out of the upper cowl. I also welded up some of the rust thru holes along with the slot cut into the sheet metal by the windshield wiper . I have also begun the process of cutting and trimming the replacement sheet metal for the LH upper cowl.
 
Auto Transport Service
Back
Top