• When you click on links to various merchants on this site and make a purchase, this can result in this site earning a commission. Affiliate programs and affiliations include, but are not limited to, the eBay Partner Network.

Subframe connectors on a rotisserie

Tzclark

Well-Known Member
Local time
10:53 AM
Joined
Jul 19, 2015
Messages
160
Reaction score
53
Location
Chilliwack
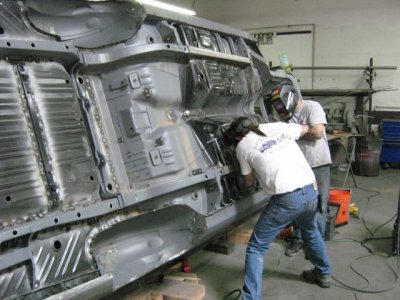
I've been putting off welding in the us car tools goodies because I have zero patience. (Must have ADD, or whatever they call it today) I've read a lot of conflicting things about the vehicle needs to be on its own weight, some say it doesn't. I have the car flipped on its side on a rotisserie right now. What do you guys think?
 
If it's on the rack with little else on it weight wise, it'll be fine. Weld away. I've cut my current project up on a rotisserie and you'd be surprised as to what moves and what doesn't.
 
Good question. Are we talking about all the sheet metal on the car, but nothing else? I'm going to be doing this in the near future and would like to know what to expect. Thanks.

Dan
 
The car is stripped as much as possible. Going to start welding tomorrow, from original fit up, the frame connectors look to need a quite a bit of fine tuning.
 
MY 70 GTX was on a rotisserie when I installed the frame connectors. I got 4 large bottle jacks, lowered the rotiss until the car rested on the jacks, leveled the car with the jacks ( piece of cake with that kind of screw adjustment), I then tack welded the connectors pretty good. After the tacking I raised the rotiss and turned it so I could complete the welding standing up instead of on my back. The car is straight as an arrow and handles like a slot car. All the doors and panels lined up just fine.

283.JPG
 
What are you guys using to stop rusting underneath/inside the connectors and existing rails?
 
MY 70 GTX was on a rotisserie when I installed the frame connectors. I got 4 large bottle jacks, lowered the rotiss until the car rested on the jacks, leveled the car with the jacks ( piece of cake with that kind of screw adjustment), I then tack welded the connectors pretty good. After the tacking I raised the rotiss and turned it so I could complete the welding standing up instead of on my back. The car is straight as an arrow and handles like a slot car. All the doors and panels lined up justfine.

My rotisserie is a home brew and it's sure as hell isn't a bragging point. Got a little ahead of myself and cut a few corners. Pretty much pop a hemorrhoid when trying to spin it.
 
If the factory had installed them on the line, it`s pretty likely that they`d have been put in along with the frame rails and side sills before the suspension, drivetrain or any other weight was added
 
I covered the insides of the rails and every place I could get it to with Rust Bullet.
 
I used POR 15 inside the connectors before welding. I welded mine on the rotisserie but I had everything I could, taken off of it. I also spent a day trimming both connectors for a really good fit. It will save you grief when you go to weld it up and don't have to fill in gaps.
 
I purchased Eastwood's internal frame paint to paint the insides of the connectors. I had to add a lot of material (1/8" to 1/4" in spots) to the driver's side of my U.S. Car Tools frame rail connectors but only a little on the passenger side. I have the car together still and was planning on welding them in the way they suggest but if it can be done on the rotisserie, that'd be a lot easier. I just wish there were better instructions with their products.

Drive'em like you just stole'em,
Vic
 
I trimmed mine the best I could but under the seat area I'll need to figure out a way to pull the floor down about a 1/4"
 
I didn't want to pull the floor down so I added weld to the sides where needed. I clamped a heavy piece of copper bar to the side and added the necessary metal. Weld filler metal doesn't stick to copper.

Drive'em like you just stole'em,
Vic
 
I purchased Eastwood's internal frame paint to paint the insides of the connectors. I had to add a lot of material (1/8" to 1/4" in spots) to the driver's side of my U.S. Car Tools frame rail connectors but only a little on the passenger side. I have the car together still and was planning on welding them in the way they suggest but if it can be done on the rotisserie, that'd be a lot easier. I just wish there were better instructions with their products.

Drive'em like you just stole'em,
Vic
UScartool has pics on their site of them being welded while in a rotis..
 
I'm certain that the reason that it is suggested to install them with the car resting on its suspension is because the stresses of the engine, trans, suspension and all factor in. A stripped down chassis has no torsion bar tension, no leaf spring tension, no 650 lb big block pressing on the frame rails...
 
I've put my car on al lift and supported it on both axles. Car was completely stripped. Had to do a lot of grinding before they would fit.
 
I'm certain that the reason that it is suggested to install them with the car resting on its suspension is because the stresses of the engine, trans, suspension and all factor in. A stripped down chassis has no torsion bar tension, no leaf spring tension, no 650 lb big block pressing on the frame rails...
If you think about it, it really doesn't matter if it's fully loaded on blocks or gutted on a rotisserie when you put them in. What matters is having the car level and square as much as possible when they are installed. The last thing you'd want to do is jack up the left front and weld one on while putting the car in a twist.
 
Auto Transport Service
Back
Top