• When you click on links to various merchants on this site and make a purchase, this can result in this site earning a commission. Affiliate programs and affiliations include, but are not limited to, the eBay Partner Network.

Fun driver project : 69 Charger

ELLIOT

Well-Known Member
Local time
1:40 AM
Joined
May 20, 2015
Messages
73
Reaction score
106
Location
Bruxelles
Hi

So basically I'm starting this thread about the build of my 69 Charger. If I remember correctly, I had already start one 2 years ago when I got it but my project as change so much since then, it should be better to start a new one.

First and before starting, my english skills are not perfect but I'm will do my best to be clear !

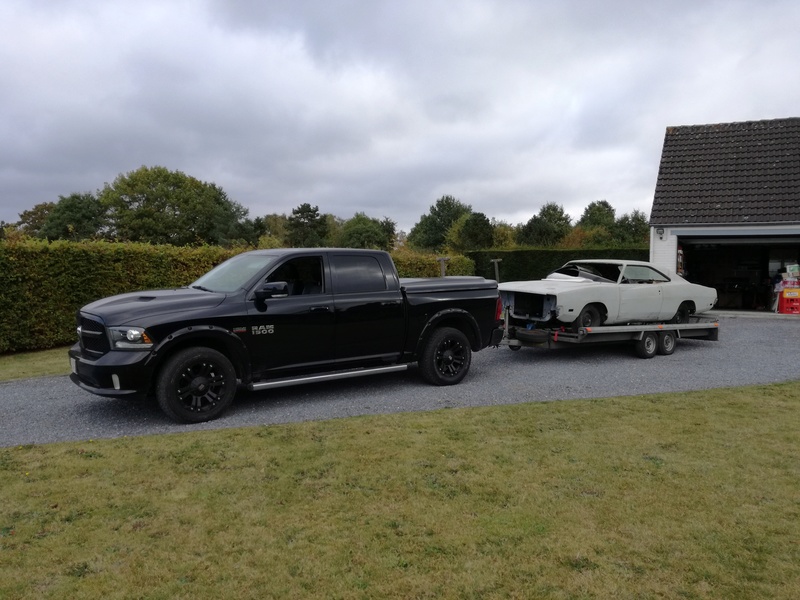
Here is my Charger when I bought it as my first car in january 2015 just after my 18 birthday.

img_2016.jpg


The first project was to restore it quick N easy by just doing all necessary stuff and throw a big block into it and drive it ratty muscle style.

I bought a freshly rebuild 440 with a 727 with the hope to trow it into it and drive it as is (yeah I was pretty stupid or blind, still don't know ^^ )

img_2010.jpg


But I quickly realised that this car needed a lot more work than what I was expecting.

img_2017.jpg


image_25.jpg


At this very moment, I decided to change my plan and do the complete restoration this car deserve.

I knew I had always wanted to build a car that I could use everyday, doing track days, some quarter miles and just have FUN with it. I decided that I should build my dream car. THE one that I have always got in vision. It will be my creation

Next chapter tonight :thankyou:
 
what are your plans for it please keep us posted
 
Chapter 2 : Game Changer/Charger

So I decided to completely restore this car, the first step was to completely dissasemble it

img_2027.jpg


The front end went off pretty easily. The first that I have done was to restore the front grille. It was pretty beat up as you can see. But epoxy glue and a lot of time got it done.

14699910.jpg


Then I needed to switch from a barn garage to a one and a half garage. Downgrade in place but big upgrade in confort
11995610.jpg


11994510.jpg

I got it equiped with the necessary stuff to restore the car.

cracked windshield came of
img_2013.jpg


With all the interior
img_2018.jpg


Thank you,

Elliot
 
Chapter 3 Body parts and suspension stuff


Then I bought all the body parts. It took me 7 months to find a pro that could send me those parts. Wasn't really happy to see all these "pro" saying trust us, we are the best for your project and take 3 months to send me a price tag that was really absurd. Next time I will buy those parts myself ...

But anyway, there are finally here so i'm happy ! I bought everything from AMD and I'm really happy with the quality of those parts
img_2710.jpg


img_2711.jpg


img_2712.jpg


Next for disassembly was the K member and the suspension parts. All went pretty smoothly
img_2037.jpg


img_2038.jpg


img_2039.jpg


Grinder time (5 hours)
img_2041.jpg


12596510.jpg


And the K member, was finaly clean.
 
Chapter 4 : Suspension Rebuild / Chassis uppgrade plan

After cleaning up the parts for the suspension, I painted them with black epoxy

12575910.jpg


The LCA were stiffened up with a boxing plate from Mancini. I still need to change the swaybar mount from a pre 69 style. mine were worn out and a friend sold me those. They are from a 70 Barracuda
img_2042.jpg


img_2044.jpg


I have since decided to build my own K member with rack N pinion and coilover so I will finish to rebuild the old suspension and sell it later.

The first part of my new plan was to stiffen up the body. I have seen to many unibody car flex with the torque of the engine. So an order from Us car tool later and

img_2045.jpg


img_2046.jpg
 
Chapter 5 Body shop FAIL, parts resto, brakes and transmission

Since the beginning I decided that I would let a pro do the bodywork. I'm not the kind of guy that have good skills with is hand. The only thing that I can do is wrenching on stuff ^^

After some research on my aera and I found what I think was the best and had a fair price. What a disappointment it was ... The guy keep it 8 months and did nothing with the car
img_2048.jpg


So I bascially loose 7 months were I could have to a lot of stuff. I took it back in september, I friends who is an ex pro bodywork man will do the job and all the modification.
img_2017.jpg


That was a very bad time for the restoration. The motivation was at the lowest point. Really not seeing the car going forward was demoralizing.

During this time, I have restored some parts including, the steering column, the pedal assembly and the dashboard (what an hell of a paint job but ended up good inoff for me ^^)

img_2010.jpg


img_2011.jpg


I have also bought some parts for my project :

A set of Ford mustang 13 inch brakes that I will adapt. I litteraly steel those. Way cheaper than everything I could find on ebay.
12324810.jpg


And the T-56 ! Since the begining it was my dream gearbox and I got the opportunity to find one for not that much money. Those are really expensive in europe and really rare for sale. I bought it from a guy that was keeping it in case his trans blow up but now it's mine and it will be fitted behind a Gen3 Hemi

14568910.jpg


14628210.jpg


14593310.jpg


I find the bellhousing on a facebook group for 300$. Think it was a good deal when you know a new one cost 650$.

So that basically resume my 2 years of ownership. I have been blocked with a lot of crappy moment but now, the resto is back on it's rail and the body work should start really soon !

thank you for reading this. I will keep you updated on the progresse. Once again sorry for my english skills ! ;)
 
Great project, keep going.
 
Impressive.
It is all ways even more impressive when someone not in the USA does this.
 
thanks for saving one more cool mopar......hope all goes well
 
That's a great car and a cool project....keep showing us your updates, and don't worry about your English...it's fine. :thumbsup:
 
Thank you everyone for the great comment ! :D

Impressive.
It is all ways even more impressive when someone not in the USA does this.

Yeah we don't see Mopar very often here. But I'm a long time member of a french club so I'm starting to know a lot of Mopar people in France, Belgium and Holland.

The car is going to my friend bodyshop. He will slowly work on it. We expect to finsih all the metal work in approximately 10 months. Then the car will be paint on the underside and the interior. Then I will rebuild the car.

Big project indeed. I will keep this thread updated as soon as possible
 
Finaly going to my friend bodyshop !

More update soon !

You can't do more Mopar than this !!

img_2023.jpg
 
Some where I have a picture of a Challenger in Brussels from 1986.. That car looked so beautiful on those streets..

Great project by the way..
 
Hi !

Some news from the bodyshop ! the rear tail light panel came of. Nothing biggie but that make me really happy so :)

receiv10.jpg


receiv11.jpg


Also receive the brakes fitting from aeroflow, the painless harness and the last body parts needed.

img_2010.jpg


img_2011.jpg


img_2013.jpg


I will order parts in february for the 4 link set up, the rear brakes hydroboost and the custom K member !

Thank you and an happy new year !

Regards
 
Your doing a great job. Keep up the good work. It will be fun to see your progress.
 
Auto Transport Service
Back
Top