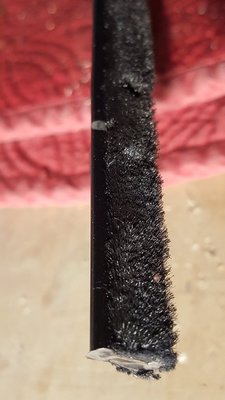
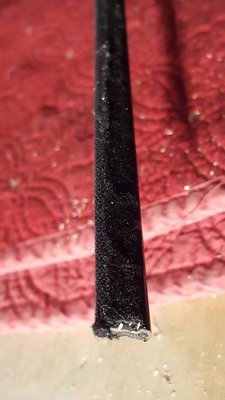
Upon removing the original fuzzies on the 65 Bel II, I noticed on the front passenger door the pronounced finished metal edge was up, and on the drivers door, it was down. I can install them either way . If you flip it over, more felt is exposed on the top edge. Is it more effective wiping one way over the other? Since the assembly line worker did not care..... should I?
You are using an out of date browser. It may not display this or other websites correctly.
You should upgrade or use an alternative browser.
You should upgrade or use an alternative browser.
Cat Whiskers
- Thread starter Thunderlugs
- Start date
Can you post a picture? Something does not sound right with this scenario.
65hemi
Well-Known Member
- Local time
- 11:56 AM
- Joined
- May 21, 2011
- Messages
- 1,249
- Reaction score
- 3,496
- Location
- Winnipeg, Manitoba
I believe the metal is supposed to be down and fuzzies up. Otherwise you see the white dots on the metal when installed.
That said, mine are on up side down. I painted the white dots black so that they were not as noticeable. I was not able to remove and the correct the new ones once installed without bending and damaging them, so I left as is.
That said, mine are on up side down. I painted the white dots black so that they were not as noticeable. I was not able to remove and the correct the new ones once installed without bending and damaging them, so I left as is.
Last edited:
Ski 61701
Well-Known Member
- Local time
- 11:56 AM
- Joined
- Nov 21, 2016
- Messages
- 882
- Reaction score
- 696
- Location
- Bloomington Illinois
Quick question, when you removed them, had you taken the window completely out, or were you able to just use adjustments to lower it enough to get at cat whiskers?
If you did the latter, which bolts did you loosen to get window to drop down low enough to access the whiskers?
If you did the latter, which bolts did you loosen to get window to drop down low enough to access the whiskers?
The window is still in. Just need to loosen the down stop lock nut and adjust slotted screw cclockwise and crank it a little lower. That gave me enough room for R&R. If you need a pic Iwill take one of stop adjustment.Quick question, when you removed them, had you taken the window completely out, or were you able to just use adjustments to lower it enough to get at cat whiskers?
If you did the latter, which bolts did you loosen to get window to drop down low enough to access the whiskers?
The adjustment nut and screw (on a 65 belv) is located at approx 4 oclock to the crank.The window is still in. Just need to loosen the down stop lock nut and adjust slotted screw cclockwise and crank it a little lower. That gave me enough room for R&R. If you need a pic Iwill take one of stop adjustment.
On my 64 I was able to install all of the cat whiskers without changing the window settings. Maybe I was lucky.
I guess it all depends on how your down stops are adjusted. My glass was too high to allow that. You were lucky.On my 64 I was able to install all of the cat whiskers without changing the window settings. Maybe I was lucky.
Having just installed the whiskers on my '63 I put the metal edge down side as the original ones were this way. The new set had push-in clips whereas the old were screwed in. I had to make some room putting in the top trim on the door so adjusted the window glass channels outward that gave enough clearance for this with a plastic putty knife to slightly have a gap for trim setting. As it ended up I didn't need to do the latter but was pretty **** as I have new paint on the car. For the panels these are riveted so my plan is to drill those out and put new rivets in for those for whiskers install. The metal edge on these are on the bottom side...
The placement of the metal vs. the fabric side of the felt depends upon the year model and body type. For the car in question, I would say that the fabric side is visible. The markings are placed on the felts for the alignment of the clips.
From my experience, it is not necessary to remove or loosen any of the glass. Just roll the glass all the way up and then spread the clip fingers or staples enough so that the felt is loose to the body. Then roll the glass back down and gently rock the old felt out of the slot. To install, roll the glass all the way down, align the clips to the slots and then gradually push the clips into the slips.
From my experience, it is not necessary to remove or loosen any of the glass. Just roll the glass all the way up and then spread the clip fingers or staples enough so that the felt is loose to the body. Then roll the glass back down and gently rock the old felt out of the slot. To install, roll the glass all the way down, align the clips to the slots and then gradually push the clips into the slips.
Thanks! Say.... Just thinking about those 65 positive battery cables you were going to make. What is your time frame on those?The placement of the metal vs. the fabric side of the felt depends upon the year model and body type. For the car in question, I would say that the fabric side is visible. The markings are placed on the felts for the alignment of the clips.
From my experience, it is not necessary to remove or loosen any of the glass. Just roll the glass all the way up and then spread the clip fingers or staples enough so that the felt is loose to the body. Then roll the glass back down and gently rock the old felt out of the slot. To install, roll the glass all the way down, align the clips to the slots and then gradually push the clips into the slips.
Ski 61701
Well-Known Member
- Local time
- 11:56 AM
- Joined
- Nov 21, 2016
- Messages
- 882
- Reaction score
- 696
- Location
- Bloomington Illinois
I guess it all depends on how your down stops are adjusted. My glass was too high to allow that. You were lucky.
My window is just a little too high on my 64 to get the strips out. Thanks for the info on how to lower it. I DO APPRECIATE the information. Im guessing the quarter windows work the same way as far as dropping the window.
Yes , it appears to be in the same position in reference to the crank. 4 oclock on the passenger side, and 7 oclock on the drivers side. I have not done the rears yet, but the procedure seems to be the same.My window is just a little too high on my 64 to get the strips out. Thanks for the info on how to lower it. I DO APPRECIATE the information. Im guessing the quarter windows work the same way as far as dropping the window.
Thunderlugs,
I sent you a private message.
Richard
I sent you a private message.
Richard
Similar threads
- Replies
- 46
- Views
- 3K


