• When you click on links to various merchants on this site and make a purchase, this can result in this site earning a commission. Affiliate programs and affiliations include, but are not limited to, the eBay Partner Network.

Gear Vendors Overdrive Install - Out or in?

inri

Well-Known Member
Local time
5:37 AM
Joined
Sep 8, 2013
Messages
163
Reaction score
51
Location
Sacramento
I just received my Cope transmission SB 727 and since the engine and transmission are out of the car I thought it might be easier to install the Gear Vendors to the transmission now rather than when I'm under the car and have much less visibility and space? I've watched some videos online but they all have the transmission in the car which makes sense with the install.

Also, the GV instructions recommend that the unit be installed by a qualified mechanic, which I am not. I'm probably a 3 out of 5 on the mechanic scale which means I can unbolt things and generally bolt them back up. I can read directions pretty well too, but that's about the length of my mechanic skills.
 
I found it much easier installing when it was out of the car, just remember its Gonna be heavier, and man what a breeze it is to install / connect the G.V to your 727, comes with easy to read instructions, your gonna love your G.V, I run a 30' tire with 4:30 gear and cruse 80 mph @ 3000 RPM :thumbsup:

Oh P.S: the tail shaft on the 727 has a clip that's a bitch to find and remove, its under the trans mount if I remember correctly, underneath those two F'n Bolts LOL !
 
I didn't see where you list the actual car that you have. This matters! Different chassis have different problems.
In my 70 Charger, there are bulges in the GV case at 10:00 and 2:00. These require dents to be placed in the floorpan so there is clearance. For proper fitment, the trans needs to be in place in the car with the engine and transmission kept at the angle that it should be in a stock position. Long sentence, but I'll say again another way:
The engine and transmission need to be in position so that you know how much to dimple/dent the floor. The procedure is to dimple, trial fit the GV, remove if more space is needed and repeat until there is at least 1/4" of clearance.
I have read where some guys just build a lower transmission mount to avoid dimpling of the trans tunnel but that way usually leads to an improper drive shaft angle. This results in odd vibrations, shakes and early U-joint failure.
 
I found on my 65 and 66 Belvederes the tunnel was too tight so I fabbed a larger section and welded it in. It is a great improvement though.
Mike
 
Yup kern dog and 493 mike are correct, I cant believe I forgot about the tunnel, on my 65 Plymouth I cut a section of the floor out then replaced it. really didn't wanna cut the car but its been two years now, you'll get over it LOl
 
I pushed my tunnel around so it would fit up there. Used a hammer attachment for my air chisel thats like 1 1/2" diameter with a rounded face. Just lightly massaged material around, no heavy thumping. I used the mid length adaptor, for an RV application, to keep it further forward where there is more room on the tunnel and I don't like the idea of having the longer one hanging in the breeze with all that mass at the end. My instal was further complicated by me using a 70 k unit in my 65 which makes the tunnel tighter still. All is fine now.
 
GearVendors.JPG
I installed mine on the bench. Piece of cake. Mine is in a '70 Charger, and I did spend some time adjusting the tunnel.

Also, the GV instructions recommend that the unit be installed by a qualified mechanic, which I am not. I'm probably a 3 out of 5 on the mechanic scale which means I can unbolt things and generally bolt them back up. I can read directions pretty well too, but that's about the length of my mechanic skills.[/QUOTE]
 
I didn't see where you list the actual car that you have. This matters! Different chassis have different problems.
In my 70 Charger, there are bulges in the GV case at 10:00 and 2:00. These require dents to be placed in the floorpan so there is clearance. For proper fitment, the trans needs to be in place in the car with the engine and transmission kept at the angle that it should be in a stock position. Long sentence, but I'll say again another way:
The engine and transmission need to be in position so that you know how much to dimple/dent the floor. The procedure is to dimple, trial fit the GV, remove if more space is needed and repeat until there is at least 1/4" of clearance.
I have read where some guys just build a lower transmission mount to avoid dimpling of the trans tunnel but that way usually leads to an improper drive shaft angle. This results in odd vibrations, shakes and early U-joint failure.

Thank you for the reply. My car is a '69 RR with a modern Hemi 6.4 to be installed. I have read up on the clearance issues many have faced in the tunnel with installing the small heavy unit that has the gears inside it.
It sounds like it would behoove me to install the housing on the 727, install the coupler and make sure it's shimmed with the proper tolerance so when I mate the transmission to the engine I can then hand hold or line up the smaller GV unit that will mate to the GV tail housing and more easily mark where I may need tunnel clearance. I hope I described that well enough?
 
View attachment 537665 I installed mine on the bench. Piece of cake. Mine is in a '70 Charger, and I did spend some time adjusting the tunnel.

Also, the GV instructions recommend that the unit be installed by a qualified mechanic, which I am not. I'm probably a 3 out of 5 on the mechanic scale which means I can unbolt things and generally bolt them back up. I can read directions pretty well too, but that's about the length of my mechanic skills.
[/QUOTE]

GKeanef, how did you go about finding the exact location to clearance the tunnel with the engine and trans out of the car? Did you clearance it while they were in the car and then remove them?
I've read that some grease or white marker placed on the top of the two GV bolts on the small unit will mark the tunnel where the dimples need to go.
Great job on the assembly!
 
I installed the engine/trans/GV as a unit from the bottom. I had the car on the lift and the assembly on the bench in the previous photo. I just did it by trial and error until I had the clearance. I also slightly slotted the bolt holes in the cross member to drop the trans slightly.
Engine Trans install.JPG
 
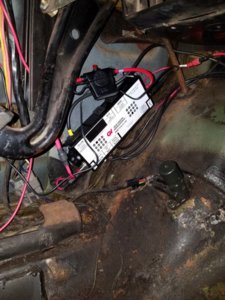
I'm much more confident in the GV assembly now thank you. Might anyone have pictures of where to mount the control box with all the wires coming from it? I was thinking of installing it in the driver side kick panel and then have the control switch with red/green lights mounted near the dash to switch the unit on and off.
The video was helpful regarding the install but didn't show where they mounted the control box in the car and I'd prefer to keep it clean inside.
 
For a cleaner install look how about this...If your car doesn't have cruise control I'd suggest installing that kind of stalk/switch lever to activate the overdrive. The on, off, set, and resume switch functions I think would duplicate the Gear Vendors ones perfectly. Tie it into a cruise control deactivation brake pedal switch so it would automatically disengage when slowing or coming to a stop. As for the red/green indicator lights, if you have fender mounted turn signals, you should have two unused holes in your gauge cluster for the turn arrow indicators. Here you gut two standard 168/194 dash bulb bases, drill a 1/8" hole thru them, feed pre wired red and green LED bulbs thru the holes, and twist/install them into back of the cluster Then wire them to the appropriate wiring to/in the original GV pushbutton box. You might want to change one of the turn signal arrow lenses color from green to red for a better visual effect. Any other GV wiring/boxes could be hidden under the dash somewhere or like you suggested behind the kick panel. The upshot of this is it looks factory with no added switches or buttons. Now if your car already has cruise control and dash mounted turn signal lights all this of course is moot.
 
Last edited:
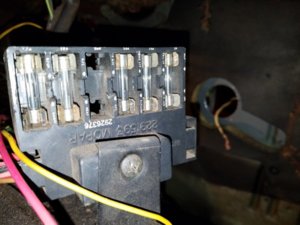
I installed the electronic control box yesterday. I'm not sure which fuse to tap into and connect the 12 bolt keyed source hot red wire to? There are only a few fuses to choose from and directions say it should be a fuse that is off during crank. Which one do I connect to and how does one connect to it?

20171111_200604.jpg 20171111_201553.jpg 20171111_201738.jpg
 
View attachment 537665 I installed mine on the bench. Piece of cake. Mine is in a '70 Charger, and I did spend some time adjusting the tunnel.

Also, the GV instructions recommend that the unit be installed by a qualified mechanic, which I am not. I'm probably a 3 out of 5 on the mechanic scale which means I can unbolt things and generally bolt them back up. I can read directions pretty well too, but that's about the length of my mechanic skills.
[/QUOTE]
I don't know any "3 out of 5 on the mechanic scale which means I can unbolt things and generally bolt them back up" mechanics that have their own bendpack and engine table.

tenor.gif
 
View attachment 537665 I installed mine on the bench. Piece of cake. Mine is in a '70 Charger, and I did spend some time adjusting the tunnel.

Also, the GV instructions recommend that the unit be installed by a qualified mechanic, which I am not. I'm probably a 3 out of 5 on the mechanic scale which means I can unbolt things and generally bolt them back up. I can read directions pretty well too, but that's about the length of my mechanic skills.
[/QUOTE]
I don't know any "3 out of 5 on the mechanic scale which means I can unbolt things and generally bolt them back up" mechanics that have their own bendpack and engine table.

tenor.gif
 
So the 2nd fuse is what I should connect the 12 bolt keyed wire to?
 
I found the answer to which fuse to connect the live wire to in case someone has a similar question in the future. That's right I'm thinking about you right now :)

You can connect to the first fuse or the last fuse in the fuse box behind the glove box. Unscrew the fuse box with a philips screwdriver and turn it over. You should have an empty connector that you can connect to on the first and/or last fuse!

Thanks for everyone's help with this. More questions to come from me as progress continues.
 
Auto Transport Service
Back
Top