• When you click on links to various merchants on this site and make a purchase, this can result in this site earning a commission. Affiliate programs and affiliations include, but are not limited to, the eBay Partner Network.

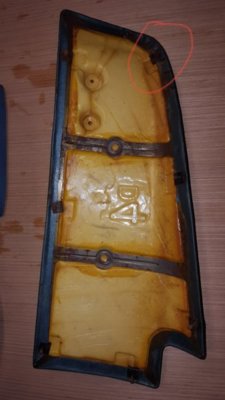
1964 glove box terrible fit. bad product?

I'm gonna make one out of fiber glass or maybe even some kind of paper mache. Gotta look into it
 
I think they have to be flexible, or foldable, to get in and out. Unless the dash is out.
 
I think they have to be flexible, or foldable, to get in and out. Unless the dash is out.

The one they sent wasn't flexible. It was made of one flat piece folded and stapled together. But as a whole it is rigid. It was too big tho, or just incorrectly shaped. Because you have to shove it in place and basically mash one corner of it to even get it in place. Securing with the screws (which they don't include btw) is another story and is just impossible without modification. A proper fitting one would be able to slide in from under dash no problem.

Funny thing is classic industries told me they sold 1200 or so of that glove box last year and I guess didn't have any returns on them.... I find it hard to believe tho that 1200 of these were bought... maybe he meant rem brand glove boxes in general.

And if the numbers are accurate I call bull **** because its fits so bad... either that or people were to lazy to give it back or just had to make it work by modifying it.

It simply presents itself so poorly I don't see it being worth my time to "make it work"
 
Last edited:
I have mine made from food grade stainless steel at a shop that fabricates restaurant equipment. First foto '72 B Body, second foto '65 A Body. I make sure they fit by drilling the holes myself.

DSC00962.JPG DSC04596.JPG
 
Yup, unless the dash is out, getting it in or out requires destroying some part of it.

Same as my 62 dash pad, one bolt is up against the windshield.
How'd they get this thing on?
Ohhh.

Screenshot_20190403-192600.jpg
 
I'm pretty sure the 64 glove box should go easily without mashing it or removing the dash. I think if it was an accurate reproduction it would.

I got mine in in a few minutes, it slips in under the dash... it's just sloppily made and the shape is off so you have to kind of crush one corner of it slightly. the screw holes don't line up also.

You might have to have the heater box out, but I'm not sure as I have it out already.
 
Last edited:
evan clear your mail box. If you any other would post a pic of the correct box liner, I will compare to several I have from 64 -65. I know the 62 63 differences, as I have many.
 
Yup, unless the dash is out, getting it in or out requires destroying some part of it.

Same as my 62 dash pad, one bolt is up against the windshield.
How'd they get this thing on?
Ohhh.

View attachment 744517
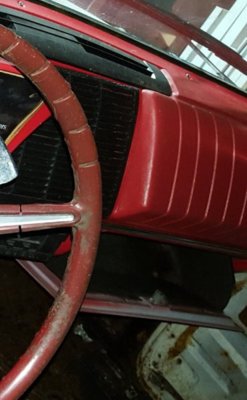
The box in my '62 was very easy to remove and install. Just slipped it through the opening with the door open. Several screws holds it in.

I was thinking about removing my pad to dye it the same color as the rest of the dash. The color I have had a brownish looking color on the pad compared to the rest of the interior color which is a rose color. They are all like this.

So one bolt is up against the windshield? Did you get to it successfully or not? Bolt, nut, or screw?

20180324_181753.jpg
 
I'll post a picture. I got the glove box in place but the screw holes on the box don't line up with the screw holes in dash. On top if that it's just a shitty looking reproduction.

The 64 is screwed to the dash frame opening with 6 screws. The 62 I think gets secured to the glove box door. They are different
 
Last edited:
My 62 glovebox screws to the door, not the dash.

Dash pad, on my 2 door I never would have been able to remove the top right nut without at least unbolting the dash above the pad, and possibly on the right side. It had been removed before when some moron took the dash and pad out, spray painted both, put the pad back on, before the paint dried, and left that top nut off!

There is, iirc, an inward seam right below the bolt which prevents a wrench, and the end of the bolt was up against the firewall, so no socket.

I had better luck with my 4 door, the nut was on, but a little more accessible, and I bent that seam a little, and unbolted the dash as described.

I ultimately took the entire dash out, same day, so I'm dumb.

You have to be a little bit of a contortionist, remove the seat, or remove the dash a little.

Your results may vary, like I said, 2 door no way w/o removing dash, 4 door possible with removing a few dash bolts.

If needed, I can get pics with my pad just set on my dash.

20190405_111831.jpg 20190405_111008.jpg
 
This is for a 64 which is completely different than the 62. I don't need to remove the dash to install it... I just need a decent box that will fit and the screw holes will line up.
 
This is for a 64 which is completely different than the 62. I don't need to remove the dash to install it... I just need a decent box that will fit and the screw holes will line up.

Sorry Evan, matthon and I kind of hijacked your thread with the '62 questions and answers. Please disregard. :praying:
 
34 posts and no on can post a correct photo of the actual desired glove box??
 
Here's my dirty glovebox. Only pics possible.

20190405_210954.jpg 20190405_211002.jpg 20190405_211017.jpg
 
I would say original, the car was complete when I got it and the po had it for decades.
 
Interesting, it looks like the same construction as the repro. But the shape is actually a little different slightly on mine I've noticed. I'll post pics when I get home to show what I'm talking about
 
This is the repro. If you notice one part inside isn't stapled when it should be and then it leaves an odd flap. Also the shape in the top right corner is off and doesn't dip down as low as the original. The diagonal curve isn't steep enough. That's also the part that rubs on the body and needs to be massaged into place and you have to sort of bend up the box in doing so. And then you do all that only to realize you need to take it back out to put another hole in the proper place for the screw on the right side. I'll make it work for now but I'm going to try to make my own at some point.

15546574110177368754615452857851.jpg
15546573816364754525103579897069.jpg
 
Auto Transport Service
Back
Top