You can adjust the tension on those. If you installed the MP springs they let the timing all in fast!Horning in on this post so I can read through this when I get time. I had installed lighter dist springs and have a stumble going on under heady throttle I can't get rid of now. Timing adjustments impact it but trying to find the sweet spot or drop the lighter springs...
You are using an out of date browser. It may not display this or other websites correctly.
You should upgrade or use an alternative browser.
You should upgrade or use an alternative browser.
Slight acceleration hesitation driving me mad
- Thread starter Coronet-383
- Start date
Coronet-383
Well-Known Member
Ok so I shouldn’t need to replace springs or anything like that? And should I be aware of how i take the distributor off the car? Or specific way to put it back in to make sure the timing isn’t way out of wack? Thanks again for the help, it may be a week till I can get it off the car but I will post updates when I can. Thanks again!It only hurts once!
Assuming the distributor is the original, okay. Single point, or dual points, doesn't matter. It's time to operate. Not that hard...those things, like anything else get used time on 'em. Then need a little care. Probably either gummed up, or rusted.
Best to simply pull the distributor, to work on it. You need the practice anyway, right! Once it's on the bench, look at how the points 'plate' is fastened to the housing. Probably a couple screws...pay attention to how the parts are in the housing, so when it goes back together, it's right.
The part of the shaft, that the rotor goes on, is separate from the main shaft. Might have to be removed first. Under the points plate, will be the main shaft, advance weights, and advance springs. Look it over, and note how things are there. The weights 'pivot' on the main shaft, moving outwards via RPM. The springs control how fast. There's also 'slots' that limit how much the weights move. Hmmm, could that be the mechanical advance??
If there's any sign of rust, clean the rusted parts. See if the weights easily swing out. Usually lube the pivot points with hi temp grease. Doesn't hurt to do a thin wipe of that grease on the entire weight, to help hold down rust.
On the two shaft parts, you'll see the upper part rides, and rotates, on the main shaft. Clean that area of the shafts, thin coat of that lube, so it moves easily. The felt 'wick' in the upper shaft, is a way to keep it lubed.
Anyway, yep, advance is hanging. Just needs a look see.
miller
Well-Known Member
I doubt the springs will need to be replaced...unless one is broken. Has happened before, but rarely. Spring kits can be found, but would need to be the right types for the distributor.Ok so I shouldn’t need to replace springs or anything like that?
Don't worry about the position of it on the motor! There's no magic to it, and the more you learn about it, the better off you'll be. Dropping a distributor in a motor, and timing it, can be as simple, or hard, as you make it.
You just need to find out why, the advance isn't working, understand why, and fix it. If you look in the book, under specs for your distributor, it will tell you how 'much' advance is built into it, via those mentioned slots.
Would be worth your time to research mechanical advances. Via those slots, that limit the amount of advance in degrees, some are fixed, some are adjustable, some get welded up (to shorten the slots), and so on.
The more you know about it, will help you decide which way you want to go. Remember full advance on these Mopars is usually 34-36, and the advance amount in the distributor should work with it. Here's the big BUT. Today's crap gas, not like the gas was back in those days, the car was made.
Initial timing (no advance) that you check with the timing light, with today's gas usually needs more initial timing. To keep full advance in check, yes, the advance amount needs to be adjusted. A fair initial timing set, for today's gas...14-16 degrees. Subtract that, from full advance, gives you the amount of advance degrees you want 'in the slots'.
Coronet-383
Well-Known Member
I’m gonna spend some time researching this like you suggested especially since I prolly won’t be able to pull it off for another week. Thanks again for the help, I’ll keep you guys postedI doubt the springs will need to be replaced...unless one is broken. Has happened before, but rarely. Spring kits can be found, but would need to be the right types for the distributor.
Don't worry about the position of it on the motor! There's no magic to it, and the more you learn about it, the better off you'll be. Dropping a distributor in a motor, and timing it, can be as simple, or hard, as you make it.
You just need to find out why, the advance isn't working, understand why, and fix it. If you look in the book, under specs for your distributor, it will tell you how 'much' advance is built into it, via those mentioned slots.
Would be worth your time to research mechanical advances. Via those slots, that limit the amount of advance in degrees, some are fixed, some are adjustable, some get welded up (to shorten the slots), and so on.
The more you know about it, will help you decide which way you want to go. Remember full advance on these Mopars is usually 34-36, and the advance amount in the distributor should work with it. Here's the big BUT. Today's crap gas, not like the gas was back in those days, the car was made.
Initial timing (no advance) that you check with the timing light, with today's gas usually needs more initial timing. To keep full advance in check, yes, the advance amount needs to be adjusted. A fair initial timing set, for today's gas...14-16 degrees. Subtract that, from full advance, gives you the amount of advance degrees you want 'in the slots'.
Mark the housing to the block, remove cap and mark rotor position on housing. Take picture.
Remove the hold down and pull the distributor straight out.
Remove 2 vacuum advance screws and remove.
Remove 2 advance plate screws and remove.
Mechanical advance is below. The plate with the 2 slots should be marked. That number x2 = crank degrees. So if it says 12....12x2=24° mechanical advance so your initial could go to 12 or 13° (24° + 12° = 36° total advance).
The weights can seize/rust so squirt some pb blaster on the pivots and work them loose.
To remove the advance plate, there is a finicky circlip holding it under the felt on the shaft.
The weights are below the plate
Last edited:
I see ya have two different size springs in there and read this is a thing to do. Was this helpful with your giddeeup?Mark the housing to the block, remove cap and mark rotor position on housing. Take picture.
Remove the hold down and pull the distributor straight out.
Remove 2 vacuum advance screws and remove.
Remove 2 advance plate screws and remove.
Mechanical advance is below. The plate with the 2 slots should be marked. That number x2 = crank degrees. So if it says 12....12x2=24° mechanical advance so your initial could go to 12 or 13° (24° + 12° = 36° total advance).
The weights can seize/rust so squirt some on blaster on the pivots and work them loose.
To remove the advance plate, there is a finicky circlip holding it under the felt on the shaft.
The weights are below the plate
View attachment 818780
Not my pic but those are stock. The heavy one has an elongated loop so it doesn't add tension until higher rpms, i.e. comes all in later. In my setup I am using the stock light spring and a light aftermarket spring. Pulls total timing around 2400 rpms.I see ya have two different size springs in there and read this is a thing to do. Was this helpful with your giddeeup?
- Local time
- 2:46 AM
- Joined
- Jul 1, 2015
- Messages
- 4,608
- Reaction score
- 5,581
FYI...Not my pic but those are stock. The heavy one has an elongated loop so it doesn't add tension until higher rpms, i.e. comes all in later. In my setup I am using the stock light spring and a light aftermarket spring. Pulls total timing around 2400 rpms.
My Prestolite dual point distributor in the GTX is similar in construction and operation. What I've done is REMOVE the heavy looped spring completely and substituted a lighter spring from a 318 auto trans engine (it fits just fine), the result is all in at 2600 RPM (engine). YES, the total advance is controlled by the length of the slots. The info given previously is spot-on. These are specific to the TYPE of distributor....does NOT interchange with the Prestolite dual point distributor. 34° - 35° TOTAL advance is a good place to start depending on the fuel composition. Everything depends on your circumstances. Just my opinion of course.
Bob Renton
It's curious that the OP said the hesitation started AFTER he rebuilt the carburetor. I'm with Bob that the check valve under the accelerator pump shooter was not put back if it was a ball bearing, or put in upside down if it was a needle. Fix the mechanical advance, but pull the shooter and check that valve!
- Local time
- 2:46 AM
- Joined
- Jul 1, 2015
- Messages
- 4,608
- Reaction score
- 5,581
Gentlemen,
My original comment re the OEM Holley carb....is it original to the car or you? I believe the original Holley is a model 4160 but some 383 engines came with Carter AVS styles....not "Eddys", but original AVS carbs.
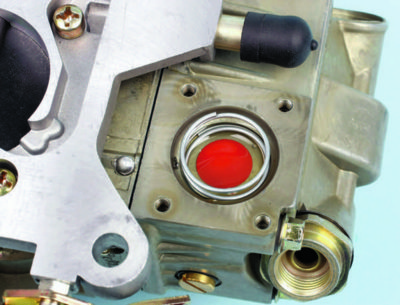
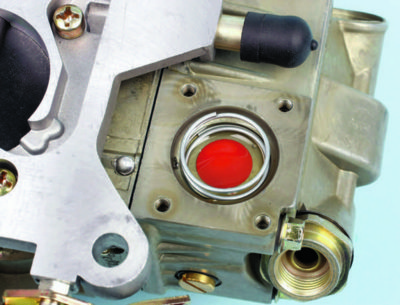
IF its sn original Carter AVS, it will have an inlet ball check valve at the bottom of the accelerator pump well. IF it is an original Holley, it MAY have an redish orange "umbrella" style accelerator pump inlet check valve OR it may have the traditional ball check valve. But both designs use a discharge check valve immediately below the pump discharge nozzles to limit/eliminate the possibility of pull over fuel discharge under high primary air flow. As mentioned previously by others, it only takes a few seconds to check. Also examine the pump's inlet check valve (both types), if not seating properly, part of the initial accelerator pump's volume will be waisted (not delivered) resulting in a possible stumble off idle. The type of fuel being consumed has EVERYTHING to do with the mixture. Ethanol blended fuels have lower heating values (energy) and highet vapor pressure index numbers which may make fuel percolation in the carb more prevalent. Just my opinion of course.
Bob Renton
Thanks - what's happened to me (sorry again for horning in on this post) is after putting in lighter springs and obtaining a functioning vac advance (as it wasn't working) is a friggin floating stumble or miss around 3000-3200rpm. This is right around the rpm I reckon the initial advance is done now with lighter springs. Adjusting timing affects the extent of this; but cannot get it to go away. Seems as though when I disconnect advance and run it stumbling goes away. Have run timing from around 12 to 5 with less stumble at lower advance but no going away. I have electronic ignition and a slightly mod cam. Ran perfect before trying to think I should have a working advance and lighter springs for quicker advance. Ready to nuke the advance and run it like it was before...Not my pic but those are stock. The heavy one has an elongated loop so it doesn't add tension until higher rpms, i.e. comes all in later. In my setup I am using the stock light spring and a light aftermarket spring. Pulls total timing around 2400 rpms.
Have you verified the vac cannister holds a vacuum? What you think is a stumble could be the vac advance buffeting under vacuum. Or maybe put the stock springs back in and try it out as a baseline.Thanks - what's happened to me (sorry again for horning in on this post) is after putting in lighter springs and obtaining a functioning vac advance (as it wasn't working) is a friggin floating stumble or miss around 3000-3200rpm. This is right around the rpm I reckon the initial advance is done now with lighter springs. Adjusting timing affects the extent of this; but cannot get it to go away. Seems as though when I disconnect advance and run it stumbling goes away. Have run timing from around 12 to 5 with less stumble at lower advance but no going away. I have electronic ignition and a slightly mod cam. Ran perfect before trying to think I should have a working advance and lighter springs for quicker advance. Ready to nuke the advance and run it like it was before...
I have the light springs but I am also running 22 initial /37 total, vac advance on mine has been shimmed. Different cam as well but mine loves it.
Coronet-383
Well-Known Member
It’s an original Holley, says it on the build sheetGentlemen,
My original comment re the OEM Holley carb....is it original to the car or you? I believe the original Holley is a model 4160 but some 383 engines came with Carter AVS styles....not "Eddys", but original AVS carbs.
IF its sn original Carter AVS, it will have an inlet ball check valve at the bottom of the accelerator pump well. IF it is an original Holley, it MAY have an redish orange "umbrella" style accelerator pump inlet check valve OR it may have the traditional ball check valve. But both designs use a discharge check valve immediately below the pump discharge nozzles to limit/eliminate the possibility of pull over fuel discharge under high primary air flow. As mentioned previously by others, it only takes a few seconds to check. Also examine the pump's inlet check valve (both types), if not seating properly, part of the initial accelerator pump's volume will be waisted (not delivered) resulting in a possible stumble off idle. The type of fuel being consumed has EVERYTHING to do with the mixture. Ethanol blended fuels have lower heating values (energy) and highet vapor pressure index numbers which may make fuel percolation in the carb more prevalent. Just my opinion of course.
Bob Renton
Coronet-383
Well-Known Member
It’s an original Holley, says it on the build sheet
it also has the orange umbrella style check valve I replaced it when rebuilding, the flat disk side is under on the spring and diaphragm side, did i install that incorrectly?Gentlemen,
My original comment re the OEM Holley carb....is it original to the car or you? I believe the original Holley is a model 4160 but some 383 engines came with Carter AVS styles....not "Eddys", but original AVS carbs.
IF its sn original Carter AVS, it will have an inlet ball check valve at the bottom of the accelerator pump well. IF it is an original Holley, it MAY have an redish orange "umbrella" style accelerator pump inlet check valve OR it may have the traditional ball check valve. But both designs use a discharge check valve immediately below the pump discharge nozzles to limit/eliminate the possibility of pull over fuel discharge under high primary air flow. As mentioned previously by others, it only takes a few seconds to check. Also examine the pump's inlet check valve (both types), if not seating properly, part of the initial accelerator pump's volume will be waisted (not delivered) resulting in a possible stumble off idle. The type of fuel being consumed has EVERYTHING to do with the mixture. Ethanol blended fuels have lower heating values (energy) and highet vapor pressure index numbers which may make fuel percolation in the carb more prevalent. Just my opinion of course.
Bob Renton
Coronet-383
Well-Known Member
This isn’t my carb but how I put it in, is it possible I pulled it through too much?Late arrival, but sounds like check valve backwards.
Coronet-383
Well-Known Member
miller
Well-Known Member
Arrggg. Sometimes, even old farts like me, have off days. Appreciate you guys straightening my act out!
So, like it was mentioned, before you pull the distributor, do this...
Yeah, you can mark the distributor housing/rotor location, to help. Or, pull the coil wire, so it doesn't try to start. Bump the motor over, until you have the timing mark on the dampner, at the timing tab on the timing chain cover. Just don't go past zero.
Then, with the distributor cap off, note the direction the rotor is pointing. It will be towards #1, or #6. Doesn't matter. When you drop the distributor back in, rotor pointing the same direction, it will be in the ballpark. A starting point. Also note the direction the housing is, so when back in, timing is adjustable.
Ron H...might already know this, on the springs. If both springs are the same, you have a single stage advance, or straight line. One light, one heavier, is a two stage advance, making a curve in the advance.
oldbee
Well-Known Member
Coronet-383
Well-Known Member
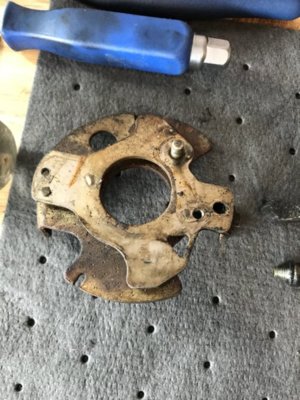
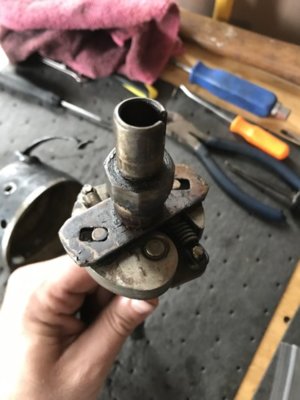
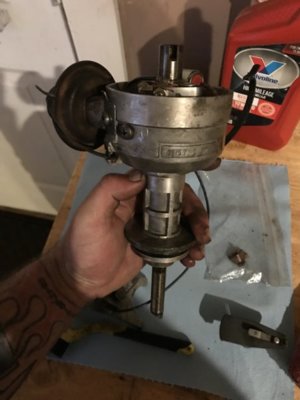
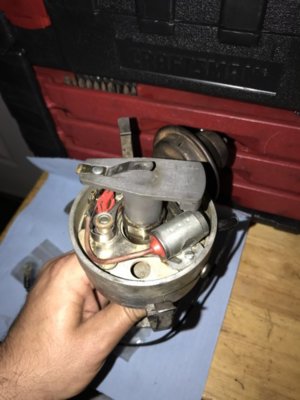
*update* got the distributor out today, first I hooked the vacuum advance to a vacuum pump to check if it worked also checked it off the car and off the distributor housing and it didn’t work at all. Seems to be dry rotted and frozen. disassembled everything and the advance plate was stuck too. Unfortunately the little nylon end piece that the pin goes through it and the distributor shaft broke when trying to get the pin out. Went to the auto shops in the area and none had the correct vacuum advance for the car and local speed shop couldn’t find the nylon piece so I ordered a remanufactured distributor which should hopefully be in monday. I also finished cleaning, lubed and reassembled the old distributor, hopefully the new one fixes the issue. Does anyone know where I can get the nylon piece that holds the shaft from moving up and down? I’d still like to get this distributor working again. Thanks again for all the help.


Similar threads
- Replies
- 26
- Views
- 2K
- Replies
- 34
- Views
- 2K

