You are using an out of date browser. It may not display this or other websites correctly.
You should upgrade or use an alternative browser.
You should upgrade or use an alternative browser.
Slight acceleration hesitation driving me mad
- Thread starter Coronet-383
- Start date
miller
Well-Known Member
I suspected.I also finished cleaning, lubed and reassembled the old distributor, hopefully the new one fixes the issue.
For what it's worth, personally I don't think much of 'remanufactured' parts. Crap shoot, take your chances, your choice.
What I'd do? Rob Peter, to pay Paul! At least the parts off the 'new' distributor are useable. Off the old one, be sure to hang on to the condenser!! You might need it.
That broken nylon collar, is what keeps the whole mess together, and sets end play for the main shaft. (Doesn't need to be nylon. Don't know why they did that!) Easy to use another collar, that fits the shaft, and gives you the right end play. Too much, add a hardened washer/shim. Not enough, cut some off the collar.
If you do want to try the new distributor, look it over good. Depending on who put it together, or tossed it together, makes it useable, or junk.
Choices! You are the one that have the parts in your hand.
And remember...there's no such thing as a dumb question!
Moparnocar
Well-Known Member
Would it be possible to make one out of a pvc pipe?
Coronet-383
Well-Known Member
I suspected.
For what it's worth, personally I don't think much of 'remanufactured' parts. Crap shoot, take your chances, your choice.
What I'd do? Rob Peter, to pay Paul! At least the parts off the 'new' distributor are useable. Off the old one, be sure to hang on to the condenser!! You might need it.
That broken nylon collar, is what keeps the whole mess together, and sets end play for the main shaft. (Doesn't need to be nylon. Don't know why they did that!) Easy to use another collar, that fits the shaft, and gives you the right end play. Too much, add a hardened washer/shim. Not enough, cut some off the collar.
If you do want to try the new distributor, look it over good. Depending on who put it together, or tossed it together, makes it useable, or junk.
Choices! You are the one that have the parts in your hand.
And remember...there's no such thing as a dumb question!
I was thinking the same thing, maybe just take off the collar and vacuum advance and replace it into the old one, I’d rather use the original stuff as much as possible. But I’ll look it over when it comes in and see if I notice anything. I’ll keep you posted on how it goes next week, thanks again!
miller
Well-Known Member
Just trying to educate you, lol for what it's worth. And, I have to admit, I'm one of those guys, who do NOT trust anyone else's work. Been there, done that.
Unfortunately, these days many parts, new or 'rebuilt', can easily be junk.
That lowly collar...I would never use a plastic one. When the builder of a new distributor installs the collar, pretty sure the pin hole is drilled, with the collar on the shaft. So, swapping collars, the pin hole could line up, or doesn't.
Try it each way it will go on. If no go, yeah, hardware stores carry collars, or pieces that can be turned into one. Guessing game on getting the hole drilled. Drill through one side, put the collar on the shaft, use the shaft hole as a guide, and drill the other side of the collar. It's not hard.
A rebuilt distributor...I'd tear the thing down, at least part way, check things, make sure it's lubed right, at the right places, and only then see if it works for you. No telling what moron assembled the dang thing!
- Local time
- 6:50 AM
- Joined
- Jul 1, 2015
- Messages
- 4,569
- Reaction score
- 5,517
It quite likely that the original "collar", used to control or limit the shaft's AXIAL or end play movement. The material can be nylon, UHMW (Ultra High Molecular Weight) Polyethylene or perhaps Delrin. The shaft is drilled during assembly and pinned with either a roll pin or spiral pin thru the shaft after the axial clearance dimension has been established. Just measure the THICKNESS of your old sleeve. Source a new sleeve of the same dimensions, measure the old sleeve's roll pin hole location and thru drill it using a drill press, NOT BY HAND. Perhaps talk with HALIFAXHOPS for suggestions or just send him the whole thing to rebuild. IN ALL REGARDS DO NOT USE PVC....ITS JUST TOO SOFT AND CANNOT WITHSTAND THE HOT OIL BATH it will receive during operation. The end play or axial play is important but not critical.....0.003" - 0.005" (+/-) should be OK....but never tight. Check yhe FSM for this dimension. Just my opinion of course.Would it be possible to make one out of a pvc pipe?
Bob Renton
The shaft size is really close to 1/2". Go to Tractor Supply and they have steel collars with set screws. You can either dimple the shaft and red loctite the set screw or clamp it and drill for another roll pin. Up/down should have a little play. Those nylon ones break if you look at them wrong.
miller
Well-Known Member
No. Stick with the roll pin. You don't want the chance of that collar moving! Steel collar that either fits, or can be made to fit, the shaft with light pressure, by hand, to get it in place. Hole in collar does not have to be in the center of the collar's length.
Shaft end play, by the book, is .008-.018. My Mallory was at .018...put a hardened washer/shim .008 thick, and closed it to .010.
The more end play you have on the main shaft, the more movement you have inside the cap, up and down. You want things constant, and turning true.
Shaft end play, by the book, is .008-.018. My Mallory was at .018...put a hardened washer/shim .008 thick, and closed it to .010.
The more end play you have on the main shaft, the more movement you have inside the cap, up and down. You want things constant, and turning true.
Coronet-383
Well-Known Member
I’ll definitely give it a look and check out those things, you mentioned earlier high temp grease on the contact points under the advance plate and the hex that opens and closes the contact points correct? The shaft is oiled by the couple drops of oil on the wick inside of it correct? Just trying to see if I’m overlooking anything or forgetting any places to service, thanks again I appreciate all the information.Just trying to educate you, lol for what it's worth. And, I have to admit, I'm one of those guys, who do NOT trust anyone else's work. Been there, done that.
Unfortunately, these days many parts, new or 'rebuilt', can easily be junk.
That lowly collar...I would never use a plastic one. When the builder of a new distributor installs the collar, pretty sure the pin hole is drilled, with the collar on the shaft. So, swapping collars, the pin hole could line up, or doesn't.
Try it each way it will go on. If no go, yeah, hardware stores carry collars, or pieces that can be turned into one. Guessing game on getting the hole drilled. Drill through one side, put the collar on the shaft, use the shaft hole as a guide, and drill the other side of the collar. It's not hard.
A rebuilt distributor...I'd tear the thing down, at least part way, check things, make sure it's lubed right, at the right places, and only then see if it works for you. No telling what moron assembled the dang thing!
The photo of your accelerator pump check valve looks okay. However, I was talking about the check valve under the accelerator pump SQUIRTER, up top, between and just forward of the venturis. Pull the screw and make sure both gaskets and the check valve (ball or rod) are installed correctly...
Coronet-383
Well-Known Member
The photo of your accelerator pump check valve looks okay. However, I was talking about the check valve under the accelerator pump SQUIRTER, up top, between and just forward of the venturis. Pull the screw and make sure both gaskets and the check valve (ball or rod) are installed correctly...
I haven’t messed with that part of the carburetor but I’ll give it a look and make sure the gaskets aren’t missing or deteriorated or something, thanks for the advice
miller
Well-Known Member
Just to keep things clear, in your mind...I'm sure of what your saying. Contact points is usually the 'contact' points, the two contacts...in the points set.I’ll definitely give it a look and check out those things, you mentioned earlier high temp grease on the contact points under the advance plate and the hex that opens and closes the contact points correct? The shaft is oiled by the couple drops of oil on the wick inside of it correct?
But, yes, 'under' the advance plate, all the moving parts. The hi temp grease, stays in place, that's why it's used. Main shaft to housing bushings, a thin coat. The two advance 'weights', at the pivot locations...though, I always wipe a very thin coat of the grease, over the entire weight. That simply helps hold down any corrosion.
The two advance springs okay? When said, and done, you should be able to slip on the upper shaft, and check it. Rotating the upper shaft, it should move freely, and when let go, return on it's own.
The main shaft upper section, where the upper shaft goes, a thin coat of that same grease. Once it's all together, just enough 30wt oil, one or two drops, on the wick. That keeps that shaft part lubed, for all the moving it will do.
Be sure you have good shaft end play, and you won't have any problems. Check 'side play' on the main shaft/housing, to make sure it's good. If it's too much, your points gap will be all over the place.
The hex, as you call it, is the points 'cam'. A very thin wipe of the grease on it. The points itself has a 'rubbing block' that contacts the cam. Should have a felt wiper on it, that is lubed with a few drops of oil. Not wet, not dry.
Normally, for a point type distributor, a once a year tune up, with only those drops of oil on the wick, is needed for lubing. They last for years, if treated right, and maintained.
miller
Well-Known Member
Before you get too far ahead on this thing, something needs to be found out.
Right now, I'm assuming that distributor is the stock original to the car. Correct?
If so, first, know that it's probably a plain jane single point distributor. About as basic as you can get.
Second, is the 'amount', in degrees, of mechanical advance built into the distributor. That's set by the length of the slots, the pins on the advance weights moves in. Look in your service manual, and it should tell you, for that distributor, how many degrees of mechanical advance you have.
Keep in mind, the gas was different, back then. That means, the overall picture of timing, and advance, does not work with today's junk gas. It needs to be adjusted for it!
Look the upper shaft over, the two blades with the slots in them. Numbers or letters, and report back. There's several guys aboard, that can tell you right off, what advance you have, and give advice.
These Mopar engines go off of 34-36 maximum full advance. Knowing how much mechanical advance you have, and subtracting that, from the full advance, tells you what initial timing should be.
7.5 probably won't cut it. That's because today's gas, calls for 'more initial timing'.
But...you don't want to go over the full advance range.
Many times, on some of those non-adjustable advance distributors, the advance slots need to be shortened. Welding the outer ends of the slots, to shorten the slots, can be done. Then, filing to finish, and get both slots the same length, for less advance. You get the higher wanted initial timing you want. Mine is 14 degrees, 20 degrees mechanical advance.
Coronet-383
Well-Known Member
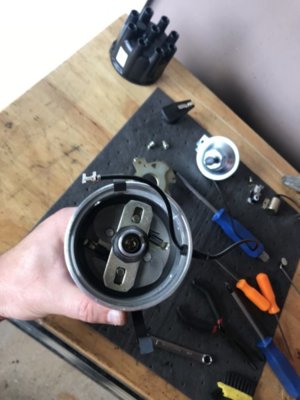
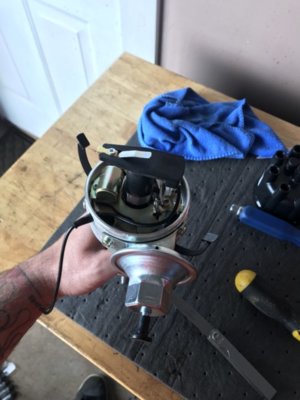
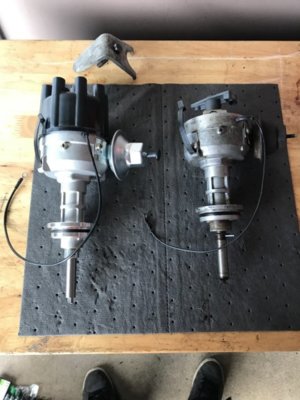
Here is a pic of the original distributor that was on the car it looks like it says “L16” or “LI6.” It is a single point distributor and the original one as far as I know. I got my remanned distributor this morning, the slots for the weights are angled differently than the original but seem the same size opening. I don’t know if the advance is different in the new distributor, I took the new one apart and checked the vacuum advance and put high temp grease on the specified locations from previous advice, haven’t had a chance to get it in the car yet hopefully Friday I’ll get it in and adjust the initial timing. Thanks everyone for all the advice and hopefully this fixes it, I’ll post pics of the new distributor tonightBefore you get too far ahead on this thing, something needs to be found out.
Right now, I'm assuming that distributor is the stock original to the car. Correct?
If so, first, know that it's probably a plain jane single point distributor. About as basic as you can get.
Second, is the 'amount', in degrees, of mechanical advance built into the distributor. That's set by the length of the slots, the pins on the advance weights moves in. Look in your service manual, and it should tell you, for that distributor, how many degrees of mechanical advance you have.
Keep in mind, the gas was different, back then. That means, the overall picture of timing, and advance, does not work with today's junk gas. It needs to be adjusted for it!
Look the upper shaft over, the two blades with the slots in them. Numbers or letters, and report back. There's several guys aboard, that can tell you right off, what advance you have, and give advice.
These Mopar engines go off of 34-36 maximum full advance. Knowing how much mechanical advance you have, and subtracting that, from the full advance, tells you what initial timing should be.
7.5 probably won't cut it. That's because today's gas, calls for 'more initial timing'.
But...you don't want to go over the full advance range.
Many times, on some of those non-adjustable advance distributors, the advance slots need to be shortened. Welding the outer ends of the slots, to shorten the slots, can be done. Then, filing to finish, and get both slots the same length, for less advance. You get the higher wanted initial timing you want. Mine is 14 degrees, 20 degrees mechanical advance.
We will be watching for the burnout video.


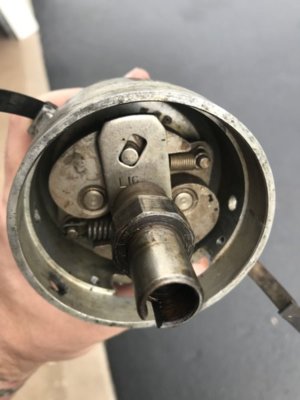
Here is a pic of the original distributor that was on the car it looks like it says “L16” or “LI6.” It is a single point distributor and the original one as far as I know. I got my remanned distributor this morning, the slots for the weights are angled differently than the original but seem the same size opening. I don’t know if the advance is different in the new distributor, I took the new one apart and checked the vacuum advance and put high temp grease on the specified locations from previous advice, haven’t had a chance to get it in the car yet hopefully Friday I’ll get it in and adjust the initial timing. Thanks everyone for all the advice and hopefully this fixes it, I’ll post pics of the new distributor tonight
View attachment 824820
Your original is 32° mechanical advance (16×2=32°). Not much leftover for initial.
Grab some calipers and measure the length of the slots. See chart below...
dist. degrees / slot length
6.............. .340
7............... .355
8............... .375
9............... .390
10.............. .405
11.5 ........... .420
12.............. .435
13.............. .445
14.............. .460
15.............. .475
16.............. .490
17.............. .505
18.............. .520
Coronet-383
Well-Known Member
So does that mean the initial timing should be set at around 3-5 degrees btdc for the original distributor’s initial timing (ex.36-32=4) And for the new distributor I measure the new slots to figure out the mechanical advance from what you listed above then multiply it by two, and subtract that from 34 to 36? Sorry if I’m confusing itYour original is 32° mechanical advance (16×2=32°). Not much leftover for initial.
Grab some calipers and measure the length of the slots. See chart below...
dist. degrees / slot length
6.............. .340
7............... .355
8............... .375
9............... .390
10.............. .405
11.5 ........... .420
12.............. .435
13.............. .445
14.............. .460
15.............. .475
16.............. .490
17.............. .505
18.............. .520
So does that mean the initial timing should be set at around 3-5 degrees btdc for the original distributor’s initial timing (ex.36-32=4) And for the new distributor I measure the new slots to figure out the mechanical advance from what you listed above then multiply it by two, and subtract that from 34 to 36? Sorry if I’m confusing it
Yes and yes. If you know what total timing should be (say 36 degrees total), subtract it (36) from the mechanical advance to get your initial setting. If those slots are .490" long (16 degrees) then that is 32 crank degrees. 36 total - 32 mech = 4 degrees btdc initial.
Here is where it gets a bit confusing. Most engines will want a bit more initial timing. But if you increase the initial you also increase the total by the same amount. Say you try out more advance, maybe it likes 12 degrees btdc, now your total ( 12 initial + 32 mech = 44 total which will probably result in some pinging. Not good. Two easy ways to correct this on a stock distributor...1) weld the outside of the slots to limit advance (.435 slot = 12 dist. degrees......12x2=24 mech + 12 initial = 36 total. Or there is an advance limiter plate (FBO) available that drops in and does the same thing.
With a stock motor set it to factory specs and try it out. Big issue at the moment is to get rid of the stumble to don't get too far involved
Some reading...
miller
Well-Known Member
Your doing fine. Probably more than you wanted to know! Your engine will thank you.And for the new distributor I measure the new slots to figure out the mechanical advance from what you listed above then multiply it by two, and subtract that from 34 to 36? Sorry if I’m confusing it
I was sure someone with those advance numbers would chime in. Thanks, threewood!
Unfortunately, on some of the earlier parts, they need to be updated, as in the timing for the gas. And, some of the info from your post, will help others, just getting into the game.
Coronet-383
Well-Known Member
Yes and yes. If you know what total timing should be (say 36 degrees total), subtract it (36) from the mechanical advance to get your initial setting. If those slots are .490" long (16 degrees) then that is 32 crank degrees. 36 total - 32 mech = 4 degrees btdc initial.
Here is where it gets a bit confusing. Most engines will want a bit more initial timing. But if you increase the initial you also increase the total by the same amount. Say you try out more advance, maybe it likes 12 degrees btdc, now your total ( 12 initial + 32...
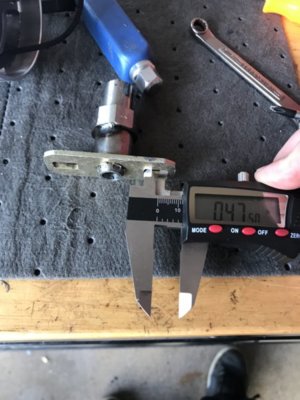
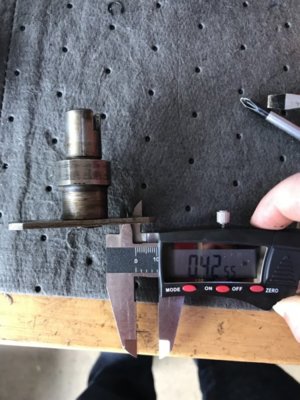
Ok so not sure if all the readings made me more confused or not but here’s some pics of the new distributor measurements for mech advance for the new distributor which was .475 which = 15(x2)= 30(36-30=6) so if I’m understanding correctly, when I put this particular distributor on the car my initial timing should be set to 6 degrees btdc so that my total timing advance equals 36 degrees? The original distributor mech advance measurement was .425=11.5 (x2)= 23(36-23=13) which means 13 btdc would be initial timing for that old one, is this correct? Sorry if I sound like an idiot, I’m a Marine and need to break it down Barney style hoping to get this thing on and running again today or tomorrow. Thanks again for everyone’s help.
Similar threads
- Replies
- 26
- Views
- 2K
- Replies
- 34
- Views
- 2K

