• When you click on links to various merchants on this site and make a purchase, this can result in this site earning a commission. Affiliate programs and affiliations include, but are not limited to, the eBay Partner Network.

Borgeson Steering Box mount on K-Frame fail, what to do now?

MoparGuy68

Well-Known Member
Local time
12:44 PM
Joined
Mar 31, 2019
Messages
780
Reaction score
550
Location
Phoenix, AZ
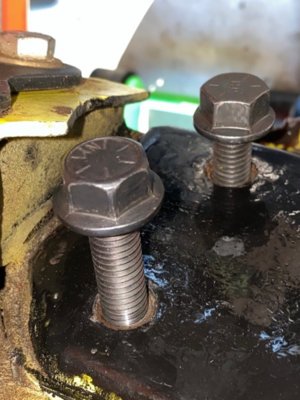
My attempt at mounting the Borgeson box in a 1971 Charger, has ended in failure. I'm not exactly sure what the hell happened during the process. I attribute this disaster fail probably to having attempted to mount the box to the K-Frame by myself, when I don't have the strength of Braun Strowman to hold the damn thing up and get the bolts threaded in place using only 2 hands.. The Scourge China Virus equals no help for the install last weekend.

Three bolts hold the box to the K-Frame. I did a trial run of all three bolts in the holes, before the install attempt. Seemed like all 3 bolts went in their threaded holes in the frame without any excessive resistance. I did the check quick and didn't think too much about it.

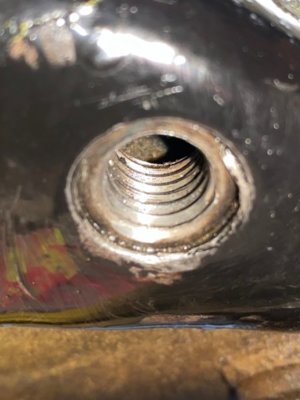
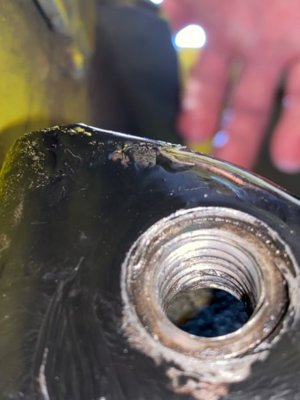
I get the box up into place with difficulty.. Then, when facing the mounting surface, I get the upper right bolt started, then the lower right, then the upper left. The upper left and right were a bitch to get started while trying to hold the box in place. After trying to tighten the upper left and right bolts, it was obvious that they both refused to screw in further than 1/4" deep. Bottom right bolt went all the way in till flush with box mounting ear surface. The other two wouldn't budge!

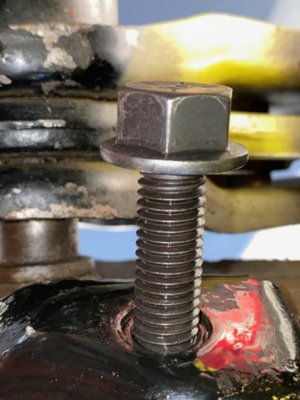
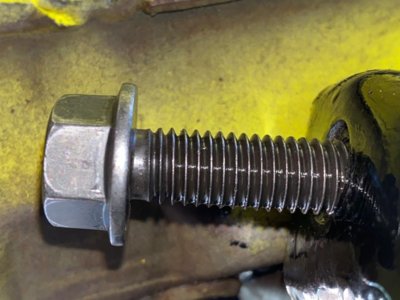
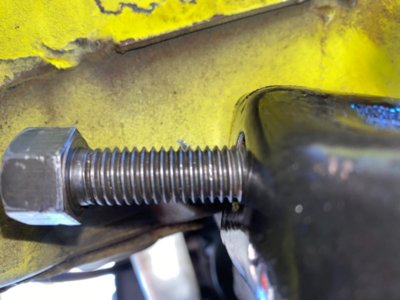
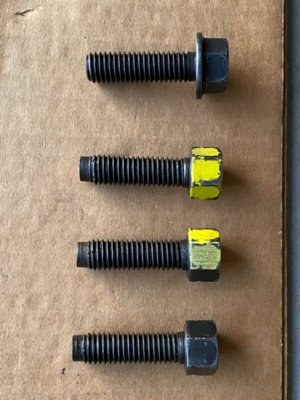
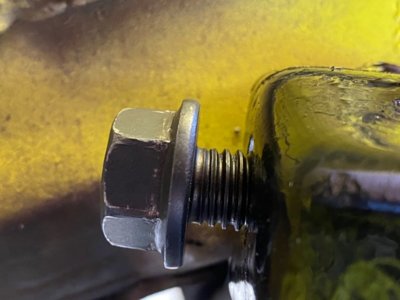
I pulled all of the bolts out and removed the box from the K-Frame. Then spent a good hour testing the bolts on the bare K-Frame. Can't get either of the top two to seat now more than 1/4" deep. The bolts are 1.75" in length. Grade 8 for critical high stress, 1/2" - 13 thread size. I even bought a new set of identical spec bolts to try them. Same problem as the original bolts.

Only explanation I can come up with is that I must have allowed the heavy weight of the box to pull on those two upper bolts or I didn't get them started in the threads with correct alignment. Or the holes in the gearbox mounting ears are not lining up properly with the holes in the K-Frame. So now the bolts will NOT screw into the holes more than about 1/4" deep. So I'm f*^&ed!

I read about Chaser Taps, to chase existing threads to try to clean them up. Maybe try getting a 1/2" - 13 Chaser Tap, and try that. If that doesn't work get a regular Tap and try running that through. Next, maybe a stripped thread kit with the helix insert thing. Beyond that a new K-Frame?? Or just start over with another car that doesn't need its steering box replaced. Getting very discouraged with this car.. Working on it has been like fighting a war. And I'm losing that war..

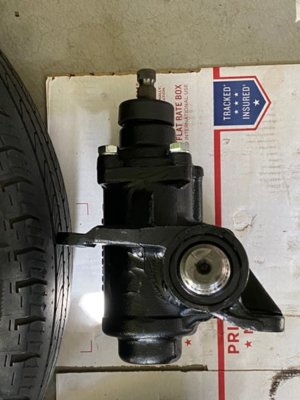
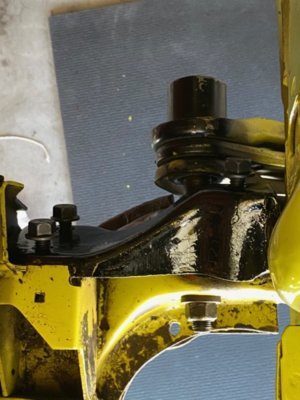
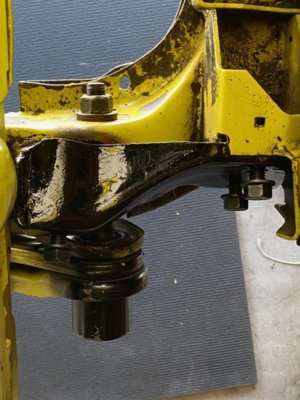
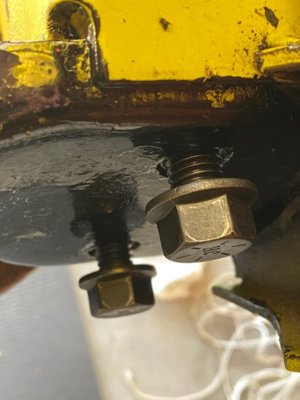
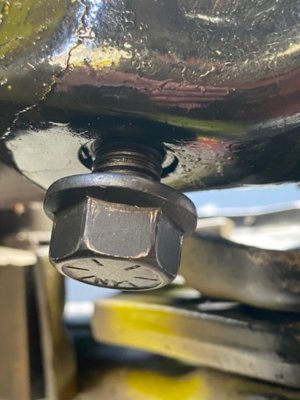
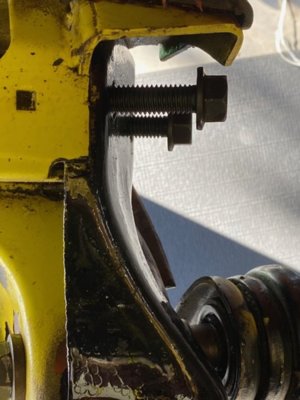
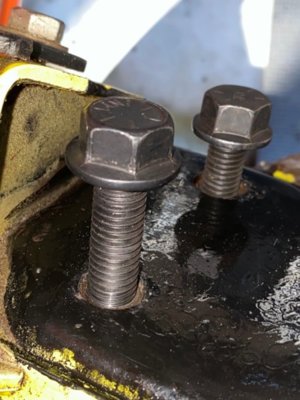
I've attached photos of the aftermath. I'll post about the 4.5 degree slant on the gearbox tomorrow, as it's late and I'm exhausted..
IMG_1634.jpg IMG_1642.jpg IMG_1644.jpg IMG_1647.jpg IMG_1654.jpg IMG_1656.jpg IMG_1663.jpg IMG_1664.jpg IMG_1665.jpg
 
well your not screwed may have slightly
crossed threaded them. chase the with a tap
and forget about it. Get yourself a piece of thin card board and make a template of the bolt pattern on the mopar box and compare it to the borgeson
 
They can be a bitch. I'm old and skinny and have the same problem trying to hold that heavyass thing in place and starting the bolts. The box needs to be kinda seated in place to start the bolts. I've done this a gazillion times and still have trouble. Try not to get too discouraged.
Yes run a tap down there to clean things up and then get someone to help hold it in place.
 
Agree with thread damage, I've read ( never tried it though) you can cut a small verticle notch on the tip of the bolt and it will act like a thread chaser/tap and clean the threads up if you dont have a tap.
 
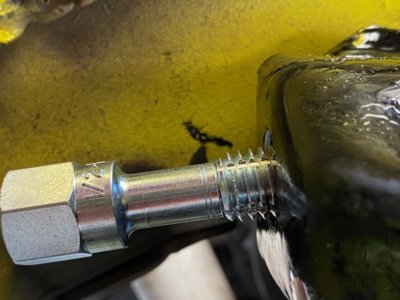
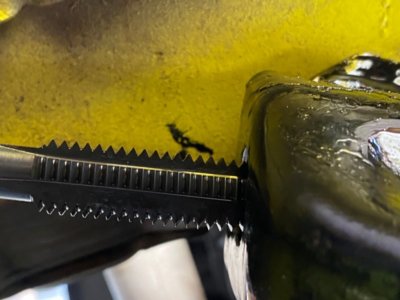
Well it sounds like the bolts keep going in cocked. Look at the bolts - are the threads damaged on those too - if so, clean them up also. In photos 5 and 6 you can see the bolts aren't square to the mounting surface.
 
After you get the threads ironed out. You can slice the head off one of the extra bolts and start it in the hole It will hold the box up for you.
 
brilliant idea !! In fact do two bolts then replace one at a time.
 
Yes, buy a set of thread chasers. The set will come with both types to chase female and male threads. The chaser will straighten out the threads. Do the bolts as well. Very useful in working on old cars. I'd shy away from running a tap into the holes. Then, as several members have suggested, cut the heads off 2 longer 1/2" hardware bolts and screw them partially into 2 of the threaded holes. You can slide the box over these and they will position the box and hold the weight for you. Once you get 1 bolt almost home, remove one of the long bolts and install the 2nd bolt, etc. Blue thread locker is a good idea too.
Good luck...
 
It's an old running joke, but still rings true. That performance parts never fit correctly, and the more expensive the part is, the more modification it takes to make it fit. Or something like that. I might have to Google it....
 
Did you measure the holes in the new box? They could they be slightly smaller in diameter than the holes in the factory box. If the K frame weld nuts are out of position slightly now you could have a bind.
Doug
 
if possible...try running the through the holes from the backside in. see if they make it. also, figure out thread pitch and buy a nut and run the bolts through the nut with some oil.

i think i needed a washer as a shim for my borggie install. i dont recall if it came with new bolts or not.


watermelon
 
I've got some conflicting advice regarding whether I should use a Chaser Tap or a regular Cutting Tap. I talked to a guy at ARP Automotive Racing Products. They manufacture Thread Cleaning Chasers, one of which is a 1/2"-13 (which I had identified last weekend as the size and pitch of the old bolts that were holding the old gearbox in place). He told me these are meant for cleaning out threads, not for reforming them. If mine have any cross threading damage, he said the chaser will not fix that. He recommended careful use of a Cutting Tap, to attempt to fix cross or malformed threads. He didn't specify any specific type of cutting tap though..

Cutting taps have different chamfers, such as Bottom, Taper, and Plug. There are also 3 flute and 4 flute taps. So I'm not sure yet which to use to attempt to fix the threads in the K-Frame. I've got enough money into this car that I don't want to make the situation worse than it already is. Want to hopefully fix the threads without stripping them out. If the threads won't hold the bolts in place solidly the whole steering system will be compromised.

The suggestion of cutting off bolt heads to temporarily insert to support the gearbox made me face palm myself. A couple weeks ago I bought 4 studs to screw into the heads, two on each end, to hold my header flange in place, for when it comes time to mount them with new gaskets. I could get three 1/2"-13 studs, to hold the gearbox in place, then replace each stud, one at a time with the bolts. I got them for the headers to protect the delicate Remflex gaskets during installation. Heed my warning people and don't just hold the gearbox up with one hand and start trying to screw in your bolts with the other...
 
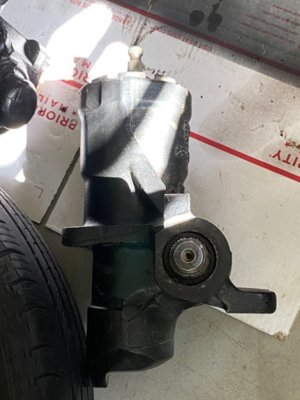
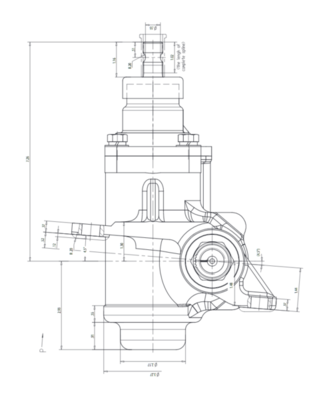
Regarding the 4.5 degree slant of the mounting ears in relation to the input shaft. These photos and the Borgeson plan drawing show what I was talking about in the other thread.

Notice how when mounted to the K-Frame the stock box's input shaft will point directly at the firewall. The input shaft is damn close to perpendicular to the mounting ear surface. The Borgeson box input shaft will point 4.5 degrees toward the inner fender. And it DID on my car when I had it up against the K-Frame. This appears to be by design according to the drawing plan I got off their website. By a design, that probably wasn't meant for our cars is what I suspect. Why would you want the input shaft angled over toward the inner fender? I still need to call them and ask them that.

IMG_1671.jpg IMG_1674.jpg Borgeson_plan.png
 
I've got some conflicting advice regarding whether I should use a Chaser Tap or a regular Cutting Tap. I talked to a guy at ARP Automotive Racing Products. They manufacture Thread Cleaning Chasers, one of which is a 1/2"-13 (which I had identified last weekend as the size and pitch of the old bolts that were holding the old gearbox in place). He told me these are meant for cleaning out threads, not for reforming them. If mine have any cross threading damage, he said the chaser will not fix that. He recommended careful use of a Cutting Tap, to attempt to fix cross or malformed threads. He didn't specify any specific type of cutting tap though..

Cutting taps have different chamfers, such as Bottom, Taper, and Plug. There are also 3 flute and 4 flute taps. So I'm not sure yet which to use to attempt to fix the threads in the K-Frame. I've got enough money into this car that I don't want to make the situation worse than it already is. Want to hopefully fix the threads without stripping them out. If the threads won't hold the bolts in place solidly the whole steering system will be compromised.

The suggestion of cutting off bolt heads to temporarily insert to support the gearbox made me face palm myself. A couple weeks ago I bought 4 studs to screw into the heads, two on each end, to hold my header flange in place, for when it comes time to mount them with new gaskets. I could get three 1/2"-13 studs, to hold the gearbox in place, then replace each stud, one at a time with the bolts. I got them for the headers to protect the delicate Remflex gaskets during installation. Heed my warning people and don't just hold the gearbox up with one hand and start trying to screw in your bolts with the other...

I understand your confusion, but don't over-think this. The thread chaser will straighten the threads unless you tried huge force trying to install the bolts. Same goes for using the chaser. Some resistance is to be expected but with moderate force, the chaser should work fine. If it locks up or refuses to thread with moderate force then go for a tap. This set will work, no need to buy ARP for a one time use:
https://www.summitracing.com/parts/sum-900200
Also, as I said, go to the local Lowes and buy (2)1/2x13 x 2" grade 5 (standard) bolts and cut the heads off. 1/2" studs are more expensive and harder to find.
Go for it...

Thanks for your help, along with the other responses from the rest of you guys. I ordered the Summit 900199 set that includes what’s in the set you linked to but has fine thread chasers too, and the matching die chasers. I also ordered the single ARP 1/2”-13 chaser also, as its threaded area is longer in length. I figure one of the two should hopefully fix my problem..
 
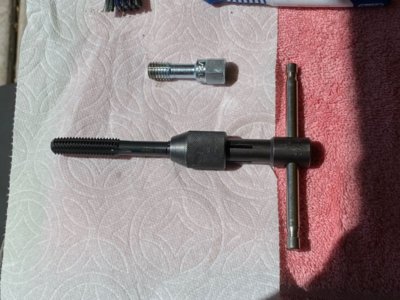
The cleaner/chaser taps arrived on Friday. I put them to use today. The ARP 911-0005 1/2"-13 Cleaning Tap saved the day!!! That thing was worth its weight in gold! I'm glad I decided to order it in addition to the Summit set 900199. I tried the Summit 1/2"-13 first and that was doing nothing. It is too short and wasn't up to the task. My threads were malformed and the ARP straightened them out better than I was expecting. The Summit taps are good for cleaning out dirt and grime from threads, as I cleaned all the exhaust manifold/header threaded bolt holes with them. Now I can screw all my header bolts in and out by hand too. There was a lot of grime inside those threads!

Using the ARP tap I did a little at a time, screwing it in until it hit resistance, then cranked down on it a bit, then screwed the whole tap out. When it came out I cleared the metal debris out of the tap with an old toothbrush, then repeated, over and over. The upper left side thread was tougher to straighten than the upper right, and did require more force. Now I can thread all three bolts ALL the way in, and back out, by hand!

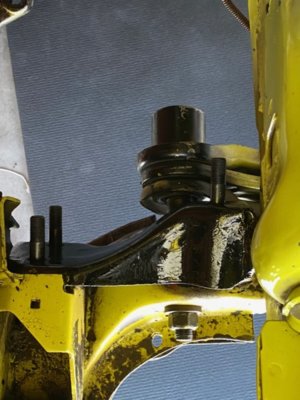
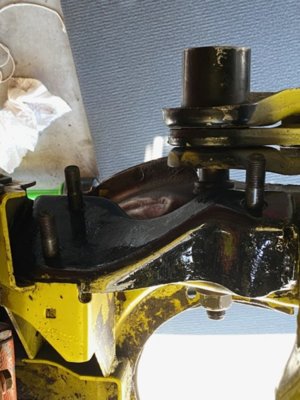
I bought three 1/2"-13 studs at Ace Hardware and have those screwed in by hand. Will be attempting the gearbox mounting tomorrow, this time using the studs.

Found my father's old "made in USA" 1/4" to 1/2" tap driver in one of my tool boxes, so didn't have to buy one. It worked great with the ARP Cleaner tap.

IMG_1683.jpg IMG_1684.jpg IMG_1687.jpg IMG_1688.jpg IMG_1689.jpg IMG_1690.jpg IMG_1692.jpg IMG_1694.jpg IMG_1696.jpg IMG_1697.jpg
 
After all that work on Saturday, another fail today, on Sunday... I've had the gearbox up against the K-Frame three times now, and had to pull the SOB back out each time. The second time today, was me testing if it was possible to mount the gearbox FIRST with the header completely out of the car, then put the header up into place after. No f-ing way that was gonna happen, unless maybe the car was on a 4 point lift.

Third time, I got the header between the engine and inner fender, held up and out of the way with rope and a wooden 2x4 up above. This allows the box to just pass through like a baby's head between it's mother's pelvic bones. Both times I could get the box slid over all three studs and resting against the K-Frame, fairly easily..

Problem is the hole in the mounting ear that points toward the driver side wheel. I can remove the studs on the passenger side ear from the two holes on that side, and then carefully turn the bolts in by hand, but that driver side hole, is still a bitch. I could barely get the stud out, then when trying to screw in the 3rd and final bolt, it didn't want to go in and I didn't want to force it. Even if I had someone helping me I still don't think I'd have been able to get that last bolt in..

The holes are 5/8" diameter. The bolts are 1/2"-13. I think the reason I have no problem getting all three holes in the mounting ears over the studs, are because the threaded end of the stud is 1/2"-20 fine thread. The bolts are 1/2"-13 coarse thread. I believe the 13 pitch coarse thread is larger in diameter than the 20 fine thread. So I don't have as much clearance through the holes. The middle part of the stud has NO threads, so when the mounting ears are on that middle part, I can shift the box around, a bit, side to side and up and down. With the damn 1/2"-13 bolts, I can't shift the box horizontally at all, and only slightly vertically.

Maybe the solution is to enlarge that driver side mounting ear hole. Ream it out with either a 5/8" drill bit or a large round metal file, to gain enough clearance so I can screw the damn bolt through it... Or just use the studs and not the bolts at all, and get three 1/2"-20 nuts to screw on them. Though the 20 thread and nuts probably aren't heavy duty enough to hold the box securely in place. When I bought the studs I could not find any that were 1/2"-13 thread on BOTH ends of the stud. One end of the stud is always fine thread.. Un-F-ing believable to have this much trouble mounting a steering gearbox!!!

I don't even have this Borgeson gearbox mounted in the car yet and I already hate it.. I want my GB5 Blue 1971 Challenger back with it's MANUAL STEERING gearbox!! Not one problem with that steering system during the entire 12 years I owned it..
 
Keep at it, man. You'll get it installed eventually and then you'll be loving that new steering system. You're also giving out a lot of good information here for people like me that will do the 'Borg swap someday, so we appreciate what you're going through!
 
hex-cap-screw-dimension-chart.jpg

The OD of the bolts (fine vs. coarse) is the same. Try removing one of your other bolts, loosening the last one, and installing the hard one first, leaving it loose enough to move the box a little for the last bolt.
I would not recommend using studs of an unknown hardness to fasten the box. Have you used a caliper to compare the hole size to the factory box's mounting holes? If you still have problems, try using a rat tail file or a reamer to SLIGHTLY enlarge ONE hole. Hang in there. You'll get it.
BTW, if you slot the end of the stud with a hack saw, you can remove it with a slotted screwdriver easier...
 
Last edited:
The steering box is held on by a bolts that have shoulders on them so that the 1/2” bolt centers itself up in the 5/8” hole. It also shouldered so that the steering box doesn’t move when it’s under stress.
 
Auto Transport Service
Back
Top