• When you click on links to various merchants on this site and make a purchase, this can result in this site earning a commission. Affiliate programs and affiliations include, but are not limited to, the eBay Partner Network.

Lookie what $5000 buys you....

It was over 100 again today but I felt motivated to do something so....

RSB 26.jpg


I bought 2 muffler clamps, sized 3". They were cut down the middle.....

RSB 30.jpg


That gold colored plate was welded in between them...

RSB 31.jpg
RSB 29.jpg


Here is the mock up:

RSB 33.jpg


RSB 34.jpg

RSB 35.jpg


Looks much better than the flimsy way the manufacturer designed it to mount.


RSB 3.jpg
RSB 11.jpg


RSB 36.jpg


So far, I'm into this little project about $7. Yeah, seven dollars. Okay, add in welding wire & gas, electricity, blah, blah...
The sway bar was bought 8 years ago for $25 but I traded some stuff I had in the attic to get this. The metal for the brackets was already here. The bushings were too. The only thing I've dipped into the pocket for is the muffler clamps I used to make the mounts above.
I love this stuff!
 
See the difference? The bracket will be welded to the housing to prevent movement.

RSB 35.jpg
RSB 38.jpg
 
All welded up and spritzed with a bit of paint to cover the bare metal.

RSB 39.jpg


RSB 40.jpg


The car is being held in the air with the car on jackstands under the axle and lower control arms. This allowed me to establish the proper place to mount the brackets. I had to consider movement of the suspension for placement. The sway bar lever arm is even with the leaf springs at this point. The bushings are urethane but do flex enough to allow suspension movement without binding.
RSB 41.jpg

I did use the urethane lube around the bushing on the axle. These bushings can S Q U E A K without the lube in there. I need to repack the bushings in the red car for that reason!
RSB 42.jpg

Still not a master welder but I do better with the thicker metal where the risk of burning through is much lower.
 
The bushings are urethane but do flex enough to allow suspension movement without binding
My general takeaway thought or concern for you was binding and bending, but this is a component that I know very little about. I had recently seen a TV car shop show that had a Mopar with a sway bar that had the anchor point out of place and that caused the bar to bind and those 2 end links to bend.
Anyway, what you did looks GREAT to me, as far as an effective, strong mounting solution.
 
I did a test before final welding. The brackets on the frame rails were tacked, then I raised the car up with the lift to see how the end links reacted. The sway bar levers pointed UP but the end links stayed plumb-straight up and down. Ideally, the sway bar end would be on some type of swivel to really allow friction free movement. Maybe I can look at some new cars in junkyards to see if there are some better ways to connect the bar to the frame of the car.
In reality, the suspension will likely only move 2 inches each side of center in most types of driving. Full extension-droop is about 4 1/2", something that would only happen if I jump the car!
 
Last edited:
Within a month or so, I hope to have the 383 in and running.
This is where I am concerned:
The car has been sitting since 1997 or 1998. I got it with NO engine side wiring, no fuel lines or tank and the 383 outside of the car.
In the past when I have had a car project, I always put in a used engine. I've mostly built A body cars and the 318s and 360s are still around in decent shape.
This car is getting a rebuilt 383, the original engine. It is going to get a new cam and lifters too.
See where I am going with this?
The wiring I have is coming together. I have a headlight harness, the original from my red car. I replaced it back in 2013 when an attempt to wire in relays went wrong. I soldered the wires back together so that section should be fine.
I have no engine harness that I can trust. I am likely to order a new one from Evans with pigtails to run electronic ignition. The wipers are 3 speed according to the dash switch. I'm not concerned with that though. Wipers are not essential to getting the car started and running.
The gas tank and lines are in place.
My concerns....Once the engine is in the car, how do I ensure that the car will light when I turn the key?
I have had "no spark" incidents with the red car at the MOST inopportune times, twice being during the first fire.
I cannot risk that. I need to have this flat tappet 383 start right away.
I have found that I can take the distributor out of the engine, turn the key to RUN and spin the spade at the bottom while watching the end of the wires (With spark plugs attached) and look for the crackle of the spark.
I have used pressurized air to push fuel forward from the tank to the carburetor. I plan to fill the bowls before setting the carb on the engine. I have also used a small spritz of Ether down the throat to help it fire.
I'm going to butcher together some type of exhaust system so I can actually break it in without scaring the neighbors.
The 727s I have out back are all of unknown quality except ONE. It was in a truck I had awhile back. Soft shifts but it wasn't a slippy trans.
I had initially planned to use the 727 from "Ginger" my red car. I planned a 5 speed swap for Ginger but have not even ordered the kit yet. The guys I had locally that built my transmissions disappeared as if I.C.E. were after them.
Any suggestions?
 
Use the best assembly lube you know of, to protect parts during the inevitable time span before it fires up and stays lit, the best oil additive and base oil, and let 'er rip!
 
Uncle Tony may have stumbled onto something....
I like the idea of checking for taper on the lifters.

 
Get your oil pressure spun up. When you have it, continue spinning with the drill and get several turns on the crank so you get your galley's filled up even to the point where it shows up on the rockers. Find true TDC and zero up your timing marks. I always take the lh cover off to watch the rockers to verify for TDC by watching the intake rocker closing then continue for 1/2 turn or so till the damper mark hits zero on the cover. From there I'll drop the dizzy in where it needs to be after getting the o/p drive set where it needs to be. Get fuel from the tank to the carb. You can use vacuum or pressurize the tank. Fill the carb and go from there. Make sure your battery is charged up too ahead of time. Get your fluids in. I use water only for the first light session so there is no waste of coolant in case of issues. Put the car outside too in case of "car-b-q". Have an extinguisher handy. May even wet down a big area around you to control dust being kicked up as you most likely will have the a/f off so you can adjust the carb speed for cam break in. Fresh plugs, cap, rotor, wires, fuel filter, gas etc.
 
Use the best assembly lube you know of, to protect parts during the inevitable time span before it fires up and stays lit, the best oil additive and base oil, and let 'er rip!

Get your oil pressure spun up. When you have it, continue spinning with the drill and get several turns on the crank so you get your galley's filled up even to the point where it shows up on the rockers. Find true TDC and zero up your timing marks. I always take the lh cover off to watch the rockers to verify for TDC by watching the intake rocker closing then continue for 1/2 turn or so till the damper mark hits zero on the cover. From there I'll drop the dizzy in where it needs to be after getting the o/p drive set where it needs to be. Get fuel from the tank to the carb. You can use vacuum or pressurize the tank. Fill the carb and go from there. Make sure your battery is charged up too ahead of time. Get your fluids in. I use water only for the first light session so there is no waste of coolant in case of issues. Put the car outside too in case of "car-b-q". Have an extinguisher handy. May even wet down a big area around you to control dust being kicked up as you most likely will have the a/f off so you can adjust the carb speed for cam break in. Fresh plugs, cap, rotor, wires, fuel filter, gas etc.

^^^^ This.

I suggest Joe Gibbs Driven assembly lube (I'm sure there are other good ones), including the high pressure grease like stuff all over the cam lobes and distributor gear during the build. The cam and lifters are the keys to protecting.
Assuming hydraulic lifters, soaking them in break in oil (or even regular oil) for 24 hours before assembly is good too if you can do it.
 
One thing I forgot to mention. By the time I had everything ready to go, the day was done and I was wiped. Therefore I stopped for the day and would do the startup the next day when my mind was clear so I didn't do any stupid human maneuvers. Recheck things to see if you forgot something. Leave your charger on overnight too so the bat is at full strength.
 
Within a month or so, I hope to have the 383 in and running.
This is where I am concerned:
My concerns....Once the engine is in the car, how do I ensure that the car will light when I turn the key?
I have had "no spark" incidents with the red car at the MOST inopportune times, twice being during the first fire.
I cannot risk that. I need to have this flat tappet 383 start right away.
Any suggestions?
Yes, those moments of starting a freshly built engine can be nerve wracking.
As mentioned before, spinning the oil pump to get oil throughout the oil system, via a drill, is a must. I welded a hex key to a rod to get to the oil pump shaft. Also, If you have a mechanical fuel pump, you can fill up the barrels in the carb by using a syringe filled with gasoline, injecting the fuel into what ever opening available. On Holleys it is the float height check hole on the sides.
Ragnar in Iceland
 
Finally, the Machinist texted that the block and parts will be ready by Friday.
I ordered and received an engine wire harness from Evans Wiring. There are several parts still to buy. I am thinking of stepping down a bit on the camshaft. I want this to be stronger than a 383 Magnum but I'd rather not have to spin it to 7000 rpms to make decent power.
A car club buddy might rebuild a 727 for the car, I have a factory 11" High stall converter that I had cut open and checked out. It is ready.
 
Uncle Tony may have stumbled onto something....
I like the idea of checking for taper on the lifters.


Yeah, I watched that episode and he's actually got a point, of course -
aftermarket lifters (and are there any other kind anymore?) are only made in a few places these days
and they apparently have quality control issues - LOTS of issues.
Some brands' names come up more often than others (looking at you, Comp).
Makes me wonder if scouring online ads for "NOS" old cams & lifters from I dunno, 25 years or more
back might be worth it?
 
Finally a little bit of work and since we all like pictures, I have a few of them too!
For the past three weeks, I have been working on THIS car that I am selling to a friend:

Val 81.jpg

I put in the 8 1/4" axle from "Jigsaw" because the guy wants FREEWAY gears to cruise, not to drag race. I converted the front to 11" disc brakes, made all the brake lines, patched over the hole in the floor after I removed the 4 speed hump, etc.....I pushed this one out back.
I really wanted to meet the goal of having my car running and driving by the 1 year point of ownership. The machinist with the 383 . delayed and delayed to the point that I knew it wasn't going to happen. Because of that, I jumped in with this car to fill the time and to get some start up cash. I love paying for stuff with cash earned through sales rather than reaching into the savings.

So, I am thinking that since I have the wiring to make the car run, I should focus on that. Ultimately, I want this car to have as close as I can get to the same wiring setup as I have in the Red car, Ginger. This will help me if ever there is a problem, I'll have the other car to serve as a "pattern". For now though, I think I should get it back to stock before making changes.
Last year, after 19 years of driving Ginger with no heat or A/C, I changed the under dash Heater-A/C unit and added the other stuff to convert it to an aftermarket A/C setup. While doing so, I added an auxiliary fuse box to spread the electrical load out over more fuses. The stock fuse panel has 6 terminals. Mid 70s A bodies used a similar shaped fuse panel that held 7 fuses.

1 6 VS 7.jpg


I changed to the A body panel but still didn't like all of the jumper wires attached to the panel. That is why I added the extra fuse panel.
Ginger has an electric trunk lock release, an AFR gauge, Auto dimming rear view mirror with compass and temperature readout, a mild stereo and the aftermarket gauges. Adding those extras would have made a 6 terminal fuse block look like a mess.
Changing all of the stock stuff to match what I did in the red car is the end goal BUT for now, I am looking to wire this car to stock specs, get it running and driving, then make changes over time.
First off, take a look at the female side of the Bulkhead connector:
El ext F.jpg


Yep, that is probably a familiar sight to many that have worked on these electrical systems before. The two melted terminals are the for the black wire coming in from the alternator and the red wire coming out from the Ammeter. This car had some minor meltdown either from the Ammeter failing OR from corrosion/heat, etc.
Since I plan to wire this like original, I'll have to replace the bulkhead block. I have several harnesses from 67-76 A body cars with that bulkhead block that is a direct fit.

The wires going into the block are female spade type with a small flat tab to lock them in place. A thin screwdriver is enough to press the tab down so the wire can be pulled out.

El ext D.jpg

El ext E.jpg

El ext B.jpg
 
Last edited:
I will replace that burned bulkhead plug with this other one. All the terminals will get cleaned before stuffing them into the plug.
 
The gauges in this car may or may not work. By the look of that bulkhead plug, I'd guess that the Ammeter is AFU. I might use the gauges that were in Ginger. The Ammeter was fine, it has a tach too. The oil pressure gauge was dead, the gas gauge worked but wasn't accurate. The water temp worked sometimes...

The cluster in this car is basic XH Charger...no tach, not even a clock!
Day 1 A.jpg

Day 1 B.jpg


The gauges from Ginger:


DSCN1917.JPG
DSCN1919.JPG
DSCN1920.JPG
 
They don't look perfect but they are much better than what this car has.
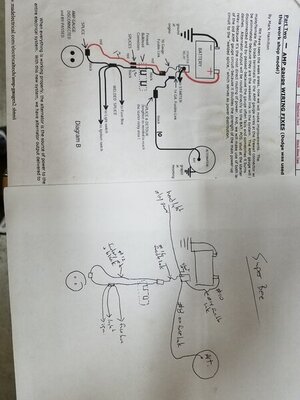
Ultimately, I will bypass the Ammeter and see about buying a voltmeter to fit in it's place with the same font style. When I do that, I'll reroute the wires similar to what is shown in the diagram below.

MAD 3.jpg
 
They don't look perfect but they are much better than what this car has.
Ultimately, I will bypass the Ammeter and see about buying a voltmeter to fit in it's place with the same font style. When I do that, I'll reroute the wires similar to what is shown in the diagram below.

View attachment 1003664
I have done the MAD bypass like you pictured on all my cars. I called Mark to order some supplies before doing it on my Bee. He told me that he has revised how he thinks the wire mod should be done, but hasn't updated it on his website. Here is a pic of what he recommends now. Either will work of course, he is just moving the fusible link from the alt feed to the main power feed.

20200918_065456.jpg
 
Auto Transport Service
Back
Top