• When you click on links to various merchants on this site and make a purchase, this can result in this site earning a commission. Affiliate programs and affiliations include, but are not limited to, the eBay Partner Network.

'68 Coronet project EFI/4 speed conversion up and running!

Alright well, the car is aligned I guess. Didn't go as well as I had hoped, I think I did a better job doing it by eye in my garage. Took forever, was there for almost 3 hours which was ridiculous. I let them balance the tires but it was totally unnecessary, the weights wound up in the exact same spots.

They actually had the specs for the car in the computer but they were nowhere near what I was looking for. I asked him to give me 4-4.5 degrees of positive caster, 1 -1.5 degrees of negative camber and 1/16" total toe.

I made sure that he set the ride height equally on both sides which seemed to take a long time to adjust. It's level but a bit higher than I prefer.

He couldn't get the desired caster because in his words it was affecting camber too much for his liking. His comment was that the tires would wear too quickly with more than 1 degree of negative camber. I said I didn't care about that, I need way more caster than you have right now which was less than 1 degree on the driver's side and less than 2 on the pass. side.

After starting again, he was able to get it to 2.7 degrees on the driver side and 3.0 on the passenger side. It's not great since I should be able to get at least 4 degrees on each side but I suppose it's passable for now. He also told me the RF cam bolt nut was spinning so looks like I need new eccentrics. I forgot to ask for a printout because I was there so long, I just needed to get out of there. I did give him a tip but I'm going to try and find another place next time where the tech is willing to play along and not make decisions based on late model tire customer preferences.

For the most part, it drives straight and does not wander. Drove it home on the highway and on some narrow, twisty roads and it did OK, no surprises or ill handling. The steering wheel is off to the right a tad but I can live with it. Again, it felt better after I eyeballed it in the garage yesterday. Oh well.
IMG_1039.JPG


Pretty close to being done with this thing. Have to finish putting the interior back together, deal with the power steering leak and maybe a couple more odds'n'ends. After driving it to another town this AM I'm fairly confident it's ready to be driven regularly without much of a second thought. Today was so nice out here, was just amazing to be driving around in this bright blue boat with the windows down, shifting gears and listening to the exhaust. There have been enough days like this over the last two years where I found myself wishing I was driving the Coronet instead of my Ram but I don't have to wish anymore!
 
Well, not so fast! Car leaks like a sieve!
IMG_1040.JPG


Took it in to work yesterday, about 35 min. one way with both back roads and a few miles of highway driving. Went great and was really enjoyable. Definitely getting used to the handling and feeling more confident with it.

However, shifting is still an issue even with the different shifter handle, it won't stay in first without holding it and it only stays in third for a few seconds before it just kind of slips out. Guess my earlier statement about the boot pulling on the handle was kind of silly.

On a side note, After driving with both the Ricky Racer 4084 handle and now the factory pretzel type, I think I prefer the factory style. It's in a much more natural spot and somehow gives the illusion of a shorter throw.

In any event, first thing I will try is to re-adjust the rods to see if that helps it stay engaged. Maybe the side cover is off somehow? Hoping it's not the synchros. It's a newly rebuilt unit from a well-known vendor so I doubt there are any internal issues. However... it did sit dry for almost two years and maybe was shifted enough times without lubricant causing some wear on brass parts. It wasn't like thousands of shifts so I'm inclined to think that's probably the least likely cause here. Hopefully re-adjusting the rods will do the trick.

So anyway, when I put it up in the air to adjust the shifter rods, I saw that oil is seemingly coming from everywhere. There is oil on the passenger side of the pan which looks like it may be coming from the front somewhere, possibly the fuel pump block off of the lower corner of the timing cover. The underside of the driver's side front frame rail , t bar, starter and exhaust are completely wet with oil. Could be coming from the valve cover, dipstick... I can't tell, it's everywhere. Power steering is still leaking as well.

First order of business is to address the valve covers. I chose Moroso valve cover gaskets but I don't think they work well with stock cast heads. Second thing is that the ancient Edelbrock valve covers don't have a provision for a PCV. Can't say for sure whether there is too much crankcase pressure but I always prefer to run a PCV. Going to swap the old-school chrome finned ones out for these bad boys which are more modern (?) no-name M/T "Japanese Market" pieces. The M/T covers have a provision for a PCV. I have to alter some Mopar Performance baffles to be able to use them in these but it's only elongating one attachment hole. My boy Benny Beans hooked me up with some cork gaskets today so I should be back in business in a NY minute.
IMG_1043.JPG


Second operation might be more involved - the oil pan and timing cover. Not sure how involved I want to get here. I gotta take the center link down after having just had the car aligned... Getting to the timing cover is a huge pain - accessories, harmonic balancer, water pump... then clean all the old schmutz off, and re-install while it''s all in the car. It's not hard but it is kind of of a sucky job especially since I just buttoned it all up like last week. I may just take down the oil pan, get rid of the crappy homemade-looking windage tray and go back to a single pan gasket.

Thanks for reading along through all my trials here. Getting the car running was a huge step for sure but getting it all sorted out is a task in and of itself. Stay tuned.
 
Oil can be a pain. Check the corners of the valve covers. Look for the highest place you find oil. Oil psi sender.
 
Couple updates from today's drive as I continue to sort out these bothersome issues.

First step to mitigating the oil leaks was to put a different set of valve covers on. These seem to have done the trick, no visible leaks for now. For whatever reason I have shied away from using cork gaskets in recent years but these were free so why not? I think the secret with the cork gaskets is basically to install them carefully. I used to some light adhesive to stick them to the valve cover rails. I put some weights on top of them overnight to ensure they were flat before putting them down. I was keenly aware of not over torquing them which I'm guessing is a common malpractice. Again, so far so good. These valve covers look cool too, I kinda like 'em better than the chrome ones that were on there before.
IMG_1061.JPG


And again, the other reason I switched to these was because they have a provision for a PCV. It's not a race car so in my mind there is no reason not to use one. In theory it should help with leaks and thus far it seems like it's doing it's job. Didn't seem to have any effect on the EFI but if there was, it just learned a new tune. For kicks in style I stuck a regular old chrome Auto Zone breather on the other side. Shiny!

The other thing I learned yesterday was that what initially appeared to be an oil leak coming from the front was actually coolant. While looking things over yesterday, there was evidence of antifreeze on top of the t-stat housing. Broke out the coolant system tester and lo and behold, the thing is a leaker.
IMG_1058.JPG


First thing I noticed was the hose clamp was a little loose. Doh! I tightened it up, tested again and it held but after the ride back and forth to work today, it was pissing coolant everywhere. Since the parts on the car look to be the 52-year old originals, I think it might be time for a new water pump and housing, or at least something that does not have a badly pitted T-stat surface.
IMG_1059.JPG


So yeah, I'm guessing my 'oil leak' was most likely coolant mixed with road grime and possibly some power steering fluid. Makes sense since it was dripping down the front. The rushing air and fan would spray the coolant backwards onto the motor.
IMG_1060.JPG


As far as the power steering, it seems OK now. Yesterday I pulled the return hoses as far as I could onto the fittings. and re-clamped them. Checked the fluid level after I got home and it was still full so that was a good sign.

Still not quite there on the shifter. After re-adjusting the rods it mostly stays in first gear now and only pops out of 3rd when coasting though it does stay in gear under acceleration. Unfortunately I may have gone a little too far on the 1-2 rod because it's now tough to find 1st from nuetral. There were a couple times taking off from a light were I accidentally put it in reverse or started off in 3rd and stalled. I've been driving stick cars since I have been able to drive but today was a struggle. Adjusting the rods certainly made things better in one respect but it still needs some fine tuning. Just hoping that if I go back closer to where I started it won't pop out of gear again. Shifting under power is great though, smooth and sure.

Couple other realizations were made today - the brakes are marginal. Going to try and adjust the rear shoes to see if that helps. Could also be the fronts need a different pad compound? I've read that can help but I'm not quite sure what to get or what's on there now. The P.O. put a prop valve in the rear line and I'm not sure it's needed. I'm a little wary of messing with it because I don't know where/how it's set but it sure seems like it may need to be backed off to allow the rears to grab better. I have not touched the brakes since I've owned the car. Don't remember them needing this much effort to stop either!

I think the updated suspension parts are illuminating the fact that I likely need new shocks. The rears are your garden-variety Mopar blue ones with KYB's up front. Body roll is not bad at all, it's the extension/rebound that is jarring. Whenever you go over a bump of any significance it feels and sounds like the car is bottoming out. They're not leaking or anything, they just may be inadequate. Bilstiens seem like the go-to for this type of application so I may order up a set. Can't hurt, that's for sure.

This big boat of a car needs more power, the stock 383 is not doing it for me. I bumped up the initial timing to 17 from 15 which helped throttle response off the line in 1st (when I can find it). Once I get the leaks taken care of I plan to start getting into the software to see if I can get it to be more responsive. Adjusting the timing is so easy to do with the Sniper, it's almost laughable.

Having trouble getting the can-bus fuel level gauge to read correctly. Not sure what the heck I am doing wrong. I've tried to program it several times with no luck, just keeps reading empty. I am about to throw in the towel with these Holley gauges and just get conventional ones.

But even the conventional gauges I left in the instrument panel don't want to work. I installed a new speedo cable today and - nothing, no speedo movement at all. It installed fairly easily on both ends so something could broken inside the speedo mechanism. I don 't know or care. Not happy with the overall dash function right now, methinks I am going to wind up completely re-doing it sooner than later. Going to be an expensive lesson and frustrating to say the least.

All in all though, I am having a blast driving this car. Gets a lot of looks and thumbs up.

Stay tuned for more updates.
 
Last edited:
Does the stock air cleaner fit the Holley Sniper okay? Any issues
 
Does the stock air cleaner fit the Holley Sniper okay? Any issues

Yes, the throttle body is the same as any Holley-style carb.
IMG_1062.JPG


I do have a slightly dropped base so a regular one should fit easily.
IMG_1067.JPG


Because of the slight drop in the base I am using, the 90º inlet fitting in the driver's side front port is real close to the inside edge of it but it clears.
IMG_1066.JPG
 
Alright, making progress getting things sorted out.
IMG_1112.JPG


So after taking the whole thing out, cleaning it, re-greasing it and putting it all back together, the Hurst shifter finally seems to be working OK. It's not perfect because it still pops out of 3rd gear on coast but other than that it's way better. Guess ultimately the side cover may need to come off to have a look see at the internal parts but for now, I'm going to leave it alone.

I'm not sure if this was the source of my shifting issues but when I first took the shifter off I saw there was a bunch of fibers in the mechanism from when the carpet was installed. Hard to tell if it was making it bind internally but makes sense. Once it was all apart and I was able to inspect the parts on the bench, the gear selector plunger thing inside the receiver felt like it was hanging up. There were a bunch of fibers all matted up in the grease preventing smooth operation. After cleaning it, I polished the plunger with 2,000 grit sandpaper to eliminate any burrs. Works OK now.

Inside there were some pretty significant witness marks on the lever shims so clearly something was out of adjustment. Regardless, whatever I did by taking it apart seems have remedied the situation. Sorry, no pics of the shifter R &R, was after 11:00 PM when this thrash happened.

But more likely than the shifter itself causing problems was the linkage rod adjustment. It's not clear what the heck I did previously but after re-installing the whole works the adjustments were much easier. I still have to set the 3 & 4 stops but again, it's way better than it was. Maybe whatever was making it bind up was also preventing the linkage from being adjusted properly.

For those keeping score at home, the all-encompassing fluid leak battle continues. After driving it the other day the coolant leak seems to have been reduced to a slow drip though it is still leaking. Had the thought that since the heater hoses were not hooked up, it may have been overfilled and since it's liquid and can't be compressed, the extra coolant that usually lives in the heater system had to go somewhere...

The other thing I noticed was that coolant seems to be weeping out from behind the header bolts, there were a few stains on the header flanges. I used Teflon paste on them when they were installed, not sure what that is all about.

However, a nice, big fat clue presented itself after a drive the other day. Once back home, I shut if off, popped the hood and could hear the coolant boiling in the heads. Personally, I have never encountered before, especially since it's fall and the ambient temps are nice and cool. Kinda makes me think there could be air in the system. The engine does seem hotter than you would expect, the upper radiator hose is almost too hot to touch. The temp gauge has been OK though, nothing out of the ordinary. It's a brand new aluminum radiator, 16 psi vented cap with an overflow tank so those parts must be doing an OK job. Guess I will have to re-do those header bolts which absolutely sucks, they are hard to reach.

Either way, I did wind up ordering a new water pump, new heater hoses, a new timing cover with gasket set and a molded windage tray type oil pan gasket.
IMG_1113.JPG


I got a new timing cover because on close inspection I spied a spot on the lower rail of the one in the car that is bent and could easily be the cause of the oil leak on the passenger side. And if the timing cover is coming off, kind of makes sense to do the oil pan and ditch the OE style windqge tray gasket sandwich. Not real thrilled about changing out all this stuff out since the car is running but it's also not too wise to keep hammering it with short blasts or long drives without dealing with this stuff first. Doing the water pump will also allow me room to look at the power steering hoses, maybe I can finally get those to stay dry too.

The valve covers also still leak. Guess it's just the nature of the beast, Mopar valve covers have been leaking for centuries. Factory iron heads have such irregular valve cover rail surfaces, it's probably next to impossible to make anything seal. One can only do so much.

Last item to report is that the passenger side seat upholstery job has commenced. It will be nice to have a co-pilot seat because I can finally take my wife and kids for a ride. Just getting things underway now but have everything on hand already, should go smoothly.
IMG_1115.JPG


Until the next installment...
 
wow what an adventure

sounds like you are ironing out the issues
of a new build & old parts, combined

looks good
I love the detailed commentary & photos too

good luck in the future
 
there was evidence of antifreeze on top of the t-stat housing.

Where did you get the spacer with the sensor bung???
I am running EFI as well but would like to hook up a standard analog gauge.
Thanks
 
Where did you get the spacer with the sensor bung???
I am running EFI as well but would like to hook up a standard analog gauge.
Thanks

It's one of AndyF's parts. http://arengineering.com/products/thermostat-spacer-with-efi-sensor-port/ Mancini's has them, so does Hughes.

Not sure what type of EFI you have but in case you were not aware, the coolant temp sensor in the spacer serves as an input for the Sniper ECU. The spacer basically provides a port for that particular size of the fitting. The spacer does raise the upper radiator hose upward so you may have to trim the bottom of it at the t-stat outlet. I left mine because if the hose was any lower my fan would hit the bottom of it. Looks a little odd but it 's all good.

Also as an aside, the Holley 'can bus' gauges I am using get signals from the ECU and not from a temp sensor so a temp gauge in the dash is kind of redundant if you have the handheld in plain view. For me though, it's a little hard to read the handheld while driving/shifting/keeping my eyes on the road so it stays in the console. It's good to have the temp gauge in the dash where I'm used to seeing it.

Frankly, I've been looking at replacing the stupid can bus gauges. For whatever reason, I was unable to program the fuel level gauge so it's not working at all. Plus, as I mentioned already in a previous post, there is no input for oil pressure through the ECU so that gauge is also useless. Two out of four kind of sucks!

In other news, all the replacement parts are in.
IMG_1141.JPG


Frankly, getting the molded pan gasket installed kinda sucked. It's more rigid than the metal ones so there is less give when getting it close to where it needs to be. Coupled with the fact that my pickup tube seems like it's cemented in place and basically immovable putting it in exactly the wrong spot which made it difficult to get the bolt holes lined up. Maybe it was because I was doing the job at night, I dunno but I kept having to undo bolts at different ends to get it lined up. I did use carb studs (!) to help line it up, worked good. Next time the pan has to come off, I need to remember to use my pole jack to raise the motor a little so I can get a ratchet on those front bolts more easily.
IMG_1144.JPG


On the power steering leak, close inspection of the return hose adapter revealed the bead flare had a small dent/crease in it making the outside diameter oval shaped, pretty sure that was what was causing the leak because the fluid was getting past the flattened bead.

Went down to a hydraulic shop to see if they could make me a new hose. Unfortunately they didn't have the necessary materials but they gave me a compression fitting and adapters to try and make it work. Still leaks! Perhaps the red, old-style hose clamps that came with the hose are not strong enough? Did I mention I detest power steering fluid?
IMG_1155.JPG


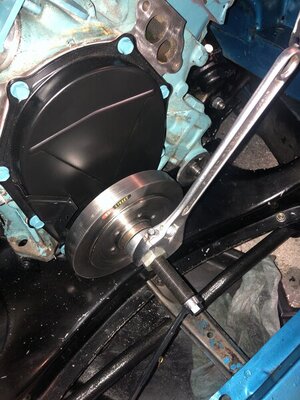
The timing cover, water pump and balancer went in fairly easily. No silicone 'sealing' goop was used on any of these parts, just good gaskets and proper fastener torque. I cleaned a ton of old RTV off all the mating surfaces, the P.O. must have had stock in Permatex or something.

Having the right balancer installer tool makes life easy.
IMG_1146.JPG

But despite all the effort, the f*ng thing still leaks. Drove it back and forth to work today, motor oil is leaking from somewhere, couldn't tell exactly where it was coming from though. On the right here is power steering fluid, there's a puddle on the K-frame flange.
IMG_1152.JPG


Throughout the ride the oil pressure was normal so it's not a bad leak but still totally frustrating. Hoping it's something easy to deal with like a loose pan bolt. Before installing the pan I spent some time with a ball peen hammer trying to flatten out the bolt holes but I'm thinking the rail is probably warped. If I can't get a handle on this situation with a new pan I may throw in the towel on this situation and pull the motor for something else. I'd rather spend my money on something other than a worn out 383.

The valve covers still seem to be weeping a little but they are better. I changed out some studs on the corners for regular hex bolts so see if they could spread the load more evenly. Who knows if that actually did anything, I'm just clutching at straws.

Had one loony thing happen on the way home. Was driving along a county road at about 30 mph about to get on the highway when I heard a pop and what sounded like something rattling around underneath the car. Right then I noticed something in my rear view mirror that looked like a golf ball bouncing off to the other side of the road. Seemed like something in the road so I kept driving up to the next light.

As I am coasting up to the light getting ready to make a right onto the ramp, the car began to stall like it was running out of fuel and then backfired really loud with a car right behind me. Crap! WTF just happened? Flashers on, I get out pop the hood and ... the overflow tank cap blew off? Really? Aaaahhh, that was the thing under the car that looked a like golf ball because it's round and shiny.
IMG_1153.JPG


Left the car on the curb and walked about a 1/4 mile back up the road to look for the cap. Found it laying in the grass all scratched up but in tact. That was a new one for me! Thinking I may need to use something with a lower pressure rating than a 16 psi cap?
IMG_1157.JPG


Anyway, after my twilight hike along a busy roadside was over, I put the cap back on, got in, turned the key and she fired right up. Took it easy the rest of the way home but all seemed normal. Crazy.

Stay tuned for the next installment at your own risk.
 
It's one of AndyF's parts
I appreciate it, I have the Terminator HP. Ya I knew about the size, I actually had an inline coupler that had the boss, just dont like it there.
As far as the oil pressure I was able to re-pin one of the out puts and set it up to read.
I have the 3.5 handheld and there just a lot to glance at, so I have the 3 pod gauges for quick reference.
 
I have the Terminator HP.

As stated before, the Sniper really is lacking in that regard. Hard to imagine the engineers could not figure out a way to have the ECU read oil pressure. Holley even sells pressure transducers for this express purpose which work with their other EFI products just not the Sniper.
 
As stated before, the Sniper really is lacking in that regard. Hard to imagine the engineers could not figure out a way to have the ECU read oil pressure. Holley even sells pressure transducers for this express purpose which work with their other EFI products just not the Sniper.
Really not that familiar with the Sniper and its capabilities. The Holley EFI forums are pretty good. Danny C is the resident expert and is pretty good about referencing materials and diagrams.
He gave me all the info needed to repin my ecu.
 
So yesterday before Turkey Time I put the car up in the air and wouldn't you know it, the oil pan bolts were loose! Doh! Only thing I can say was that I was trying not to gorilla them but ended up not tightening them enough. I used a 1/4" hand ratchet the first time but went to a 3/8" and managed to get a few turns out of each bolt. At the dealership, I used to use a 1/4" air ratchet for pan bolts. I rarely had any problems with loose bolts using the same type of molded gaskets. Again, was doing this whole thing late at night so I opted not to use air tools. Have not driven it yet to see if that was the source of the leak but one would think so.

If the loose pan bolts take care of the oil, the remaining leak problem will be the power steering return hose.
I would like to use -AN type fittings for the return hose. I always have good luck with that type of fitting and have a bunch of them on hand already, just have to find the right adapters. And besides the weird incident the other day with the overflow bottle cap, the coolant appears to be staying inside the engine where it belongs.

One thing I have noticed are consistent exhaust leaks. The Sniper seems to be OK with it though it's probably just adding more fuel to compensate for the abnormal lean condition. It's not going to "throw a code", would have to look at a data log and see what the fuel tables look like to be sure. The other day I re-did a few of the header bolts that were easy to reach but I'm betting all the the hard-to-reach ones have also worked themselves loose. It's always something!

Despite these nagging little problems, driving the car has been a good experience thus far. Driving it like I would my regular car makes it easier to diagnose these little problems because most of the time everything is working fine. In my feeble mind, that means there really isn't anything major to deal with which is always good!

Until next time.
 
Do you have a Super Sniper or the base Sniper? The Super Sniper has three additional input lines so you can data log fuel pressure, oil pressure and one other pressure. Those input lines don't work with the can bus gauges but they do work with a digital dash. So if you had bought a digital dash rather than the four CAN bus gauges you would be able to few them. Not sure what your issue with the fuel gauge is. I have the fuel gauge in my car hooked up to my digital dash and it works but I've never tried hooking up to a CAN bus gauge.

Your leaks are all normal. It takes some work (and some knowledge) to seal a big block up. Valve cover leaks are very common with cast iron heads, especially when using cast covers.

You should convert over to fixed orifice PCV rather than using a Mopar PCV. If the PCV fails it can cause a dangerous situation with a high idle speed. The fixed orifice PCV can't really fail or cause an issue.
 
Do you have a Super Sniper or the base Sniper?

Just a regular Sniper. Not a huge fan of the digital dash even though it's probably the most logical solution.

I don't really understand what happened with the fuel level gauge. At one point I was able to get into program mode but for whatever reason could not get it to read the correct amount. At the moment it will not go back into program mode and reads empty. I basically gave up on it for now.

Your leaks are all normal. It takes some work (and some knowledge) to seal a big block up.

Well, thanks. To me the work and knowledge part must translate into doing it over and over again. Oh, and maybe remembering to tighten the pan bolts... Based on that notion I am going to be an expert if I can eventually get this thing to stay dry.

So the car was still up in the air yesterday and could not believe what I saw, the thing was leaking without even starting it! Tried to follow the oil trail and it looks like it may be coming from a rear head bolt? Is that even possible? It's a huge pain to re-torque the head bolts, the exhaust has to be taken off to get to them and it sucks getting it back on. Might have to though? The head bolts are ARP with the proper lube, torqued in sequential increments. Steel shim head gaskets coated with copper spray.

Normal or not, these leaks are insane. I've never had anything hemorrhage fluids like this.
 
I fought valve cover leaks for years and then eventually figured it out. The Mopar cast valve covers are very difficult to seal to a cast iron head for two reasons. First off, the cast iron heads typically have a very poor casting surface. If you put a straight edge on them you'll often find voids and gaps. Second, the Mopar cast covers are designed wrong. They are too wide. If you don't believe me just flip them over and measure the rail then measure the rails on your head. The guy at MP who designed the covers wasn't smart enough to use the correct dimensions. About the only way to get that combination of parts to seal is to use the super thick FelPro gasket.

I gave up on all that mickey mouse junk and designed my own valve covers. They never leak and I can reuse the gasket over and over.
DSC_3301 (Large).JPG
 
You should convert over to fixed orifice PCV rather than using a Mopar PCV. If the PCV fails it can cause a dangerous situation with a high idle speed. The fixed orifice PCV can't really fail or cause an issue.

I have been researching this idea. I watched a video where a guy installed three different PCV valves in his Sniper equipped Fairlane. Unless I missed something obvious, I am not exactly sure what the overall conclusion was but it seemed the fixed orifice type provided the smoothest idle.


Andy, do you or anyone else for that matter have any experience with M/E Wagner "Dual Flow" PCV valves? Kind of pricey especially if you intend to only use it in fixed orifice mode. Not entirely sold on it but it seems like a nice piece.

http://mewagner.com/?p=444

I found a list of specific part numbers for fixed orifice PCV valves on the Holley forums, may go down to Napa and see if they have one and give it a try. I am not really having any glaring idle issues per se, except for that one low rpm stall the other day.
 
There is no part number for a Mopar fixed orifice PCV. GM made a fixed orifice for their cars for a few years but it is 0.750 diameter so it doesn't fit the normal Mopar grommet. You can either change the grommet and use the GM part or you have to make your own PCV. It isn't difficult to do make one since it is just a tube with a hole in it.
 
Well, all this PCV talk got the wheels turning - have to think this old guy is not doing much of anything except creating a vacuum leak. Have not gotten around to finding a f.o. type yet.
IMG_1168.JPG


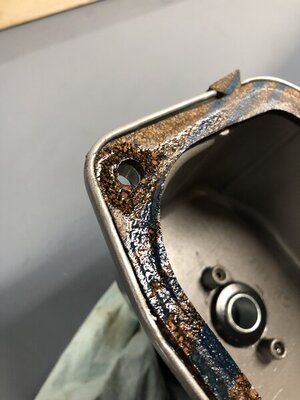
The main reason the PCV was out was to pop the valve covers off and see what, if anything was to be seen in regards to my leaks. They're not as bad as I thought but I can see where they were wicking oil in the lower corners. The lower corner bolt threads were soaked with oil so it's weeping past the gasket. These cork gaskets were free and filled in OK but clearly are not up to the task. Plus, now that they're off they're pretty much junk. Have some new gaskets on the way from Summit, ordered two different brands just in case.
IMG_1164.JPG
IMG_1167.JPG
IMG_1166.JPG
IMG_1165.JPG


Never gave it much thought before but now that I am dealing with these leaks head on, it's obvious why people have been pulling their hair out with this nonsense for 50 years.

Between leak mitigation procedures, I managed to get started on the passenger bucket seat cover. Got the bottom cushion done but then I ran out of hog rings. Summit has packs of them that come with the correct tool (I have one but it's a single use throwaway and it sucks) so that'll be arriving with the valve cover gaskets. So far so good on the install, no major hassles. Everything else is prepped, just a matter of making the time to finish it.
IMG_1169.JPG


Updates to come as they happen, stay tuned.
 
Auto Transport Service
Back
Top