You are using an out of date browser. It may not display this or other websites correctly.
You should upgrade or use an alternative browser.
You should upgrade or use an alternative browser.
Tremec 5 speed conversion in a 1970 Charger
- Thread starter Kern Dog
- Start date
- Local time
- 5:12 PM
- Joined
- Jul 17, 2008
- Messages
- 19,199
- Reaction score
- 53,125
- Location
- South Jersey USA
200 bucks? geeez......... I think I have one, I will look hang on
200 bucks? geeez......... I think I have one, I will look hang on
I agree the $200 for that turd is crazy... But it's not a common part anymore...
- Local time
- 5:12 PM
- Joined
- May 14, 2011
- Messages
- 17,237
- Reaction score
- 32,426
- Location
- On the Ridge, TN
In regards to the driveshaft CL-CL measurement, perhaps the "full droop" measurement and the
"normally sitting" measurements are the same because the actual furthest (longest driveshaft CL-CL)
dimension actually occurs exactly in between them?
Or even...
Sort of a radius measurement type deal maybe, where the measurement is the same regardless of
any point in suspension travel of the rear axle?
- Local time
- 2:12 PM
- Joined
- Apr 13, 2012
- Messages
- 35,564
- Reaction score
- 125,313
- Location
- Granite Bay CA
I'll also need the thin sheet metal pieces that the woodgrain applique attaches to. I started a WTB thread too....
- Local time
- 5:12 PM
- Joined
- Jul 17, 2008
- Messages
- 19,199
- Reaction score
- 53,125
- Location
- South Jersey USA
I had a woodgrain lid and 4 speed plate kicking around here for about 20 years...... I located the lid right where I thought they would be, but the shifter plate is not there....... I will do a little more digging, but it seems to have grown legs; which will really piss me off
- Local time
- 2:12 PM
- Joined
- Apr 13, 2012
- Messages
- 35,564
- Reaction score
- 125,313
- Location
- Granite Bay CA
I may need the lid too. The one I bought last month is missing the hinge and only 2 of the threaded studs remain.
- Local time
- 5:12 PM
- Joined
- Jul 17, 2008
- Messages
- 19,199
- Reaction score
- 53,125
- Location
- South Jersey USA
I may need the lid too. The one I bought last month is missing the hinge and only 2 of the threaded studs remain.
you can have the lid....I will do a little more digging for the plate.....
watermelon
Well-Known Member
i tried getting pics for you Kern but this dang pesky 5-speed shifter kept getting in the way
link if you have spare cash:
https://www.beaparts.com/list_items.aspx?body=B&cat=I&subcat=2
watermelon
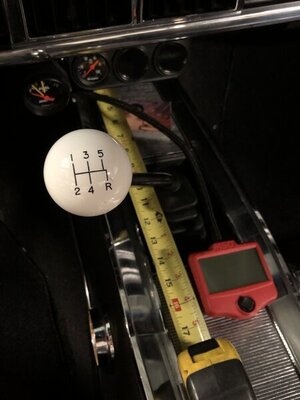
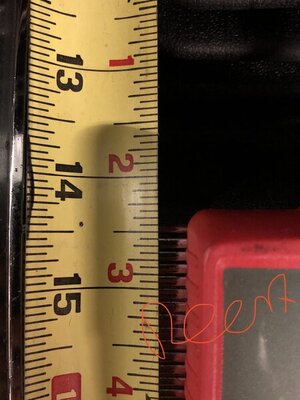
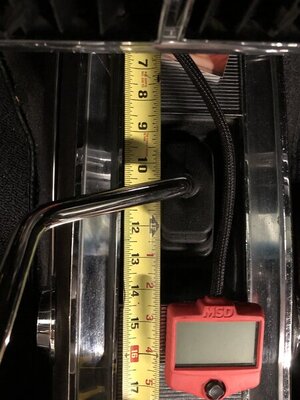
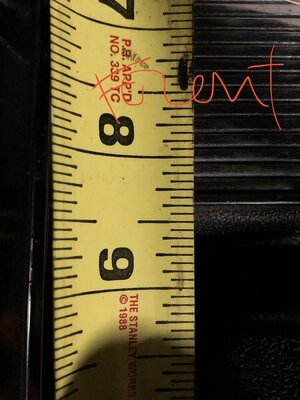
link if you have spare cash:
https://www.beaparts.com/list_items.aspx?body=B&cat=I&subcat=2
watermelon


Last edited:
- Local time
- 2:12 PM
- Joined
- Apr 13, 2012
- Messages
- 35,564
- Reaction score
- 125,313
- Location
- Granite Bay CA
Looks like you have an actual 4 speed version. The front to back measurement of the opening is approx 6 inches. The Auto opening is about 4 1/2".
IF I can't find a 4 speed version at a reasonable price, I still might be able to make mine work. The Tremec has shorter throws and the shifter stub on the trans is up higher so the opening does not need to be as big as a stock 4 speed car. Originality is not a huge priority.
IF I can't find a 4 speed version at a reasonable price, I still might be able to make mine work. The Tremec has shorter throws and the shifter stub on the trans is up higher so the opening does not need to be as big as a stock 4 speed car. Originality is not a huge priority.
If your talking about my post it's the opposite of what I said. After KD posted saw it was backward, didn't bother to correct it. Changed it.3/8" difference is not the same... I will agree it doesn't change as much as you might expect but it does change.. Strange your axle gets closer to the trans as it is raised... I'm guessing your springs don't have allot of arch?
- Local time
- 4:12 PM
- Joined
- Jan 1, 2013
- Messages
- 8,050
- Reaction score
- 3,453
- Location
- Mascoutah, Illinois
A forum member helped me out with a measurement on the 4 speed console plate.
https://www.forbbodiesonly.com/mopa...ents-66-70-b-body-console-and-4-speed.210876/
Here is mine again....
View attachment 1057902
Here is a stock 4 speed plate.
View attachment 1057909
This clears things up. Now I'm going to search for a good USED 4 speed console plate. I still plan to sandblast and paint them.
@Rat Rod Al
Has just what you need I think. I don’t know if he’s posted for sale yet though. It has woodgrain but you are changing that anyway right?
- Local time
- 2:12 PM
- Joined
- Apr 13, 2012
- Messages
- 35,564
- Reaction score
- 125,313
- Location
- Granite Bay CA
I am enjoying the journey on this one. I've encountered a few obstacles and found ways around them. The most recent is the console fitment and the shifter sitting way off center.
I knew that the automatic and manual transmission cars had different console plates but I did not know the exact differences. I thought that all I would need to do was to widen and lengthen the hole in the automatic plate that I bought. Turns out, it isn't quite that simple.
To recap....Measuring from the firewall end, the automatic version has the opening starting around 11 3/8" and ending about 15 7/8". The manual version starts at around 8 1/2" and ends at 14 1/2". In short, I needed to move the hole forward as well as lengthening and widening it. The plate is a die cast aluminum and I don't have the skills to weld this stuff. I found a way though...
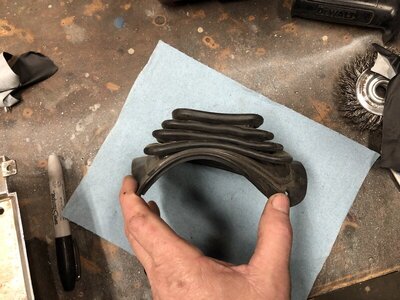
The 4 speed opening is 6 inches long. This presented a problem because the shifter boot in the kit is only 5 inches in length.

Last edited:
- Local time
- 2:12 PM
- Joined
- Apr 13, 2012
- Messages
- 35,564
- Reaction score
- 125,313
- Location
- Granite Bay CA
The Tremec has shorter throws than the 833 4 speed and the shifter stub sits up higher than the stock shifter does. Because of this, the opening in the console does not have to be as large. This works to my benefit. I posted a WTB for a stock 4 speed console plate but after some figuring and head scratching, I went ahead and decided to modify the stuff that I have. I have since deleted the ad.
I figured that just for the sake of appearance, I'd leave approximately 1 1/4" of clearance from the shifter lever to the console plate both at the front and the back. This is the mock up of how it will look.


I took the plate and started making the modifications.


I figured that just for the sake of appearance, I'd leave approximately 1 1/4" of clearance from the shifter lever to the console plate both at the front and the back. This is the mock up of how it will look.
I took the plate and started making the modifications.
- Local time
- 2:12 PM
- Joined
- Apr 13, 2012
- Messages
- 35,564
- Reaction score
- 125,313
- Location
- Granite Bay CA
The piece I cut out was then cut again to fill in the gap at the rear.


Forgive the crude cut......It won't matter though, stay tuned....

Ta..... DAH !


Forgive the crude cut......It won't matter though, stay tuned....
Ta..... DAH !
- Local time
- 2:12 PM
- Joined
- Apr 13, 2012
- Messages
- 35,564
- Reaction score
- 125,313
- Location
- Granite Bay CA
The boot fits.

The boot will fit over the front and back edges of the opening because the ribs will open up like so....

...Allowing the console plates to fit in between the "ribs" of the boot.
The boot will fit over the front and back edges of the opening because the ribs will open up like so....
...Allowing the console plates to fit in between the "ribs" of the boot.
Last edited:
- Local time
- 2:12 PM
- Joined
- Apr 13, 2012
- Messages
- 35,564
- Reaction score
- 125,313
- Location
- Granite Bay CA
The top of the console plates will get the thin sheet metal with the vinyl overlay. It will hide the ugly seam. To hold the new section in place......

I did the underside first. It does not have to be pretty. Thank the Lord for that!

It has gotten colder the last few days so it will take overnight for that to set up. I'll smear some more epoxy on the top side tomorrow and make sure that it is sanded smooth.
I did the underside first. It does not have to be pretty. Thank the Lord for that!
It has gotten colder the last few days so it will take overnight for that to set up. I'll smear some more epoxy on the top side tomorrow and make sure that it is sanded smooth.
- Local time
- 2:12 PM
- Joined
- Apr 13, 2012
- Messages
- 35,564
- Reaction score
- 125,313
- Location
- Granite Bay CA
The tunnel work meant that I had to remove the console mounts, at least the front and middle one. The stock floor shifter bracket had the middle console mount built into it.

This could have been cut off and modified but I wanted to keep it intact for the other car, Jigsaw.

I made a simple bracket to replace it.

I had the idea to put a couple layers of sound deadener on top. The console sometimes squeaked so maybe this will dampen the noise.

This could have been cut off and modified but I wanted to keep it intact for the other car, Jigsaw.
I made a simple bracket to replace it.
I had the idea to put a couple layers of sound deadener on top. The console sometimes squeaked so maybe this will dampen the noise.
- Local time
- 2:12 PM
- Joined
- Apr 13, 2012
- Messages
- 35,564
- Reaction score
- 125,313
- Location
- Granite Bay CA
The front bracket was removed and set aside for Jigsaw as well. The tunnel is now a little taller where the front bracket sits so it would not have worked anyway. The replacement bracket is smaller and didn't need to be as thick.


Mock up:


Mock up:
Similar threads
- Replies
- 484
- Views
- 32K
- Replies
- 26
- Views
- 1K
- Replies
- 17
- Views
- 2K
- Replies
- 2
- Views
- 905
- Replies
- 5
- Views
- 2K


