• When you click on links to various merchants on this site and make a purchase, this can result in this site earning a commission. Affiliate programs and affiliations include, but are not limited to, the eBay Partner Network.

Pinion depth dilemma

LemonWedge

Well-Known Member
Local time
7:08 PM
Joined
Dec 27, 2009
Messages
937
Reaction score
1,966
Location
Puyallup, WA
I’ve set up a few gear sets over the years. I usually just start with .090 shim behind the pinion, and start with trial and error from there. I have a rheemed out pinion bearing to make things easier, and this time around I decided to grab this little Ratech pinion depth tool. So far all it’s doing is confusing me.

Its supposed to be pretty simple, and it is simple to use; but the numbers I’m coming up with are right enough to make me think there’s just something I’m missing, but wrong enough to make me think the tool is useless....

Check out the video and let me know what you think. Is there something simple here I’m missing?


interestingly, I saw a thread somewhere from a guy using the same tool, and I swear he was having the exact same issue I am, but I can’t find that thread now.
 
Last edited:
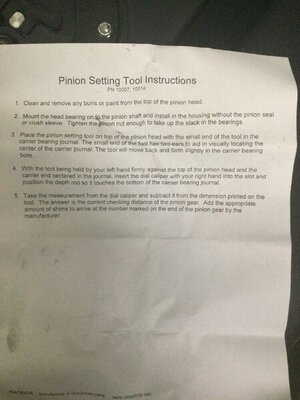
Here’s the simplistic directions that come with the Ratech tool:

EFD91FF0-B1B8-4A61-98F0-C576BB527E4C.jpeg
 
On my tool, the nylon centering part was too long and the tool would not sit flat on the pinion head. I trimmed it down so the tool face sits square with the head of the pinion.
I don't know how you zeroed the dial indicator to get the distance from the bottom of the carrier bearing bore to the measured height of the tool?
You want to subtract the distance from the bottom of bearing bore to the top of the tool.
I use dial calipers with the depth rod to get the measurement.

These type of measuring fixtures are using bottom of the carrier bearing bore as a way to reference the axle centerline.
The outer carrier bearing spec is 3.2650", so the center is 1/2 = 1.6325"
Subtract the 1.6325" from the marked pinion install height 2.721 = 1.08850" <--This is the distance the head of the pinion should be from the bottom of the carrier bearing bore. That is why I just lay a straight edge across the bottom of the bearing caps, and measure from there to the pinion head.
Because the pinion is not exactly under the center of the bearings, I place a 1-2-3 block on the pinion with the 1" parallel to the pinion head. Then just check for the 0.0885" difference with shims. So I have the tool, but don't use it. The 1-2-3 block and straight edge seems to work better for me.

When using setup bearings, use shim(s) where the pinion height is just slightly below the install height. The press fit of the new bearing expanding should bring the pinion height back up to spec.
 
First I've never used this tool. I went online and looked at the pictures supplied with the instructions. The instructions show using a dial caliper. True zero is the top face of the tool. The measured distance is a dimension from the top of the tool to the bottom of the bearing bore. So how did you zero a dial indicator to the top of the tool? I'd try a dial caliper or a depth mic.
Doug
 
When all else fails go back to what works, I do all of mine like you described... A honed bearing with some trial and error. I've always use the settings from the one I removed as a starting point but can't help you much on this one.

I'll be interested to see if you figure it out and whether or not it saves time, nothing wrong with making life easier.
 
I’ll go back and measure with a caliper instead of the dial indicator and see if things change. I know I also could just throw this tool in the bin and start looking at contact patterns, letting them tell me what to do. But I’m a bit obsessive and I want to understand this tool and what it’s telling me.
 
I have used it once and it worked for me, I used one of these,
1b015f518a10e586472ce9175c8af231.jpg
 
Good news: measured with a caliper and it all makes sense to my pea-sized brain now. Doug was correct, I wasn’t measuring from a zero’d point. In fact I wasn’t measuring anything at all . How it randomly ended up at the exact number as my shim package will be chalked up as the big guy messing’ with me. Hopefully he got a good chuckle.

So once I measured with the caliper, my measured pinion depth with the .090 shim package is 2.732. Pinion gear calls for 2.721. So I added .011 to my shim package, re-measured: bang. Right on the money. I haven’t added the ring gear yet and looked at patterns, but Ive got to think that starting with the pinion at the right depth is an advantage.

This little tool was less than $30. It and a reemed out bearing are certainly worth the cost if you do this now & then.
 
I originally used a Ratech tool on a Dana 60, and it is pretty good for the money.
The tool is unique to the different axles, so I also bought the 8-3/4" tool.
When I used the 8-3/4" Ratech tool, and compared the difference to using the 1-2-3 block and straight edge, the difference was only 0.0010" so it was good to see both methods come out with the same pinion depth, plus or minus a thou.
 
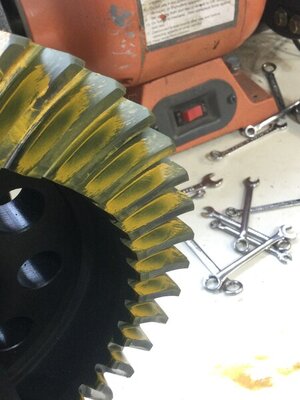
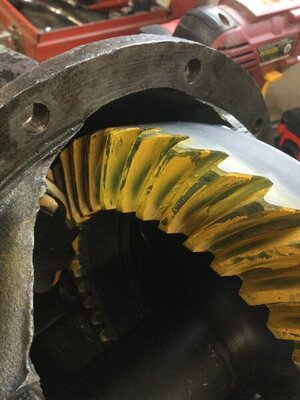
Just as Doug said; when the pinion is at the correct depth, the rest of it comes together pretty easy. I got the backlash to just shy of .008, which I figured was a little less than what I ultimately wanted. Ran a pattern check, and the markings confirmed my suspicion. Pushed the backlash out to .009, and came up with this:

D61CFB45-2B5D-4B74-AA60-7A022C1E5CF6.jpeg 2857329A-F907-4E82-A58D-EDB26C095D80.jpeg
 
Auto Transport Service
Back
Top