• When you click on links to various merchants on this site and make a purchase, this can result in this site earning a commission. Affiliate programs and affiliations include, but are not limited to, the eBay Partner Network.

'68 Coronet 440 to R/T Clone

Looking very good. So much work dose go into these car's. Good job. :thumbsup:
 
After reading through the thread that Hunt2Elk has on his '69 Super Bee and seeing his pedals looking great, I decided to redo mine again. I originally sandblasted them, primed and then painted everything black. So I got the Eastwood Detail Grey paint and some Matte Black for the pedals. I sanded everything down again and painted them the way that I should have the first time. I am very happy with the results and glad that I toke the time to redo them.

IMG_0926.JPG
IMG_0935.JPG
 
and possible a black tail stripe. I am not sure yet on having the tail stripe. Were they standard on an R/T or still an option?

The tail stripe was standard but delete at no cost was a common option...

Good Looking 68!!
 
My progress is very slow on the car now because of other kids and other priorities. But my daughters are starting to get interested in the car and curious about helping. I am hoping they stay interested and I can get them to help me.
I did make some progress in the last couple months. Sandblasted the K frame, lower control arms and spindles. Welded the the stiffening plates and sway bar brackets to the lower control arms, then epoxy primed and painted the k frame, lower control arms and spindles black.
IMG_0507.JPG

K frame and suspension all reinstalled. Installed the Hotchkis adjustable strut rods and new lower ball joints. New PST torsion bars will get installed after the K frame comes out again to put the engine in. Just reinstalled the old torsion bars for now so that I could put the car back on the ground.
IMG_1416.JPG


I need to do some cleanup on the outside of the frame rails from the primer overspray when I painted the car. But ultimately, I will be undercoating all of this. There will be new upper control arms to before the cars is back on the road. Just haven't settled on which ones yet.
IMG_1425.JPG
 
Back in December, I moved the Coronet into a different garage spot where I have move space to work around it. Was able to do some final buffing and polishing on the paint. Now onto working on other items.

IMG_2033.JPG
 
This weekend I was able to put some sound deadener on the entire roof. Looked at many different options, ended up settling on a brand called Second Skin. Had decent review and it is made in the USA. Next will be the jute on the ceiling and then I think I will be putting up the headliner.

IMG_2509.JPG


IMG_2508.JPG


IMG_2538.JPG
 
Super job!
I love the attention to detail and quality of work.
Some are good with a welder and some are good with a grinder. You look like you’ve got the welding nailed!
Your paint and body work is kick ***, as well!
Nice job!
 
Lots of hard work in a fun sort of way, she's beautiful. Great job!
Thanks! Definitely a lot of hard work that my brother and I have put into the car. For me though it is relaxing and stress relieving. I know I still have a lot left to do, but I always like when I get to the point of putting stuff together and back on the body.
 
Super job!
I love the attention to detail and quality of work.
Some are good with a welder and some are good with a grinder. You look like you’ve got the welding nailed!
Your paint and body work is kick ***, as well!
Nice job!
Thanks! Though I have to give all the welding credit to my brother. He has tried to teach me, but I have not mastered it yet.
 
While I have been waiting for my headliner to get all the folds out, I figured I would start insulating the firewall. I decided to try a product from Thermo-Tec. It is their Suppressor Sound and Heat Barrier.

IMG_2736.JPG
 
Next was the under cowl insulation from REM. I used 3M Super 77 spray adhesive to glue it to the underside of the cowl.

IMG_2719.JPG IMG_2721.JPG IMG_2749.JPG IMG_2745.JPG
 
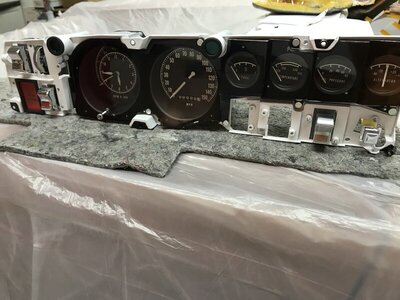
I just received my rallye gauges from @steve817 and they look phenomenal. I couldn't be happier with them. Now I can't wait to start working on my dash so I can put them in the car.

IMG_2717.JPG
 
Hello, I am always excited to hear my customers responses on my Gauge Cluster Restoration work. Thank you for your business and please let me know if you need anything else. Steve
 
Time flies, I didn't realize it has been over a year since I provided any update here. Next up was the firewall insulation pad.

IMG_2779.JPG


IMG_2857.JPG
 
Then I moved on to the headliner. I bought the headliner back in 2011, so it had been folded up in the box for 10 years. I had a pretty serious crease right down the middle. So I put it in and just clamped it along the doors to stretch it tight to get the crease out. I left it clamped for about 3-4 months and occasionally would go over it with a steamer to help get the crease out.

IMG_2798.JPG


IMG_2856.JPG
 
Here is the headliner after about 3-4 months of being clamped. Not quite perfect yet, but the crease was just about fully gone.

IMG_2903.JPG
 
Auto Transport Service
Back
Top