• When you click on links to various merchants on this site and make a purchase, this can result in this site earning a commission. Affiliate programs and affiliations include, but are not limited to, the eBay Partner Network.

Some changes for LemonWedge

Thanks, just ordered a pair!
 
Wow... wish I would have seen those a month ago. I looked at Calverts and figured others would be comparable. Guess not. Like I said before.... someday.
 
I would've thought they'd be noisy cause they do have some play. But to be honest, really haven't noticed much noise.
Doug
 
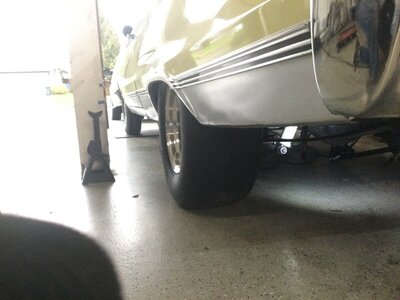
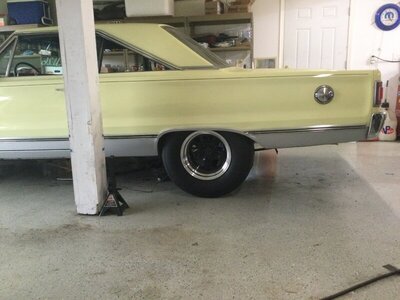
It continues to feel like two steps forward, one step back with this project. I got the interior back together, only to find that I’ve got some overspray from painting the trunk in the car. Not happy, and not yet sure what I’m going to do about that. I also got the 4.56’s set up, and installed the chunk into the housing. I came to the conclusion that rather than re-tube my stock driveline, now would be the time to upgrade, so I’m going to order a Strange 3” Chrome-moly unit with 1350 joints through Dr. Diff. Because of this, I’ve needed to get this thing on the ground so I can measure for the new driveline. I did just that today, and in the process identified a couple of other areas that are going to need to be addressed. Bear with me:
1. The CalTrack pivot assembly doesn’t fit inside the USCT spring bucket. This will be fixed by simply throwing cash at it, as Calvert makes a pivot assembly that is designed for this application.
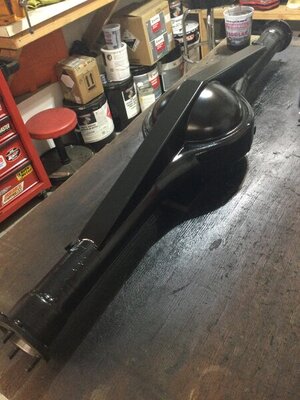
2. After narrowing the rear end, The backbrace on my 8-3/4 now interferes with the inner U-bolt. I’ll have to cut and grind the backbrace at the ends, shortening it by about an inch. I’m sure I’ll be able to tackle this issue, but I’m not happy about it.
3. Since the axle moved rearward, the shocks now also contact the backbrace. I have some options here:
A) I have a full inch clear at the front of the tire / wheel well. I could move the axle 3/8” forward on the leaf spring by simply welding up and re-locating the locating hole in the perches. This would effectively kill two birds with one stone, because I really don’t care for the full inch gap aesthetically, and it would probably clear the shocks.
B) I could relocate the top shock mount to stand the shocks up more vertically. This would clear the shocks, and my understanding is it would also help the shock better control the rear end.
Which of these options would you pick, and why?

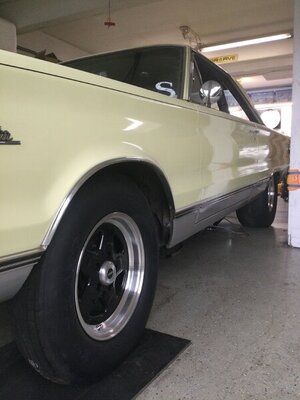
Man has this ever been a learning experience. I guess it makes sense, but every time I change something to tackle one issue, it creates another issue. On the positive side, the new stance looks killer! I must have looked at it from every angle possible today, and came to the conclusion that LemonWedge is gonna be LEGIT! I’m still a long ways from the finish line, but I think I can see the end in sight.

09D206A6-7E6E-4D95-86B4-2D0CD5539618.jpeg 79065F8E-DE48-41EB-9BFA-258FDAED6906.jpeg EF115E5B-49FC-4140-BBAF-FB5D9C1370FC.jpeg 7517FCFD-A6A6-4E2B-8127-4907B2A7F72C.jpeg F538E551-DEBE-4DCD-8DFF-6820CB840FFE.jpeg
 
I'd maintain that 1 inch clearance at the front of the wheel well. That's mighty nice for tire growth or taller tires. I moved my axle back 3/4" to get clearance for a 30.25 slick instead of the 28.5's. I have a similar issue with possible shock interference & thinking about relocating the upper mount.
Fantastic work you've done. You have amazing patience. You're handling the one step forward two back better than I did. Keep it up.
 
If you ever want to run slicks instead of radials keep the inch. Been down the back brace trail myself years ago. Slipped my mind or I would've mentioned it. Upper shock mount is cake. Leave the stock one in there. Mine actually goes thru the rail. In your case plate the inside of the rail with 1/8". Going vertical you will gain shock travel as well. Just make sure the can compress the shock fully without bottoming. Ah paint in the interior. Made that mistake bigtime. Painted the entire trunk with Urethane. It came thru the speaker holes and covered everything. Lacquer thinner and black seat dye are your friend. Still have the car. Interior still looks good 30 years later.
Doug

S13.jpg
 
Terrific progress LW. Going to work well and the space in front of your tire is a good thing. My upper shock brace is done the same as Dougs. Hole saw on each side, then slip the brace up into place and go from there. Of course, a couple pictures.
F6AB0969-7DFD-46D0-9782-83506854E463.jpeg


293784FF-5C62-4156-A5DA-8213A23119CC.jpeg

Your new stance looks serious. 100%
 
Terrific progress LW. Going to work well and the space in front of your tire is a good thing. My upper shock brace is done the same as Dougs. Hole saw on each side, then slip the brace up into place and go from there. Of course, a couple pictures.
View attachment 1073280

View attachment 1073281
Your new stance looks serious. 100%
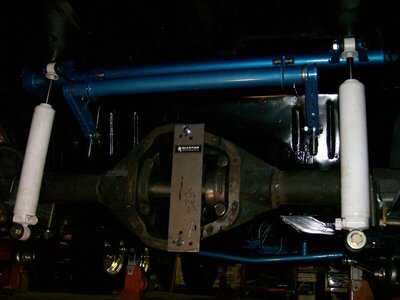
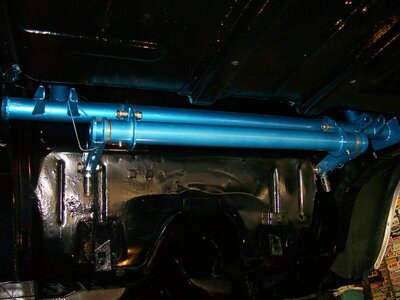
Mine is similar, however I have a bar that goes from frame rail to frame rail that my shocks bolt to. That bar also has my rear speaker tray bars tieing into it from above and also my anti roll bar is welded off of that bar as well. Old pictures after mock up.

100_1716.JPG 100_1704.JPG
 
Last edited:
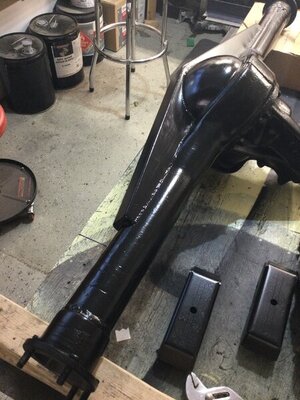
It continues to feel like two steps forward, one step back with this project. I got the interior back together, only to find that I’ve got some overspray from painting the trunk in the car. Not happy, and not yet sure what I’m going to do about that. I also got the 4.56’s set up, and installed the chunk into the housing. I came to the conclusion that rather than re-tube my stock driveline, now would be the time to upgrade, so I’m going to order a Strange 3” Chrome-moly unit with 1350 joints through Dr. Diff. Because of this, I’ve needed to get this thing on the ground so I can measure for the new driveline. I did just that today, and in the process identified a couple of other areas that are going to need to be addressed. Bear with me:
1. The CalTrack pivot assembly doesn’t fit inside the USCT spring bucket. This will be fixed by simply throwing cash at it, as Calvert makes a pivot assembly that is designed for this application.
2. After narrowing the rear end, The backbrace on my 8-3/4 now interferes with the inner U-bolt. I’ll have to cut and grind the backbrace at the ends, shortening it by about an inch. I’m sure I’ll be able to tackle this issue, but I’m not happy about it.
3. Since the axle moved rearward, the shocks now also contact the backbrace. I have some options here:
A) I have a full inch clear at the front of the tire / wheel well. I could move the axle 3/8” forward on the leaf spring by simply welding up and re-locating the locating hole in the perches. This would effectively kill two birds with one stone, because I really don’t care for the full inch gap aesthetically, and it would probably clear the shocks.
B) I could relocate the top shock mount to stand the shocks up more vertically. This would clear the shocks, and my understanding is it would also help the shock better control the rear end.
Which of these options would you pick, and why?

Man has this ever been a learning experience. I guess it makes sense, but every time I change something to tackle one issue, it creates another issue. On the positive side, the new stance looks killer! I must have looked at it from every angle possible today, and came to the conclusion that LemonWedge is gonna be LEGIT! I’m still a long ways from the finish line, but I think I can see the end in sight.

View attachment 1073188 View attachment 1073189 View attachment 1073191 View attachment 1073192 View attachment 1073193
I like the stance :thumbsup:

the tires look good & in the opening with more clearance too :bananadance:
can't hardly tell it was moved back
 
Agree with others above, fab a new upper shock mount (leave the stocker alone). And i like the way yours looks with the rear moved back. But then, mine is moved back an inch too, and i think they both look better that way.
Edit: if the pic in #147 is where it is now.... that looks perfect to me!
 
Last edited:
Got the backbrace taken care of. Also received my new Strange 3” driveline and 1350 yoke. I really feel good about that upgrade. Struggling a little bit with the plan for the shock mount, but I’m making progress. Looks like it’s going to be 3/16 x 1-1/4” flat bar welded to inside of the back section of the stock mount, with shock-mount tabs extending rearward. I don’t have a scrollsaw, and making these little pieces is offering a challenge. In the end, it won’t look as pretty as the guys above, but it’ll work, and how often does someone crawl under your car to inspect your shock mounting bracketry work??
After:
1F6DF12F-6FC7-4A38-99C0-E155FED67391.jpeg
Before:
C08DEFF4-29FE-42BF-A0F6-41D4EA5BC7FC.jpeg
 
It's amazing what can be fabricated with a hammer, hacksaw, vice , and a file.
Doug
 
We did the roll bar fabrication on my '65 Coronet with hack saw cutting a die grinder & stones. The tubing I got from the scrap yard apparently was some odd alloy, harder than hell. It would wear out a standard hacksaw blade with one cut. Heavy too. Later got smart & learned to use carbide cutters for the die grinder. LOL
The roll bar & sub frame connectors got welded in the car by the welder that built Don Ness cars in the mid '70s, a true professional.
 
Calvert customer service strikes again. I called them this morning and asked if I could source a couple of the shock absorber bushings to replace the worn lowers in my CR shocks.
John Gay: “No problem, we’ll just send a set out to you”.
Me: “Great, what do I owe you, this’ll be on my debit card”
John: “No worries, we’ll just send them. Thanks for your business”
I have been treated unexpectedly well by Calvert on multiple occasions now. I can’t say enough how much I appreciate those guys and the way they go about their business.
 
Last edited:
Good companies should always get as shout. I've have similar results from BME rods, Isky, Trend, and Trans Go. All have gone above and beyond at Zero cost to me.
Doug
 
Calvert customer service strikes again. I called them this morning and asked if I could source a couple of the shock absorber bushings to replace the worn lowers in my CR shocks.
John Gay: “No problem, we’ll just send a set out to you”.
Me: “Great, what do I owe you, this’ll be on my debit card”
John: “No worries, we’ll just send them. Thanks for your business”
I have been treated unexpectedly well by Calvert on multiple occasions now. I can’t say enough how much I appreciate those guys.
Couldn't agree more, Calvert's been great to deal with and that is a increasingly hard thing to find these days. Quick question, you mentioned in an earlier post that Calvert had a way to deal with the U.S. car tool hangers being narrow, i have the same problem, what was the solution?
 
Couldn't agree more, Calvert's been great to deal with and that is a increasingly hard thing to find these days. Quick question, you mentioned in an earlier post that Calvert had a way to deal with the U.S. car tool hangers being narrow, i have the same problem, what was the solution?

Same here. Originally my kit came with A body lower bars in error. My set up is an E Body. Sent replacements at no charge. Told me to keep the wrong ones. Then once I had everything bolted together my shocks were too long. I had there -1" lowering springs. They swapped them out at no charge to me. Great customer service in my opinion. I will always recommend their products.
 
Auto Transport Service
Back
Top