• When you click on links to various merchants on this site and make a purchase, this can result in this site earning a commission. Affiliate programs and affiliations include, but are not limited to, the eBay Partner Network.

Gorilla Glue problem potentially solved yesterday . . .

I tried a few aerosol cans, but they don't last long, and the last one I had - the nozzle snapped halfway through the job. I only use the Pro Gun now...more expensive, but works better.
2p90 if you want a good glue.
 
A more righteous use of Gorilla Glue:
Used to make wax rounds and shot them with a 357. They wouldn't stay together with anything more than a 1/2 load of powder. They didn't penetrate anything but they would sure let you know you got hit with something!

For all i know they used Gorilla Glue, super glue, on me, on the long incision they had to do opening me up, and putting my skin back together, after my recent heart surgery.
Apparently you don't get stitched together anymore, but glued back together, with thin surgical tape over the glued incision, until it falls off, or you remove it, after a certain days time frame.
Can't even tell that i got opened up, the incision, is so fine.
Wonderful things they do, in medical science in this modern day and age.
Came thru the surgery pretty good.
Woke up alive, again this morning. lol
Surgery was done November 30th.
Wish they could have done that with the chunk of skin they removed from my forehead!
 
Used to make wax rounds and shot them with a 357. They wouldn't stay together with anything more than a 1/2 load of powder. They didn't penetrate anything but they would sure let you know you got hit with something!

Wish they could have done that with the chunk of skin they removed from my forehead!
That would be scary to most.
 
He was beautiful and unique.

Honestly seeing him in person wasn't that great... He'd been in captivity long enough that he wasn't real impressed with living his life on a stage... Mostly he hid in a secluded area & when he came out he did two things, he slung poo at the spectators & he smeared crap on the glass so people couldn't see in....
 
Honestly seeing him in person wasn't that great... He'd been in captivity long enough that he wasn't real impressed with living his life on a stage... Mostly he hid in a secluded area & when he came out he did two things, he slung poo at the spectators & he smeared crap on the glass so people couldn't see in....
:lol:lucky he didn't get you, he have a sad life story, captive as a baby, sold and pretty much spend his hole life in a zoo, he was beautiful because he's still the only albino gorilla in the world, that made him unique, i think.
 
:lol:lucky he didn't get you, he have a sad life story, captive as a baby, sold and pretty much spend his hole life in a zoo, he was beautiful because he's still the only albino gorilla in the world, that made him unique, i think.

He was undeniably special, beautiful and really cool, but his albinism caused health issues so while it was sad that he lived in captivity chances are if he'd lived it the wild he wouldn't have lived nearly as long as he did.... The dilemma for a longer life or freedom...
 
Last edited:
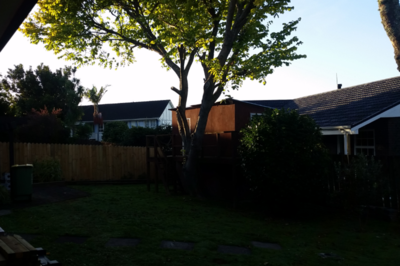
Here are some pictures of the shed build....started with the part slab that was hand mixed by my brother about 18 years ago - he built a two-story playhouse for my kids. The underneath was used to store the lawnmower and firewood etc. Sadly, the plywood starting going bad, and the tree wreaked havoc upon the roof eventually. There once stood a huge Elm that spanned both sides of the boundary, as well as touching the peak of the house roof behind us. My wife and I took to it about 4 years ago, and then I got the Pro's in 3 years ago when the local authority announced open season on any trees of no interest. Chop and gone now. :)

See how much higher the tree is compared to our house....the rear gutters rotted out due to the continual dropping of leaves...
upload_2021-3-22_21-53-11.png


After a severe trimming 4 years ago...chainsaw and a ladder...that entire yard was 6 feet high was branches stacked everywhere...ready for chipping

and then the Pro's came in and removed the three big trees for me....all over in 4 hours....instead of the 4 days it took my wife & I to do some initial trimming.
upload_2021-3-22_21-57-7.png


It took another year to get all the fences replaced slowly - I di it all myself....neighbours were conveniently inconspicuous
the entire time. Then when I had the driveway and pathways around the house replaced, I had the guys extend the original playhouse slab for the shed...
upload_2021-3-22_21-58-55.png


First job after the fences were done was to dig in a drain coil around the perimeter...we get one or two downpours of rain a year, and the yard fills up fast. I didn't want to take any chance...so I started at the bottom corner around 2'6", and tapered up to about 1' behind the shed corner. Pre-socked drain coil was used...it was hard going - all by hand with a pick and trench spade. Took me about 2 weeks each night after work.
upload_2021-3-22_22-3-24.png


Back-filled the trench with scoria rock. All barrowed in from the driveway...by me. :rolleyes:
upload_2021-3-22_22-4-38.png


Tree roots made the digging most entertaining...
upload_2021-3-22_22-5-42.png


The original slab hadn't fared too well over the years....so I dealt with that just last week or so. Framed up with treated 2"x4", and long galvanised screws into the existing posts, then edged all the gaps with the foam, and screed mix....with final coat of self-levelling compound...pics of that later on.

At the beginning of November just gone, I got a call to say the shed components were ready.
upload_2021-3-22_22-9-24.png


upload_2021-3-22_22-9-53.png


So it was time to start the assembly...
upload_2021-3-22_22-10-48.png


:) upload_2021-3-22_21-54-24.png
 
That last pic is out of sequence... :lol:

So I opted for the 'outer hung' option - where the timber frame sits on top of the slab, and the supporting floor channel is screwed to the outside of that frame. That meant I could still have the maximum available size of a footprint, while having full control over the level of the channel for a much squarer finish on the completed walls. Framing has self adhesive water-proofing tape underneath.
upload_2021-3-22_22-14-13.png


First end section ready for erection...I have only been involved in building one of these - with my Sparkie buddy and a qualified builder who has assembled a couple of these...so I was doing this carefully and methodically. :D
upload_2021-3-22_22-15-19.png


Sections for one end and the back wall cut and sized - pre-painted the exterior to keep the neighbours happy....
upload_2021-3-22_22-17-33.png


BTW...the insulated panels are Fire Resistant, so they are allowed to go near the boundary like that.
upload_2021-3-22_22-18-42.png


I came up with an idea of a couple of corner braces which could be removed when the entire shed was complete with the roof - it worked great....
upload_2021-3-22_22-20-5.png


upload_2021-3-22_22-20-35.png


upload_2021-3-22_22-20-58.png


upload_2021-3-22_22-21-22.png


It can get technical cutting those angles, and shortening the panels....you can only cut once....:D The protective plastic film is your best friend here....
upload_2021-3-22_22-24-25.png


:)
 
Starting to feel quite cosy now...
upload_2021-3-22_22-26-3.png


upload_2021-3-22_22-28-4.png


As the factory was so busy, the salesman said I could build my own doors, and also save about $1100 in the process. I see now why the doors cost so much. So I put some thought into how best to build them. I used the off-cuts of the opening, and gave myself the biggest door for the one that would be opened the most. The biggest opening was on the side of the smallest cut, so it works out well.
Starting with the inner trim channel, I mounted the 3 x hinges to that and put 2 screws in each hinge. Then I could see the opening action was going to work. Next I riveted a cut door to the hinged channel. After the panel was fixed, I then went around the door and fixed on all the other side channels.
upload_2021-3-22_22-32-40.png


The hardest part of this project is to get the time in between work and other chores so I can dedicate some time to completion. I ended up having to take a few days off from doing the casual jobs and get this finished before the rains come.

upload_2021-3-22_22-25-3.png
 
Expanding foam applied to all gaps, and then finished with a layer of silicone
20210320_134813.jpg
20210320_134824.jpg

20210320_134840.jpg


Close to 1,500 rivets in the entire building now :)
20210320_134850.jpg
20210320_150249.jpg


Cement screed used to fill the patchy original slab where it was rough, and then topped off with self-levelling compound.
20210320_182124.jpg
20210320_182131.jpg
20210320_182147.jpg


Carpet at last.....man that roller is heavy....something in the vicinity of 100 pounds.
20210321_172112.jpg


This was the last picture I took before going to a Trade Show this afternoon. One patch of self-levelling compound needed a bit more dry time from last night.
20210321_172131.jpg


Started moving my racking in today....now I can start emptying my garage at last. :bananadance::bananadance::bananadance::bananadance::bananadance:
 
Last edited:
My weapons of choice..... For those who are wondering....

upload_2021-3-22_22-53-48.png


upload_2021-3-22_22-54-20.png


upload_2021-3-22_22-54-49.png


This was what I practiced on before my own shed....in a Quarry, on the top of a wind-swept hill, perched on the side of a cliff, with all four seasons in one day....rain, horizontal rain, near gale force winds, blistering sunshine, more rain, and dust storms....great fun.
A real tiring weekend that was - built the shed around the distribution board that had to remain in operation and in position.
upload_2021-3-22_22-58-16.png


Replaced the old steel clad wooden framed 'structure' that was nearly rotting into the ground. First time I went inside there was about 4 inches of dust on every ledge and the floor. It took two of us about 3 hours to clean it....and it all came back within days. :cursin:

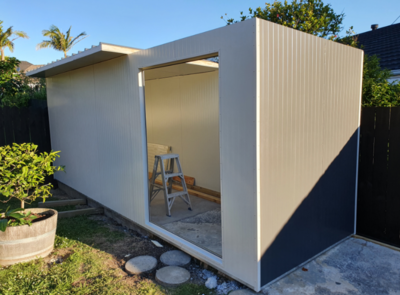
Now, the shed is locked, and dust free, warm and dry...just how it should be. :thumbsup:
 
That last pic is out of sequence... :lol:

So I opted for the 'outer hung' option - where the timber frame sits on top of the slab, and the supporting floor channel is screwed to the outside of that frame. That meant I could still have the maximum available size of a footprint, while having full control over the level of the channel for a much squarer finish on the completed walls. Framing has self adhesive water-proofing tape underneath.
View attachment 1087117

First end section ready for erection...I have only been involved in building one of these - with my Sparkie buddy and a qualified builder who has assembled a couple of these...so I was doing this carefully and methodically. :D
View attachment 1087118

Sections for one end and the back wall cut and sized - pre-painted the exterior to keep the neighbours happy....
View attachment 1087119

BTW...the insulated panels are Fire Resistant, so they are allowed to go near the boundary like that.
View attachment 1087120

I came up with an idea of a couple of corner braces which could be removed when the entire shed was complete with the roof - it worked great....
View attachment 1087121

View attachment 1087122

View attachment 1087123

View attachment 1087124

It can get technical cutting those angles, and shortening the panels....you can only cut once....:D The protective plastic film is your best friend here....
View attachment 1087125


:)
Is that the New Math?
 
Now THAT'S a shed! Great job Roger! Interesting design. I like it and you were very conscientious in building it, attention to the details so it will last. Impressive.
 
Auto Transport Service
Back
Top