• When you click on links to various merchants on this site and make a purchase, this can result in this site earning a commission. Affiliate programs and affiliations include, but are not limited to, the eBay Partner Network.

68 Road Runner Project-First Mopar

Cool. I'm guessing those are boats?
I thought everyone in Los Osos owned a boat and knew each other? lol. Nice little town sort of out of the way and not many people really realize it is there since Morro is right next door.
They are boats, Don Radon has been building boats down in Goleta for decades. Many of the commercial divers in SoCal are running them as well as some sport fisherman. Pretty distinct looking and super tough, ride like tanks. I had one of the 26' Andersons for several years and it was the same way, the rougher it got offshore the more it liked it.
 
I was just looking at your paint booth, do you have the plans for that thing? :) I am looking at going the same route and some of the guys on here have done a great job on fabricating home built paint booths. My neighbor has a 68 Cuda to paint and so he was asking if I was interested in going halves on one of those inflatable booths but I kinda think the rest of the neighbors might frown on us painting cars in a inflatable booth in my front yard :)
I over killed the CFM on the Dayton fan I bought. Had to make a baffle to choke it down. It was like a Hurricane in the booth before I did that. Still sucked a lot of paint to the filter's. If you surf paint booth on the computer their are CFM to square foot calculations on paint booth's Height X square foot. This will give you a CFM figure. Have a friend he used a box fan. But I was wanting explosion proof fan. Found this one on E bay and went and got it. Put my own fan motor on which it did not have the motor or belt. So we can do any thing we want if we put our mind's to it. Good luck
 
But I was wanting explosion proof fan. Found this one on E bay and went and got it. Put my own fan motor on which it did not have the motor or belt. So we can do any thing we want if we put our mind's to it. Good luck

Not to get off subject, but explosion proof fans are rated assemblies. Replacing the motor makes it no longer explosion proof unless replaced with another explosion proof motor by the same manufacturer and wired with proper conduits and seals.
 
I thought everyone in Los Osos owned a boat and knew each other? lol. Nice little town sort of out of the way and not many people really realize it is there since Morro is right next door.
They are boats, Don Radon has been building boats down in Goleta for decades. Many of the commercial divers in SoCal are running them as well as some sport fisherman. Pretty distinct looking and super tough, ride like tanks. I had one of the 26' Andersons for several years and it was the same way, the rougher it got offshore the more it liked it.
I never got into boats, other than rides. My bag has always been 4 wheels. You are correct that not many people know this town which makes it nice. My place is 1/4 mile or so from the bay. We can see a good portion of it, the rock and stacks plus some of the sandspit from the deck. Like now, the roar of the waves breaking on the sandspit is a very nice background noise. Back on booths. I'm going to need to do one in the future too for my ride. Have to watch for options.
 
I never got into boats, other than rides. My bag has always been 4 wheels. You are correct that not many people know this town which makes it nice. My place is 1/4 mile or so from the bay. We can see a good portion of it, the rock and stacks plus some of the sandspit from the deck. Like now, the roar of the waves breaking on the sandspit is a very nice background noise. Back on booths. I'm going to need to do one in the future too for my ride. Have to watch for options.
I tried to search the forums here for the thread I found with the great spray booth but to no avail. Like blue69 eluded to is there is almost an art to figuring out the fan size ect. I did run a search over on the Southern Polyurethane forums which quite a few of the guys on here post on also and there are some great threads on booths and fan size.

http://www.spiuserforum.com/index.php
 
Not to get off subject, but explosion proof fans are rated assemblies. Replacing the motor makes it no longer explosion proof unless replaced with another explosion proof motor by the same manufacturer and wired with proper conduits and seals.
The motor is on the out side of the paint booth. It is mounted on the out side of the drum that the fan is in. So that makes it explosion proof. Vapors can not get to the motor. Box fans are not explosion proof the motor turn's the fan by the blade affixed to the motor so the vapor's pass over the motor. Don't know how many I have wired up over the year's. Squirrel cage fan's also are not explosion proof if the cage is mounted to the motor.
 
I have been thinking about other parts of the car while doing the body work. I have pretty much settled in on a disc brake kit and narrowed it down to Dr Diff or SSBC or maybe even a set from Pirate Jacks. Sunday morning while waiting for my wife to get ready for church I did a quick spin through ebay and saw a set of 73 Cuda spindles with no bids and 2hrs left. Starting bid was $125, I thought what the heck for $125 I would take them but figured at the last second someone would snipe them. I bid $125 and go figure we get home from church and I am the proud owner of a set of Cuda spindles. So now I am going to piece the front disc together and save a few bucks. There is a great thread here on the boards for that exact swap. I also picked up the sliders from a member here on the boards, Dr. Diff has the caliper kits really reasonable so it has all worked out so far.


View attachment 1090425View attachment 1090426View attachment 1090427View attachment 1090428
Nice project you got there, Keep it Up!
I know the pain of getting a dismantled car in a pile of boxes. Bits and pieces missing, parts from other cars..
What is the advantage of using e-body spindles and do you have a link to this thread on here?
 
Nice project you got there, Keep it Up!
I know the pain of getting a dismantled car in a pile of boxes. Bits and pieces missing, parts from other cars..
What is the advantage of using e-body spindles and do you have a link to this thread on here?
I didn't bookmark that thread either (not sure how to) but here are a couple of articles outside the forum. The kits make it easier and all the parts are there and are supposed to work well together but that comes with a price tag-not to mention some of the spindles are Chinese made which just doesn't do it for me. I like the idea of keeping the swap mostly all Mopar although I also realize it will be impossible to get away from Chinese parts. The rotors I found are Raybestos and are made in Canada so that is a plus not sure about the calipers I need to call and see. The botton line is cost and being willing to piece it together. I see advantages both ways.
I have found that the worst part about getting a car in boxes is when there are parts in the boxes that go to other cars/trucks. That really throws you off! After the GTO I swore off resurrecting piles of parts but here I am again I guess it is really not as bad as I like to whine about. Sort of like the challenge-

https://www.allpar.com/threads/disc-o-tech-stop-on-a-dime.237038/#post-1085245451

BTW I saw the thread on your ride-looks great, very nice work!
 
I was hoping to get the first coat of 2k primer on the car before I left for Idaho in the morning but it seems like there were a ton of things pop up at the last minute-plus I promised my wife she could park in the garage while I was gone so I shot everything minus the front clip and then put most of it loosely back together so I could get her in the garage. I sure miss having a shop but this will have to do for now I know other guys work with less space than I have. I did a little blocking with 220 on the left quarter and all the blocking I did with the polyester primer paid off that thing is straight as it can be. One more coat of the 2k and some 600 and it will be paint ready..............really need to figure the booth thing out.
IMG_1433.jpg

IMG_1432.jpg
IMG_1431.jpg
 
Since I got back from Idaho I have not posted any progress on the car so I thought I would do a short update. I took a few days off after getting back.....driving fence stakes and stretching barbed wire was a little more work than I remember or maybe I was just younger last time, lol. I finally jumped in and shot the rest of the car with 2k primer and sanded it down with 400/600. Over all it looked pretty good but after I washed it I could really see some areas that needed some attention and so I had to go back and shoot a little more primer and do some sanding. I think it is pretty much ready for color now. I also jumped in and sealed all the seams, I read about 10,000 posts on seam sealer and settled in on 3M urethane for all the interior seams and SEM on the exposed areas. I wrestled with using 2k seam sealer but just decided 1k was fine. Funny the things you notice when you are sealing seems.....I realized that somewhere along the line the passenger floor pan was replaced and there was no seat belt anchor thanks to hunt2elk here on the board I had an anchor in my hand in 3 days! Pretty awesome. As it stands now I will go over the car inch by inch one more time and then start getting some color on the car latter part of the week. Thanks to a couple of other members on here I have a pretty good idea of the best sequence to paint the car in. I did get the BC/CC last week-putting my money where my mouth is I purchased Motobase and SPI clear. Quite a few members on here and on the SPI boards use this combo and gave it rave reviews. My car has an unusual color combination and I was thinking about changing the interior color but after talking with Frank Badalson on the phone he really thought I should keep it original since it was unusual so I will call Chad's back up tomorrow and order the Burgundy paint for the interior. W1 exterior with R code interior.

Paint.....since I paint one car every 4 years I was really trying to figure out the most cost effective makeshift paint booth to build that would do what I wanted. What I came up with is not ideal but I figure it will do the job. I can put it up in an hour and tear it down in about 45 minutes. I put some 3/16 cable about an inch off the ceiling ($9 at HF) and will hang a white tarp on it. I picked up an explosion proof confined space fan on Craigslist that pulls 3500 CFM. I have 4 more LED lights on order from Amazon, 2 more on the ceiling and 2 on stands inside the "booth". It is not "air tight" but I can control the environment at least. I did hang one tarp and oh man the white tarp really reflects the light better than the clear plastic would.


IMG_1479.jpg
IMG_1503.jpg
IMG_1502.jpg
IMG_1501.jpg
IMG_1488.jpg
IMG_1492.jpg
IMG_1489.jpg
IMG_1498.jpg
IMG_1483.jpg
 
Here are a few of the makeshift paint enclosure we will see how it works.........the plan is to do 3 sides leaving the garage door side open. I will give the garage a good cleaning to get the cobwebs and dust cleaned up as much as possible before painting anything. I also plan to put the red rosin paper on the floor rather that plastic then tape the white tarp to the paper. Plastic is probably cleaner for the floor but slippery when wet.


IMG_1497.jpg
IMG_1496.jpg
IMG_1495.jpg
IMG_1494.jpg
IMG_1491.jpg
IMG_1490.jpg
 
Jumped in today and shot the trunk and the inside of the doors. The pic does not do it justice but the trunk turned out nice. I ended up picking up the door paint locally just so I could get it done, the color is a little off it should be more Burgundy and less red so I will shoot them again later. By the end of the week I want to have the engine compartment shot as well as the bottom side of the car. We will see how that goes.

IMG_1508.jpg
IMG_1507.jpg
IMG_1505.jpg
The next
 
That red looks good to me. What's with the chrome looking shiny spot on the upper of the drivers door?
Trunk pan looks great, is that original?
Looking at the floor pan, did you install frame rail connectors?
Sorry for the 20 questions. You and I are sharing the same mud pit at this point.
 
The shiny spot is just the sunlight reflection from the garage window....No frame rail connectors trying to keep it as original as possible. The trunk pan and the passenger side floor pans were replaced before I purchased the car but whoever did it did a pretty good job replacing them with the exception of installing the gas tank strap hanger brackets, spare tire hold down and the seat belt anchors, or drilling any holes for the fuel tank vent.

The red looked good in the can and even as sprayed on the base coat it looked like a decent match, I knew it was off a little but wasn't to concerned since all of the interior parts were getting painted but as soon as the clear went on the red really popped. When you compare the rear upper door panel piece and the door they are off considerably. I had it mixed to the 68 Plymouth R interior code which is what my fender tag indicated, PPG missed this formula. In the next day or so I will take an interior piece down with me and have them match it at the paint supply store like I should of done at first.

No worries about the questions that is why we all post on here, to help each other.

IMG_1509.jpg
 
Crazy how the light is reflecting in that door pic. I get it.
Why not just shoot the interior quarter trim panels to match the doors?
 
I thought about it since all the interior pieces including the dash will get painted but the seats have burgundy inserts and I was concerned it wouldn't match the dash pad. I took the quarter trim panel up to the paint store today and they did the digital scan/match. Says that color is a VW color now, too funny, anyway I have the door sanded and masked off again and will shoot it again tomorrow - Since the quarter trim will eventually get stripped I did take a small brush and apply a little paint to the lip right above the part number, perfect match.


IMG_1513.jpg


IMG_1512.jpg
 
Last edited:
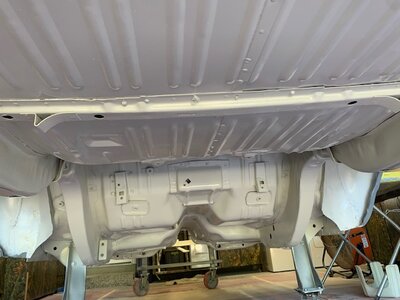
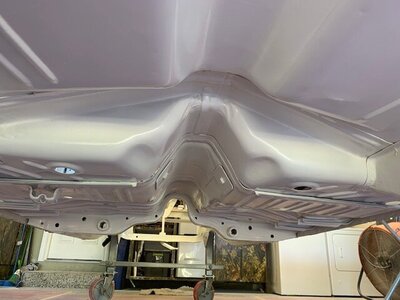
Moving right along re-shot the doors and did the inner fenders today. I really wish I had a rotisserie....tomorrow I am going to spend the day laying on my back prepping the bottom of the car to spray. I want to do the engine compartment and the bottom of the car the first of next week and hopefully tackle the entire car by the end of the week.


IMG_1518.jpg
IMG_1520.jpg
IMG_1519.jpg
IMG_1514.jpg
IMG_1515.jpg
 
That's going to look really sharp and be very unique: White with a dark red/burgundy interior. I like! :thumbsup:
 
Busy day today but I am happy with the progress. Nothing like painting on your back.....That $1200 I was too tight to spend on a rotisserie was looking real cheap about half way through.

IMG_1530.jpg
IMG_1529.jpg
IMG_1528.jpg
IMG_1527.jpg
IMG_1532.jpg IMG_1531.jpg
 
Last edited:
Auto Transport Service
Back
Top