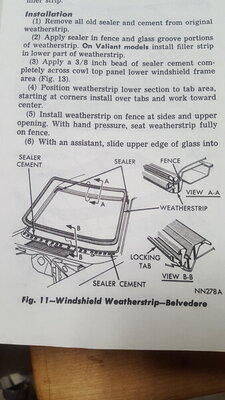
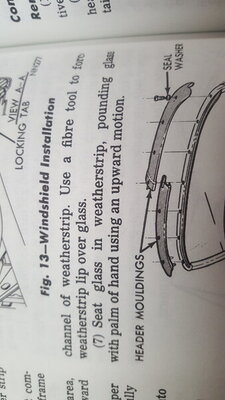
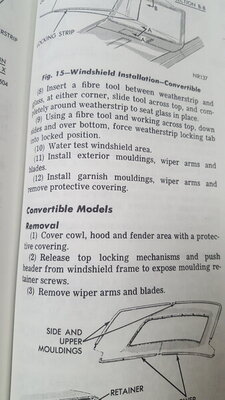
Going to put the front windshield on the 69 runner this weekend. Question on weather to use butyl or urethane calking. Had found a video on U tube of guy's putting on in a Supper bee. But now can not find it on U tub. I liked what they did in the video to keep it from leaking and would love to find some pointer's. Found an old post on this site and was informative. Here you should flood the lower corners with calk before setting the glass in to the channel. Also run a bed down the A pillar's and across the top. Then saw they ran the calk in the gasket around the window once in. So Still wondering if I am missing any thing. Blue.
You are using an out of date browser. It may not display this or other websites correctly.
You should upgrade or use an alternative browser.
You should upgrade or use an alternative browser.
Front windshield install.
- Thread starter blue69runner
- Start date
- Local time
- 7:22 AM
- Joined
- Jan 29, 2018
- Messages
- 19,372
- Reaction score
- 63,268
- Location
- Midland Ontario, Canada
All covered starting here..
http://www.dodgecharger.com/forum/index.php/topic,121731.msg1595156.html#msg1595156
If I was doing it again and had a helper I'd slide the window up into the seal and then flip the bottom in, vs putting the bottom in first.
http://www.dodgecharger.com/forum/index.php/topic,121731.msg1595156.html#msg1595156
If I was doing it again and had a helper I'd slide the window up into the seal and then flip the bottom in, vs putting the bottom in first.
So putting the gasket on the glass first is what I have seen then like you say put the bottom in. I know that the new glass is probably not as thick as the original glass. So think it would be advised to run a bead of calk into the seal before setting the glass into it. Right. Other question can I go ahead and install my A pillar trim inside and the upper front headliner trim in side.
- Local time
- 7:22 AM
- Joined
- Jan 29, 2018
- Messages
- 19,372
- Reaction score
- 63,268
- Location
- Midland Ontario, Canada
NO you can not put the gasket on the glass first!
You obviously didn't bother to follow the link..
You obviously didn't bother to follow the link..
Ok I will go back and watch the old post I found when surfing the net. It was the vert. he put the glass in.
- Local time
- 7:22 AM
- Joined
- Jan 29, 2018
- Messages
- 19,372
- Reaction score
- 63,268
- Location
- Midland Ontario, Canada
So you're not interested in the link I provided? Carry on...
Basket case
Well-Known Member
wonder if you'll break three or four glasses like you did doing the back window.....
Butyl caulk all along the lower half of the frame. And I used it in the rubber channel as well. I did my windshield myself. No leaks. Took some back and forth to get it in the gasket. I started on the bottom.
65-440
Well-Known Member
- Local time
- 9:22 AM
- Joined
- Dec 2, 2009
- Messages
- 3,378
- Reaction score
- 3,019
- Location
- virginia beach, va
BUTYL !! .... lay a double bead along the bottom channel, also put a bead inside the rubber before pushing it onto the pinch welds along the sides and top. Also laid a small bead inside the rubber before putting the glass inside the seal...nothing beats a dry interior!!!
747mopar
Well-Known Member
I had mine professionally installed 3 times before I said F it and did it myself... Do not jump into this without researching it like my installer did! He never read up on it to know that the gasket requires the use of bedding compound along the bottom. Never having done it before it was an absolute mess but I got it done and it's now sealed.
No Dadsbee I did look at the link thank you very much. It will be help full. Always appreciate any help I can get.So you're not interested in the link I provided? Carry on...
That's the way the FSM says to do it. I always did the bottom first. I did do my last one top in first and it was a challenge. I base that on my wife as a helper and a new rubber. I think if I used my old one it would of been easier. The other problem I had was my final area to get the glass to drop in. As luck has it the lower left corner is where the rummer seal was butted together. That butt seam was stupid tough to get the glass seated. I got it done but worked up a nervous sweat doing it. Another possible item was this new glass. Who knows how exact it is compared to the OEM.All covered starting here..
http://www.dodgecharger.com/forum/index.php/topic,121731.msg1595156.html#msg1595156
If I was doing it again and had a helper I'd slide the window up into the seal and then flip the bottom in, vs putting the bottom in first.
Thanks for all the input on installing the window. Good to here from experience learned. This will be help full. Do have a friend that install's automotive window's for a living and he helped me put the back window in. So with all the input this should go smooth. Blue.
So here is the old saying if you don't first succeeded then try try again. We car builder's don't give up and this is the proof of that. Their is a learning curve to every project. This is my biggest one in restoring the runner. Every thing else I did on the car has come out fine. It was not sent to a shop to be done. It was done in my shop at home by me. So the cost of a mistake is expensive and learn from them. Would pass on the advice to other's when working on their car. Be ware of after market metal. So here is the final results of not giving up no matter the cost it got done.

65-440
Well-Known Member
- Local time
- 9:22 AM
- Joined
- Dec 2, 2009
- Messages
- 3,378
- Reaction score
- 3,019
- Location
- virginia beach, va
**** the back glass is cake, it just sits there!
4406bbl
Well-Known Member
Notice the black sealer in the upper corners also, that was a big leak area when the glass shop hero's did these half assed back in the day. Run the bead 4" up from the bottom also of the lower corners, or it will leak when driven. 8509 3m is the bedding compound, do not use urethane. Do not use bedding coumpound between the glass and the rubber, clear glass sealer goes there, and should at the very least be in the 4 corners. Permatex 81730 is one that will work, 3m no longer males one that I could find.


All covered starting here..
http://www.dodgecharger.com/forum/index.php/topic,121731.msg1595156.html#msg1595156
If I was doing it again and had a helper I'd slide the window up into the seal and then flip the bottom in, vs putting the bottom in first.
In that link, post 654 he talks about a rope. I've done several A bodies and the difference is the rubber goes on the glass first.
Ropes work good for that type.
I've done one B body in which the gasket goes in the car first.
In fact, I put the glass in more than once due to leaks.
I tried a rope.
It doesn't work. The rope will just pull out of the rubber.
Even if you try sections. There is nothing to contain the rope in the inner radius of the rubber gasket.
I tired it both ways.
Top first like the factory says didn't work any better than bottom first.
And I had a helper.
You made it look easy.
- Local time
- 7:22 AM
- Joined
- Jan 29, 2018
- Messages
- 19,372
- Reaction score
- 63,268
- Location
- Midland Ontario, Canada
Rope trick does not work on a glass into a rubber gasket and nowhere did >I< say it did. The poster in 654 has never done one to our knowledge... and as you'll note in post 655 I told him that might work for a Bronco !
Ok now have had the window in the car for over 3000 plus miles on the car. Had it leak once and put Urethane around the window area of the gasket. That fixed it but now after washing the car this weekend and taking it for a drive noted water dripping on my pants leg and under dash felt water in the grove under there. Any ideas on what or where it could be leaking. 
Similar threads
- Replies
- 2
- Views
- 369
- Replies
- 28
- Views
- 2K
- Replies
- 7
- Views
- 959


