• When you click on links to various merchants on this site and make a purchase, this can result in this site earning a commission. Affiliate programs and affiliations include, but are not limited to, the eBay Partner Network.

Lookie what $5000 buys you....

I just uploaded the video of the day that I brought it home, Sept 5th 2019. As soon as it finishes downloading, I'll post a link.

Boom......


I got tickled watching this. I can just imagine Greg's teacher being asked about him:
"Well, Greg always was an excitable boy..." :lol:
 
I had a few successes today!
The Fel Pro valve cover gaskets arrived and I put them in using The Right Stuff sealant. It looks like the leaks there are gone.
I got the speedometer working. The cable just wasn't pushed onto the speedometer "snout" quite enough.
The gas gauge works!
The ground strap on the fuel line wasn't making a good enough connection. It is now. The gauge reads just like it did when I had this cluster in Ginger....With about 4-4 1/2 gallons in the tank, the gauge reads empty. Oooof. These damn aftermarket fuel sending units! At least it works like it did before and with it reading lower than the actual amount, it serves as a warning of getting fuel well before it is needed. The other way would be a LOT worse. Who here hasn't ran out of gas in total disbelief....I KNOW that I have more gas than this!
The tachometer works now. THAT is a funny thing...
I watched over this past week at how the tach would sometimes work and most times did not. Today it was intermittent. It worked at idle sometimes but would flicker or drop to zero when I revved it up. I noticed that the ammeter flickered at amount the same rate as the tach would flicker....Related?
Yeah.
I had the wires on the coil reversed. The blue field wire from the alternator is supposed to go to coil positive. I had it on the negative.

383 coil.JPG

The black with yellow tracer was on the positive.
This is why the ammeter and tach were acting the same...I had them on the negative terminal.
Now the tach works along with the speedometer and gas gauge. The water temp and oil pressure gauges are dead. I have 2 other clusters that I can try. As I mentioned before, the faces of them are heavily faded but if I can get those vinyl overlays, it would buy me some time until I restore the panel.
This is the original gauge panel....
XH 101.jpg


This is the one I installed from Ginger:

Dash 4 A.jpg
Dash 4 B.jpg
Dash 4 E.jpg
Dash 4 F.jpg
 
Covid shmovid kinda screwed my plans for my valiant wagon when my machinist closed shop and had my slant six crank, block, and head for like 9 months. Now the shop is never going to reopen because the guy is in his late 70s and I doubt he's coming back.
That is a sad story sorry to here that. I am sure like working on a motor is going to give you covid. People and Goverment are taking this way too far. But yet they want to spend money to bring people from all over the world that have not been tested or even gotten their shot's. So what is up with that. Sorry just to mad over the hole deal.
 
I tried another gauge cluster to see if they worked any better than the set that I cleaned up and polished.
Nothing worked. I found that odd.
Today I rigged up a few wires and batteries....

gauge 1.jpg
gauge 2.jpg

Then tested the gauges individually. The fuel, water and oil gauges...they all worked in both of these clusters BUT the faces are heavily faded.

gauge 3.jpg
gauge 4.jpg

The faces of the gauges in this car now look better. Not new but still better...

Dash 4 E.jpg


The faces of these gauges is held to the housings with small rivets. They are not visible once the clear plastic and the black plastic trim is on. I'm thinking of removing the faces from both the good and bad gauges and using some type of JB weld or small bolts and nuts to hold the good faces to the good gauges.
 
This small rivet could be drilled out or ground down with a Dremel tool.
Gauge 7_LI.jpg
 
I always wondered if that was some sort of brownish funk that accumulates on the white lettering,
something that could be carefully cleaned - or if the silkscreened/printed white lettering ink itself
had discolored forever?
 
I just thought it was faded water based paint. I might try cleaning the faces before I do anything. Nothing to lose, right?

Gauge 11.jpg
 
Cleaning didn't help. The paint was just baked away. I wonder if the sun shining through the window hit the clear plastic and maybe acts like a magnifying glass, putting increased heat on the gauge face.
I started digging into the pieces yesterday.

Gauge 24.jpg


Each gauge is held in by two threaded rods with 3/8" speed nuts.

Gauge 25.jpg


The back side has the mushroomed rivet.
Gauge 26.jpg


A few seconds with this:

Gauge 19.jpg


Grinds off the flared edge...

Gauge 27.jpg


Then you can pry off the face.
Gauge 28.jpg
 
You can see the back side here. Note the sloppy JB weld...

Gauge 29.jpg


Gauge 32.jpg


With the whole she-bang back together, I turned the key and....

Gauge 30.jpg


The oil pressure came up immediately. The water temp did once the engine warmed up.


Gauge 31.jpg


Cost?
Nothing. S C O R E !!
 
In keeping with the LOW dollar theme, I'm just tinkering with a few things,
This car wasn't stripped out when I bought it but it was missing a few things. The radio and face plate were gone, the A/C and heater controls were too. There is no ash tray or map light. The glove box liner was missing but the door was in the back seat. The center panel that has the vent (In A/C cars) was missing too.
I bought a used center panel. For the radio....

Dash 4 C.jpg


I have a broken section that came out of the red car.

Radio 1.jpg

Radio 2.jpg


Nah.....I have another idea. I'll eventually put a stereo in the car but for now, I'm going to make a radio delete plate.
I took a spare panel that usually fits over the glove box door...
Radio 3.jpg
 
It was cut down to match the width of the radio face plate. The mounting pegs on the back were cut off since this will be retained with screws.
Radio 8.jpg


Test fit.

Radio 4.jpg


Holes drilled, then another test fit....

Radio 6.jpg


The lower middle section has nothing behind it and it wants to bend in. I put a section of a paint stirring stick in to see how it looks when straight.

Radio 7.jpg


Radio 5.jpg


If the paint stick doesn't cause a fitment problem with the plastic lower panel, I'll leave it in there for awhile.
What is next? I could put the glove box liner and door in.
I have the heater/deforster to install.
I still have no front sway bar.
I really need to insure and register it so I can drive it on the street. It is too ugly to put in a car show, even for the "Under Construction" category. It looks more like it is Under DEstruction!


Jiggy F 12.JPG


I do need to get that back window installed too.
 
It's the Beatermobile!!!

... or maybe the Amazing Technicolor Dreamboat! :bananaweed:
 
A few little nuggets:
*I started replacing the rear window trim clips. The ones along the top were replaced only because they were bent. No rust or corrosion.
The clips on the right side and bottom channel were too far gone to use, plus I patched in new metal in a few spots last year. There were 2 original clips on the left side that I replaced. I asked elsewhere about the proper positioning of the clips. "Pnora" responded with some advice...Thanks to him.

*The radio delete plate is in...It is just a bullshit temporary cover just for my own amusement. The car will get a stereo with at least 6 x 9 speakers in the rear deck.

*This 3.23 Sure Grip is as loose as a retired hooker. I can't get the car to slide sideways in the dirt! It is coming out. The gear is too soft for the combination anyway. The 280/474 cam isn't huge but in a 9.2 383, I need more gear. I have a 3.91 SG that was in my red car up until 5 years ago. It made a little whine but was tight. This engine idles with almost no lope but sounds great from the exhaust. On the road, it feels a little soft from a dead stop. I may need to check if the distributor has enough advance left in it. I welded the slots last Summer but I wonder if I closed up the gap too much and took too much out in the process.

2 XH F.jpg
 
In my down time, I did a few things with Jigsaw.
First up, I installed a front sway bar. I wanted a solid bar, not hollow. I looked around and found that the Hotchkis and Firm Feel 1 1/4" bars looked great but were sort of spendy.
The Addco and Helwig bars are cheaper but only come in the 1 1/8" size.
I decided to go back and do what I have done a few times before. I modified one from a Chevy truck to work in the 70-72 B body chassis.
I did this for the first time way back in 2001.
 
I love a good deal. I also love making something work on a car that wasn't designed for it. This sway bar cost me LESS than $100 to buy, modify and install.
The following here is a brief tutorial on how to make a front sway bar from a truck fit a 1970-1972 B body, the 70-74 E bodies and even a 1973-1976 A body models.
New sway bars are available for these cars but sometimes they are out of stock or as is the case lately, they are so behind with back orders, who knows when you'll get what you ordered
In 2000-2001 just after I bought my first Charger, I was changing the oil in my '84 Chevy truck and I noticed that the front sway bar was similar in shape to the one in the Charger. The stock Charger bar is just shy of one inch in size, something like 15/16". The 1973-1990 Chevrolet 2 wheel drive ONE ton models came with a beefy 1 1/4" front sway bar. The trucks could be Long bed regular cab, long bed crew cab, flat bed regular cab or flat bed crew cab. These trucks look like this:

0 Chev 1.jpg
0 Chev 2.jpg
0 Chev 3.jpg
 
The reason for this little project is a little about availability and a little about saving money.
These Chevy/GMC trucks are not super common but they do show up at the junkyards occasionally. The designation is C-30 for 2wd (C) and One ton (30).
The 3/4 ton C-20 trucks sometimes have the large 1 1/4" front sway bar but most that I have seen have the 1 1/16". That one is still a great choice for a light A body and all modifications to make the 1 1/4" bar work also apply to the smaller 1 1/16" bar

Note the way that the ends of the bar turn back towards center. Those get cut off.

GM 1.JPG
GM 2.JPG
GM 5.JPG
 
The straight part of the bar fits through the K member in the aforementioned models. It is tight but it does fit K members that are not pushed in, bent or damaged. IF it rubs, thin shims can be slipped in for clearance.

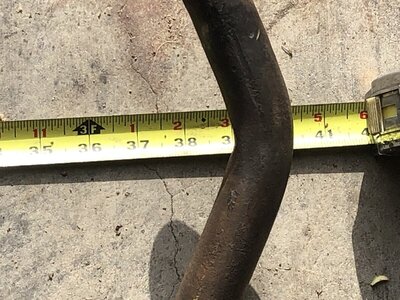
First up, with the car resting on the tires or with jack stands under the LCAs, I measured the distance between the sway bar end link brackets.
I came up with 39".

GM 3.JPG
GM 4.JPG
GM 12.JPG
GM 13.JPG
GM 6.JPG
GM 7.JPG
 
Auto Transport Service
Back
Top