• When you click on links to various merchants on this site and make a purchase, this can result in this site earning a commission. Affiliate programs and affiliations include, but are not limited to, the eBay Partner Network.

Anyone Interested?

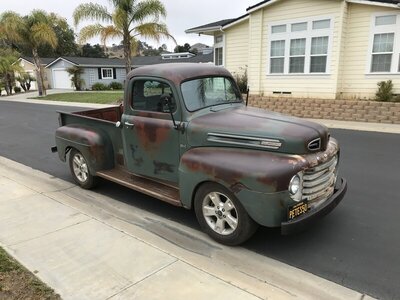
I found mine without a nose. Then I got the front later. It’s a project, but I like a challenge.

8CDDDB97-E766-4594-BBF9-D21D689D0A8F.jpeg
7824256F-D078-4D07-A3C8-C4D4AEF164F5.jpeg
 
You've got a diamond in the rough. Correct
on the challenge. This project has resided
i three different states over the years.
I had the privilege to design some of this
truck when my son was in the sandbox.
20210525_125532.jpg
 
There's a boatload of us Vets here, y'all are in good company, I'm a disabled A.F. retiree myself! Nice looking work!
Thank you, and all here who have had the
honor to serve. My hope was to get my son
involved in something to be excited about,
something to look forward to, and something
to be proud of. His first sargent told me
personally, that my son was "one hell of
a soldier". I knew he would be when he
signed up. My heart is broken, seeing
what he was, compared to what he is
now. Void of compassion, aggressive
in his thoughts, and paranoid that all
have evil intentions. Maybe this isn't
the right venue to bring all this out,
but I love my son.
 
Maybe this isn't
the right venue to bring all this out,
but I love my son.

You show me a Father that doesn't love his son, and I'll show you a man that shouldn't be a Father!
 
The shifter location reminds me of our old 66 D200 when I was a kid. He has some hidden skills with the metal work.
 
I think everyone here loves and respects the military and would love for you to share your story. It wouldn't matter if it was a radio flyer wagon everyone here likes mechanical projects. Post away and I sure hope your son gets well. And thank him for his sacrifice and service to our country.
I'm trying to respond to all those
here
Oh I’m already storing ideas! You guys have awesome skills. There aren’t many of these around so the uniqueness makes them even better yet!

Are you gonna run the headlights out on the fenders, in close to the nose or inset completely? I’m thinking I like them in closer to the nose. That’s how the 39 was. I’m not sure when they changed and moved out onto the fender top.

Edit, I missed that pic! In close it is!
20210815_082703.jpg
20210815_082714.jpg
Placed one on the fender so you can get an idea
what it's going to look like.
20210815_082650.jpg
 
Maybe an "L"shaped bracket and have it sitting square with the world. But I am no engineer or artist!!! It will be a cool ride regardless of how the headlite sits!
 
Maybe an "L"shaped bracket and have it sitting square with the world. But I am no engineer or artist!!! It will be a cool ride regardless of how the headlite sits!
Thanks for your input. It may turn out that
it just doesn't look right to me and I'll change it.
Headlight stands for a 1940 Plymouth truck
are almost non-existent. I'm not much of an
artist either.
 
You both have outstanding skills. Love to see the progress. Please, tell your son that I said, thank you for your service. I thank you both.
 
We're continuing....
Wiring (my Achilles Heel).
I've got a friend who has graciously agreed to
help me with this. He's mapped out all of the
column connections, starting/charging, stop/
tail/turn. etc, and has drawn up a schematic
for future reference.
A painless type of harness wouldn't work in
this application due to the hodge podge of
components, and a mixture of LED and old
style bulbs.The guy is a wizard, and I don't
have the patience.
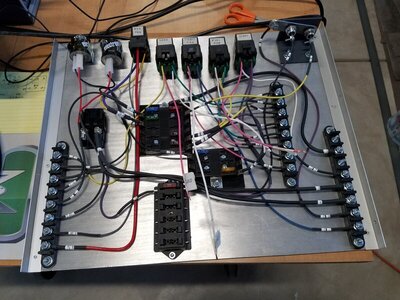
We decided to copy the RTS bus style of a
electrical component placement all on one
panel. (mounted vertically behind the driver)
The battery is a AGM. type, 641 CCA @32 deg/F
mounted to the floor passenger side.
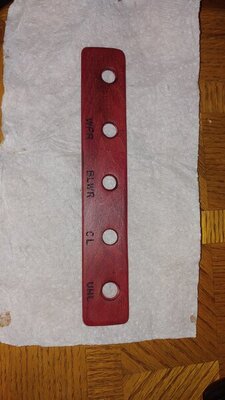
Switches and gauges were mounted in
factory locations. The switch panels are
made from some extra wood blinds I had
with their functions burned in.
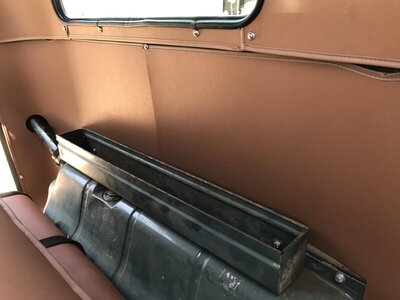
PS.....The emergency brake in the 2nd pic
is the same as used on a HUMVEE.
Snagged it for $5.00 bucks thru an
Army surplus.
If you zoom in tight you'll see the
turn signal indicators in the upper
corners where the switches are.
Small LED's.My eyes are sensitive
to bright lights, hence the location.
Mounted here they're outta my face.

IMG_20210616_220402.jpg

20201218_144146-1.jpg
20210130_091243.jpg View attachment 1153444
ATTACH=full]1153447[/ATTACH 20210430_153454.jpg
 
Last edited:
I like wiring. Just have to be able to concentrate on what I'm doing, be in a good mood. But don't ask me to diagnose. Unless its something simple, I can spend quite a bit of time figuring something out. You are mounting your panel behind the seat like I did on a 50 F1 project I did some years ago. I cut the tank apart so it could be the electronics locker with the flat panel as the mount and the belly as the cover. On that truck, my boss spec'd out using an 04 Explorer as the donor. I used the F1 sheetmetal and grafted all onto the chassis. I had to use all of the oe CANBUS system on it. Took me almost 4 months to get through that portion. It came out good though. I'll make sure I never get ahold of something that complicated again. One thing to ask your friend for when he wires. Add a plethora of grounds. Looking great on the father/son project there.

5FB08842-B134-46D6-98CE-FC462377F0F0.jpeg 19A26452-8E3A-4738-B7DB-4A86C1E99C3C.jpeg
 
Cool idea. Great use of existing components
and available space. Nice truck too.
 
It worked out great for hiding the majority of the components. The old truck don't have enough real estate under the dash to hide stuff like the ppm, fuel pump driver, fuel tank sender interface[ to go with the Classic updated gauges], speedo interface and the 04 Explorer instrument cluster. Had to keep that so the CANBUS system could communicate with the chassis. I was looking a putting the HVAC unit, from Vintage Air, in there too but the ducting was going to be a challenge. Ended up getting it behind the glove box after I trimmed the cardboard box some. The actual fuel fill is in the rh rear wheel tub. Had to make some tubs to cover up the Explorer strut mounts on the back so I got ahold of a filler door from Hagan to fit in the radius and tie into the newer tank with all the emission pieces. I did manage to get the interior fuse block under the dash. It hung down a little but I painted it black, was white, so it doesn't stand out. The battery is behind the rh headlamp in front of the wheel like what the Cirrus/Stratus cars did. Made a box for it to sit in then found some marine grade plastic that I formed into a splash shield to protect it from rocks/debris. Sometime down the road, Bob the truck owner, will get some 17" steel wheels on it that will take the stock 50 covers. I suggested he get them powder coated textured rust brown like you see on outdoor lawn furniture so he would keep the patina going. He pretty much grew up around the truck. It belonged to his grand dad who bought it new. Bob is a Vietnam vet and a way cool dude.
 
I had a pic of a nose section with the headlights mounted right off of it. It looked really good too. I don't remember for sure, but they may have hung on the upset.
 
Thanks. 440
What are you going to drop in? I love that body style.
 
Last edited:
gdrill
I placed the buckets in various locations
looking to get them off the fenders. I've
seen pics where one guy (on a '40 dodge
p.u.) mounted them horizontal high up on
the sides. Looked good, but he had to
remove the hood sides to get it to open.
 
ckessel
Sounds like you've done quite a bit of work
to that F1.
I won't be putting AC or a heater in, though
I did mount a 2 speed blower which draws
air from the cowl vent. This one's going to
be a saturday night cruiser with mom to
right, and occasional run down the strip.
 
Auto Transport Service
Back
Top