Radiator Air Shield Aventures
About this Mopar:
- Year
- 1968
- Make
- Plymouth
- Model
- GTX
Fred the GTX, rescued from a field around 2006 and then bought by my wife and I in 2011.
Previous owner did metal and paint and sold us a "done car", which turns out - he wasn't,
at all...
The last dozen years has been an ongoing project of rudimentary replacement, repair and
general on the cheap fixing up by myself on Fred of every system on the car, inside and
out as budget and physical limitation allows with time.
As a 6-time cancer survivor (and a 3-time "dead in the O.R." living corpse), the car became
much, much more than a hobby to me - it became a way to stay sane as I recovered from
all the many procedures and surgeries to come.
The car is pretty much a mechanical incarnation of me now - parts ain't right, some are
missing, not much has been left original - but what's there still works as well as it can.
DISCLAIMER: AIN'T NOTHING YOU'RE ABOUT TO SEE THE RIGHT WAY TO DO IT. IF YOU WANT TO KNOW THE RIGHT WAY, THERE'S LOTS OF EXPERTS ON FBBO TO SEEK COUNSEL FROM.
I'M FROM THE "SHADETREE SIDE OF THE TRACKS".
This project: Figure out what the funny piece of sheetmetal that came loose with the car is
and where it goes on the car!
(Been on the shelf since I bought Fred, but now's the time to figure out what it is).
Turns out, it's what the FPM says is the "Radiator Air Shield"... ah, so THAT'S what it is!
Also turns out, there's supposed to be a brace between the k-frame and radiator support
under there, too (Fred didn't have that either).
With next to zero bodyworking tools or experience, here we go...

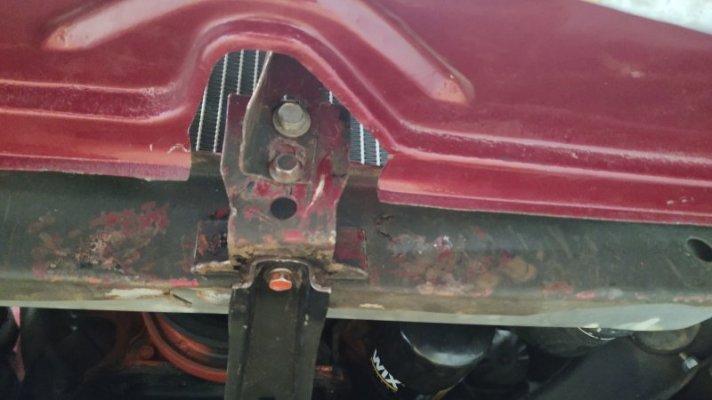
This is the brace that was missing from Fred when bought; another FBBO member had one
when I asked, so it was time to try to install it.
Two bolts, easy peasy right? Well, except for the whole "prior damage from front end
collision" thing that apparently happened in the past....
As you can see in this and following pics, a lot of caveman had to be employed to get the
radiator support in any neighborhood of lining up with the bolt on the brace - and I'm your
boy if simply beating hell out of something is required (I used a Chinese tie-down strap,
along with simple (and heavy) hand tools and wala...).
Brace installed!

Of course, getting the radiator support sort of straightened out meant the next piece in
the chain had to also get tweaked - hello, Mr. vertical grille support!
Poor thing was all mangled and twisted...but hand tools to the rescue once again!
(Yes, I'm well aware all these parts are available repro. "Budget" and "no body man here",
remember?)
Once the brace was finally on and those other pieces somewhat straightened, the formerly
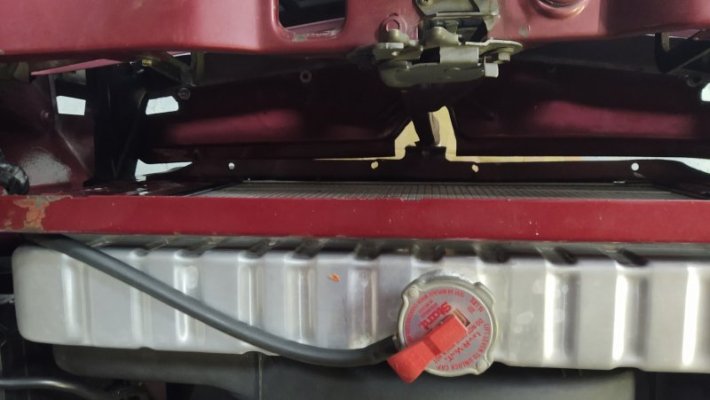
unknown sheetmetal goofy looking painted thing was quickly bolted in place underneath...

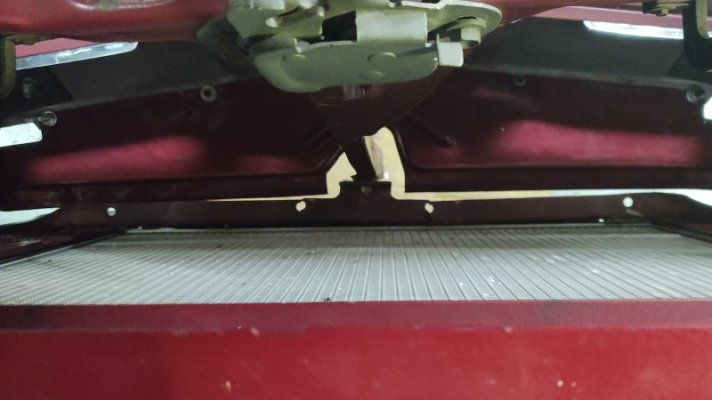
Viewing down from above, you can see all the torn bolt holes in everything from whatever
impact the car had suffered. You can also see how the air shield edge didn't quite parallel the
radiator support lip - but trust me here, it's a lot closer here than it first was!
That poor radiator support lip....damn, man. That looked painful.
The very nice reproduction bumper was the next suspect, since the shield mounts to it....
measurements were taken in the H + V and slight adjustments made until it was darn
close in all directions.
This is what is left for alignment of the shield and I was left with 1)bumper is straight and
plumb or 2)shield has even gap with radiator support.
I chose #1...and ceased all further hackings and bludgeonings.

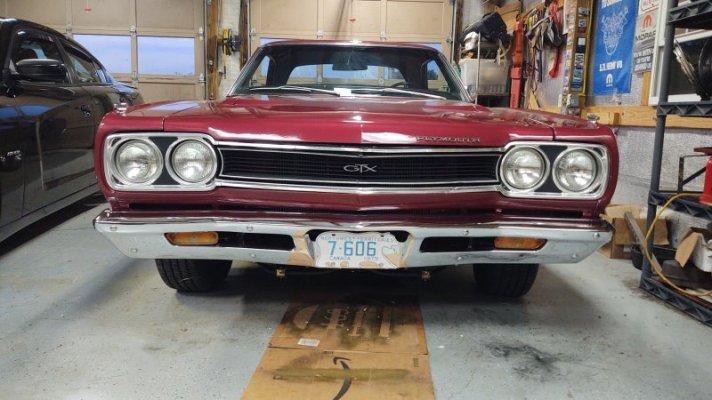
From the outside, Fred looks like ....well, Fred. That bumper is square, level and equidistant
from either sides' side marker light, too. Other than a cracked grille insert he's had since I've
owned him, it's hard to tell anything happened from looking at him square on.
For Fred, that's always been the way - get him functional first, with "as presentable in public
as possible" coming in 2nd place.
Mission accomplished. On to the next half-assery!
Previous owner did metal and paint and sold us a "done car", which turns out - he wasn't,
at all...
The last dozen years has been an ongoing project of rudimentary replacement, repair and
general on the cheap fixing up by myself on Fred of every system on the car, inside and
out as budget and physical limitation allows with time.
As a 6-time cancer survivor (and a 3-time "dead in the O.R." living corpse), the car became
much, much more than a hobby to me - it became a way to stay sane as I recovered from
all the many procedures and surgeries to come.
The car is pretty much a mechanical incarnation of me now - parts ain't right, some are
missing, not much has been left original - but what's there still works as well as it can.
DISCLAIMER: AIN'T NOTHING YOU'RE ABOUT TO SEE THE RIGHT WAY TO DO IT. IF YOU WANT TO KNOW THE RIGHT WAY, THERE'S LOTS OF EXPERTS ON FBBO TO SEEK COUNSEL FROM.
I'M FROM THE "SHADETREE SIDE OF THE TRACKS".
This project: Figure out what the funny piece of sheetmetal that came loose with the car is
and where it goes on the car!
(Been on the shelf since I bought Fred, but now's the time to figure out what it is).
Turns out, it's what the FPM says is the "Radiator Air Shield"... ah, so THAT'S what it is!
Also turns out, there's supposed to be a brace between the k-frame and radiator support
under there, too (Fred didn't have that either).
With next to zero bodyworking tools or experience, here we go...
This is the brace that was missing from Fred when bought; another FBBO member had one
when I asked, so it was time to try to install it.
Two bolts, easy peasy right? Well, except for the whole "prior damage from front end
collision" thing that apparently happened in the past....
As you can see in this and following pics, a lot of caveman had to be employed to get the
radiator support in any neighborhood of lining up with the bolt on the brace - and I'm your
boy if simply beating hell out of something is required (I used a Chinese tie-down strap,
along with simple (and heavy) hand tools and wala...).
Brace installed!
Of course, getting the radiator support sort of straightened out meant the next piece in
the chain had to also get tweaked - hello, Mr. vertical grille support!
Poor thing was all mangled and twisted...but hand tools to the rescue once again!
(Yes, I'm well aware all these parts are available repro. "Budget" and "no body man here",
remember?)
Once the brace was finally on and those other pieces somewhat straightened, the formerly
unknown sheetmetal goofy looking painted thing was quickly bolted in place underneath...
Viewing down from above, you can see all the torn bolt holes in everything from whatever
impact the car had suffered. You can also see how the air shield edge didn't quite parallel the
radiator support lip - but trust me here, it's a lot closer here than it first was!
That poor radiator support lip....damn, man. That looked painful.
The very nice reproduction bumper was the next suspect, since the shield mounts to it....
measurements were taken in the H + V and slight adjustments made until it was darn
close in all directions.
This is what is left for alignment of the shield and I was left with 1)bumper is straight and
plumb or 2)shield has even gap with radiator support.
I chose #1...and ceased all further hackings and bludgeonings.
From the outside, Fred looks like ....well, Fred. That bumper is square, level and equidistant
from either sides' side marker light, too. Other than a cracked grille insert he's had since I've
owned him, it's hard to tell anything happened from looking at him square on.
For Fred, that's always been the way - get him functional first, with "as presentable in public
as possible" coming in 2nd place.
Mission accomplished. On to the next half-assery!