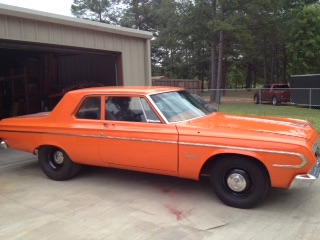
I decided to start this post for my Plymouth Project for the members interested in seeing the progress on my 64 Plymouth.
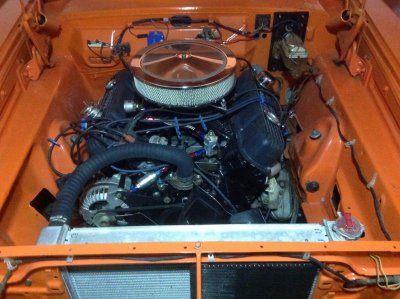
I purchased the Belvedere in April of this year and up until now I've been more less gearing up for the start of the project. Actually I started on it in July, pulling the motor and going through that. The motor was fresh, a 71' 440 block, 452 heads with a torker intake and a 1000 cfm Holley. While being fresh and a mild sounding engine, it is far from that.
A 4.375 stroker crank, JE +.040 dished pistons, and solid Lunati cam were nicely matched up. Being a good foundation the heads, cam and intake set up were removed and replaced with a Comp Solid Roller, Victor Max Wedge Heads and Indy 440-1 2 X 4 intake with a set of 750 Eddys. A set of TTI 440-200 ceramic headers finishes the combo and are tucked away, waiting to go back in.
With all the torque and HP that this 526 wedge is going to lay down a good transmission and diff are a definite need. Fortunately this Belvedere came with this taken care of. The transmission is a fuller rollerized ProTrans equipped with a reverse pattern valve body and a brake. A loose convertor and Hurst quarter stick are already in place, although the finished package will be getting a fresh high stall converter.
Another nice touch with this Belvedere is the Dana sitting on Mopar Super Stock Springs. Internals include 35-spline Moser Axles on green bearings and 4.10 gears on a spool. A 3.5" aluminum driveshaft finishes off the package.
Back to where the project is at now, the Belvedere is totally stripped and booked for the blaster next week. So I'll throw some pictures on this post now to bring the project up to current times and then will post progress info and pictures along the way. The biggest decision so far has and continues to be the finished colour both inside and out..
So follow along members!
- - - Updated - - -
View attachment 211674View attachment 211675View attachment 211676
- - - Updated - - -


- - - Updated - - -


- - - Updated - - -


- - - Updated - - -


- - - Updated - - -
A number of pictures, unfortunately they did not post in order of selection. future posts will be better.
I purchased the Belvedere in April of this year and up until now I've been more less gearing up for the start of the project. Actually I started on it in July, pulling the motor and going through that. The motor was fresh, a 71' 440 block, 452 heads with a torker intake and a 1000 cfm Holley. While being fresh and a mild sounding engine, it is far from that.
A 4.375 stroker crank, JE +.040 dished pistons, and solid Lunati cam were nicely matched up. Being a good foundation the heads, cam and intake set up were removed and replaced with a Comp Solid Roller, Victor Max Wedge Heads and Indy 440-1 2 X 4 intake with a set of 750 Eddys. A set of TTI 440-200 ceramic headers finishes the combo and are tucked away, waiting to go back in.
With all the torque and HP that this 526 wedge is going to lay down a good transmission and diff are a definite need. Fortunately this Belvedere came with this taken care of. The transmission is a fuller rollerized ProTrans equipped with a reverse pattern valve body and a brake. A loose convertor and Hurst quarter stick are already in place, although the finished package will be getting a fresh high stall converter.
Another nice touch with this Belvedere is the Dana sitting on Mopar Super Stock Springs. Internals include 35-spline Moser Axles on green bearings and 4.10 gears on a spool. A 3.5" aluminum driveshaft finishes off the package.
Back to where the project is at now, the Belvedere is totally stripped and booked for the blaster next week. So I'll throw some pictures on this post now to bring the project up to current times and then will post progress info and pictures along the way. The biggest decision so far has and continues to be the finished colour both inside and out..
So follow along members!
- - - Updated - - -
View attachment 211674View attachment 211675View attachment 211676
- - - Updated - - -
- - - Updated - - -
- - - Updated - - -
- - - Updated - - -
- - - Updated - - -
A number of pictures, unfortunately they did not post in order of selection. future posts will be better.
Attachments

Last edited by a moderator:


