• When you click on links to various merchants on this site and make a purchase, this can result in this site earning a commission. Affiliate programs and affiliations include, but are not limited to, the eBay Partner Network.

1970 Coronet R/T Project (Dasfusca's Car)

DasFusca

Well-Known Member
Local time
1:18 PM
Joined
Aug 15, 2011
Messages
269
Reaction score
227
Location
Southern New Jersey
I promise this is about my project. I am new to the site so I wanted to say hey and show you my project.

Some history
In October of 1969 my Mom and Dad bought their first new car. It was A 1970 EF8 Coronet 440. They bought it at IANNACO MOTORS in Waterford NJ. It was an auto with a 318. The car was garage kept and still perfect in 1982 with original paint. I was 16 years old in 1982 and I wanted this car for myself, I mean I loved it ( I think we all know that love) . The problem was my 20 year old sister had the use of the Coronet until I turned 17. That’s when I would get my license. My sister hated that that car and treated it like crap. She dented a fender smashed in the tail light. She was ruining it. I begged my dad to take the car away from her. He said it was her's until I turned 17. Well…this is what she did to our Coronet. The car gave its life to save my sister. She was broad sided and pushed 50 feet into a pole by an El Camino. Sis still has a small scar, but is fine. The funny thing is that I almost went with her. Anyway, I never forgot that car.
1970accident1001.jpg


1970accident2.jpg


In 2004 I decided to find a EF8 Coronet. At first I wanted one like Mom and Dad’s but then I thought, why not Restore a 1970 Coronet R/T with a 440 that happens to be EF8 green. Well I found this beauty on Ebay. Original paint car! and numbers matching block. These are the original pics from the add.

coronet4.jpg

coronet1.jpg


I have kept this car tucked away in a nice dry garage for the last few years. I have been collecting parts and I am ready to get it finished.

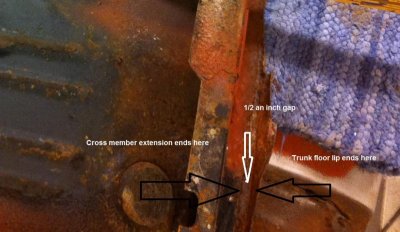
Here are some of the pics of the restoration in progress.
104_2272.jpg


Lots of bad stuff to cut away. Rails were not that bad. I put on a new tail. That was pretty tough keeping everything lined up. I found it best to put the whole rear together tail lights, end caps and dress plate, then have a buddy hold it in place while you weld. I am learning as I go!
104_2275.jpg


cor0007.jpg

IMG_0011.jpg

coronetpichag.jpg

So far the frame rails are done and the replacement tail section is welded in.
IMG_0344.jpg

IMG_0341.jpg

IMG_0329.jpg

IMG_0327.jpg
 
Wow! Awesome story, great looking car, good luck on the resto.
 
Welcome to the sight. You are doing a great job on your car. Do you have any pictures of the other side of that car cradle? I have never seen one like it.
 
Welcome to the sight. You are doing a great job on your car. Do you have any pictures of the other side of that car cradle? I have never seen one like it.

I agree, that cradle does look like an interesting contraption. Looks like your doing some good work there. I admire the guy that figures things out on his own, that's the way I did it.
 
Looks like a hell of a good start, keep up the work, and pics!
 
Here are more shots of the vehicle tilter. I bought it off ebay a few years ago. It works great on smaller cars. In order to tilt the coronet with the motor in it, I used the cherry picker to take some of the weight off. Eastwood sold these way back. The really funny thing is that the directions are on VHS. I had to go to my parents to watch it.
IMG_0008.jpg

IMG_0012.jpg

The license plate was the original to my parents car. Before they took it way I took the am radio, plates, original mopar floor mats and all the owners papers. I think I knew I'd need them again.

IMG_0009.jpg
 
I wanted to share these classics
Here are pictures of my new R/T from 1982 taken by the previous owner. I think they are really cool for giving them to me.
1970rtinvirginia3.jpg

1970rtinvirginia2.jpg


1970rtinvirginia1.jpg
 
Welcome to the Forum, Looks like you have a real nice project, Good luck on it! Looking forward to your updates..
 
Thanks everyone for the welcome.

rlsbee: I'm in Millville.
I know Millville well. Great Historic town. Big car show.

detmatt1: That thing is incredible, I've got to have me 1 of those!
it works like a rotisserie except you can leave the car together.

I would recommend it. the only problem is that it is a strain on the drill. I have a bigger drill for next time. So I may not need to use two to pick up the car. It also wont work on stones without a board under it.
 
we have a few more members on this site from Atco, so welcome & we will have to check out each others builds, you have a lot of help in your back yard.
phil
 
1970 Coronet rules!
Nice car, love that color and it is a R/T!!!
How did you find that rear tail panel?

I just wonder if you have a little mistake going on with the rear crossmember and tail light panel, on my car they are separated by half an inch and the trunk floor lip is attached to the tail light panel and then the floor is attached to the frame rails and cross member if you get what I mean. You have welded them (tail light panel and cross member) together and the result can be a half an inch greater cap between the rear bumper and the tail light panel due to the panel is forced forward to the cross member. (damn it is hard to explain in english...)
I have one picture to show how it looks on my car. it is taken from the underside of the crossmember and floor.
If someone else has some pictures, please fill in, it it possible that my car is wrong and every else is right...
 

Attachments

  • rear crossmember.jpg
    rear crossmember.jpg
    58.2 KB · Views: 2,987
Looks like it's going to be a great car.

I love the car tipper thing you heve there, i've never seen one of those before.
 
Hey Guys......Hopefully this can shed a little light on it for you...This on my 69' before changing it all out, but has the same basic config..

The view is from laying on my back on the garage floor, looking up.

seq.jpg
 
on my car they are separated by half an inch and the trunk floor lip is attached to the tail light panel and then the floor is attached

Thanks for noticing that and telling me. Keep them coming. You have a real eye(how did you see that?). I know exactly what you mean by gap. I have that gap. Its still there, its just covered. The problem was that I wanted to tip the car without pans and I was afraid that the body would shift right or left under the weight of itself so i welded it together with a piece of long angle. I will make that part of the end of my floor pan. My replacement pans did not have an angled lip on its end to the rear so I would have had to fabricate something to attach to the rear panel. The pans just stopped flat and short as though they just wanted me to lay them in and weld from the top. A big problem I had was that the body dropped about 1 and 1/2 inch down over the frame rails. So there was a step up from the rear panel to the cross frame. I had to pick the body up so that the tail section was even with the crossmember.

I took this picture tonight

IMG_1470copy.jpg


This is of the car's underside. The angled metal represents that section that would be the end of the floor pan that would be welded to the tail. looks like it is 1/2 space. Should be ok?
 
Last edited:
I am going to continue working from the rear of the car to the front. With the rails and tail about finished I decided to move on to the rear window area. I will do the trunk pans & extensions, then wheel wells and then the rear quarters
Here is a picture of my number one helper. I call him Dad.
IMG_0347.jpg


We are taking out the back window. Didn’t break it. I have a choice here for window type. Original non tint or a tinted window for the rear. I was leaning to the non tint.
What we found really sucks. Lots of rust here.
IMG_0374.jpg

IMG_0373.jpg

I am replacing the deck filler panel. I have to fix a few supports that have rust damage before I weld this in. I have a donor car for the metal around the rest of the window.
IMG_1468.jpg


I am trying to clean out the area with a Sand blaster and a Soda blaster.

IMG_1466.jpg


Sand has a nice bite for the rust. I am trying to protect the original paint. Why…I’m not sure
Here is the new deck filler panel that I will use. It's from AMD

IMG_1461.jpg
 
Auto Transport Service
Back
Top