• When you click on links to various merchants on this site and make a purchase, this can result in this site earning a commission. Affiliate programs and affiliations include, but are not limited to, the eBay Partner Network.

1973 Satellite dash removal

r0yce

Well-Known Member
Local time
7:49 PM
Joined
Jun 30, 2014
Messages
49
Reaction score
6
Location
Munich
Hi folks,
2 friends and me want to get a hand on my 1973 Satellite to renew the wiring harness and rebuild some interior parts.
First thing to do would be to remove the dash cluster.
Does anyone have a walkthrough or tips on how to remove the entire dash cluster?
Does the windshield need to get out? Do we need to disassemble / lower the steering coloumn?
Appreciate any help.
 
To get the cluster out, you'll just need to remove the screws holding it in from the front, remove the two bolts on the bottom of the steering column holding it up, lower the steering column down, disconnect the plugs and wires from the back of the cluster, and remove the cluster. It's pretty straightforward, surprisingly. The hardest part will likely be reaching some of the plugs on the back that need to be removed before it can be pulled far enough out to remove the rest of the wires. Make sure to take pictures of the back before undoing a lot of the smaller wires so you'll be able to tell where they all plug back in.
 
To get the cluster out, you'll just need to remove the screws holding it in from the front, remove the two bolts on the bottom of the steering column holding it up, lower the steering column down, disconnect the plugs and wires from the back of the cluster, and remove the cluster. It's pretty straightforward, surprisingly. The hardest part will likely be reaching some of the plugs on the back that need to be removed before it can be pulled far enough out to remove the rest of the wires. Make sure to take pictures of the back before undoing a lot of the smaller wires so you'll be able to tell where they all plug back in.
Thanks!
I guess that means we don't need to get the front windshield out?
 
Not for the cluster, no. For the dash pad, maybe. I wouldn't think so, but I do not know for sure. You can get at most of the electronics pretty good with just the cluster removed, though. Good luck! If you need any of the diagrams for the wiring let me know.
 
Not for the cluster, no. For the dash pad, maybe. I wouldn't think so, but I do not know for sure. You can get at most of the electronics pretty good with just the cluster removed, though. Good luck! If you need any of the diagrams for the wiring let me know.
Thanks for the info :)
Wiring diagrams would be awesome! Thanks already
 
To take a rallye cluster out, there are screws in the frame of the cluster, plus its easier to remove the radio, and to do that you have to take the knobs off and the nuts holding them in place, next you have to take the ashtray assembly out to reach the screw in the side of the radio and also to get to the side bracket on the radio. Lower the steering column. You can also take the heater control assembly out disconnect the vacuum hoses and temperature control from the heater control.Unplug the speedometer cable from the back of the cluster.
 
Actually for a full harness installation could be easier remove the full dash frame and work on that over the bench. It makes a cleaner and easier wiring job from back on bench. It could seem hard, but remove the dash frame is easier than it appears.

With dash frame on bench you are away to accidentally break any plastic part related to cluster, specially if you never have removed a cluster. With all these years, the plastic parts could be brittle. AC/heater control is a very delicated part.
 
Last edited:
If not removing the column, I'd get a milk crate or something to rest it on.
If the seat(s) still in it will deform it, and if the seat's not in it will stress the column.

I'd also leave the bottom side bolts in but loose.
That way you can pivot the dash down, and IIRC the bracket is actually a hook and you can lift it off the bolts.

Windshield does not need to come out like 66-70.
 
Sorry, I didn't get a chance to find these when I got home last night. These are the general diagrams for the whole car. I believe there's a detail view of cluster wiring somewhere, as well, be it online or saved to my computer. I'll see if I can find that, too. http://www.mymopar.com/downloads/1973/73SatelliteA.JPG http://www.mymopar.com/downloads/1973/73SatelliteB.JPG
Also, this may be of use to you if you're planning on going through the harness completely: http://www.madelectrical.com/electricaltech/amp-gauges.shtml There are many other thoughts on good ways to wire this on this forum, but this is a great place to start. Bypassing the ammeter is a very good idea no matter what, but it is especially so if you plan on adding any electrical accessories to the car.
 
Last edited:
Sorry, I didn't get a chance to find these when I got home last night. These are the general diagrams for the whole car. I believe there's a detail view of cluster wiring somewhere, as well, be it online or saved to my computer. I'll see if I can find that, too. http://www.mymopar.com/downloads/1973/73SatelliteA.JPG http://www.mymopar.com/downloads/1973/73SatelliteB.JPG

Mymopar diagrams ate not allways correct on everything

Also, this may be of use to you if you're planning on going through the harness completely: http://www.madelectrical.com/electricaltech/amp-gauges.shtml There are many other thoughts on good ways to wire this on this forum, but this is a great place to start. Bypassing the ammeter is a very good idea no matter what, but it is especially so if you plan on adding any electrical accessories to the car.


Why why why!!!!!

:BangHead: :BangHead: :BangHead:

:cursin:
 
IMG_2352.JPG
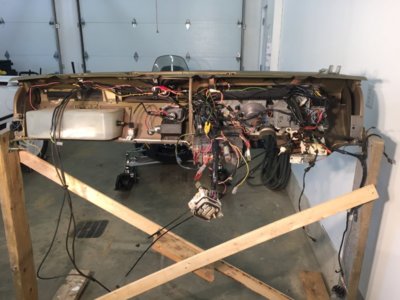
Do yourself and your back a favor: Remove the whole dash assmbky. Won't take much longer. Easier to work, less chance to break plastic pièces like heater control etc.

I've made a rack using old 2" X 6" i had laying around.

IMG_2349.JPG
IMG_2352.JPG
 
Mymopar diagrams ate not allways correct on everything
True, but they are much better than nothing, and they give you a very good idea of what's going on to start with. Filling in the blanks from there is not awful. They are the factory diagrams, after all. Again, I know there are some other diagrams I have saved somewhere, just need to find them. Generally, I cross reference all of them and verify things as I work through stuff.
In regards to the ammeter delete, it's worth it for peace of mind imo, but you're free not to. I just believe, as many others do from what I've read, that enough people have had problems with it to justify this - especially when one possible consequence of not doing it and overloading the system is a fire.
 
In regards to the ammeter delete, it's worth it for peace of mind imo, but you're free not to. I just believe, as many others do from what I've read, that enough people have had problems with it to justify this - especially when one possible consequence of not doing it and overloading the system is a fire.

Is just about understand how it works and what the readings mean
http://www.dodgecharger.com/forum/index.php/topic,33574.0/all.html
 
Is just about understand how it works and what the readings mean
http://www.dodgecharger.com/forum/index.php/topic,33574.0/all.html
I do like that way of doing it, accomplishes the same thing I guess but without disabling the ammeter. My suggestion was more that the other article is a good place to start researching the ammeter delete and something to do at the very least. I know a lot of people have their own "better" ways of doing it. Not to derail this thread too much from his original question, but in your setup, only the battery charging actually goes through the ammeter correct? I like that setup a lot, I'll probably end up gonig that route in my car actually.:)
 
Thanks to you all, this forum is worth a ton!
 
Auto Transport Service
Back
Top