• When you click on links to various merchants on this site and make a purchase, this can result in this site earning a commission. Affiliate programs and affiliations include, but are not limited to, the eBay Partner Network.

64 heater control switch

AZEricB

Well-Known Member
Local time
3:27 AM
Joined
Sep 14, 2015
Messages
61
Reaction score
2
Location
Chander, AZ
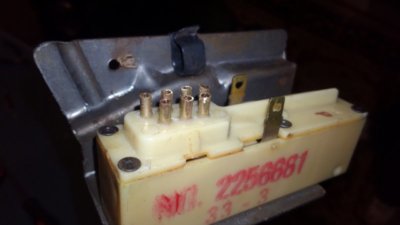
Does anyone know where I can buy 1 of these? Or does anyone repair them?

Thanks, Eric
 
Or does anyone repair them?
Look at the 62-65 Mopar website.
Don't know if he still does it, but one guy in Sherman, Tx offered repairs on them. Contact info is on that website.
He repaired mine, but that was 10 years ago.
 
Just saw your post in WTB.

For what it's worth...the 'repair', from the guy I mentioned, is for the button 'ball' receivers, in the switch itself. If broken, he replaces the ends. That's all he did on mine.

For the rest of the switch, I repaired it myself...(means anybody can do it!).

Vacuum hose tips. Some were broken, so I drilled out all, and replaced with brass tubing, glued in place.
Internal slides. Cover has melted tips holding it on. I cut them off, drilled and tapped for small screws, to hold the cover in place. The slides themselves...pay attention to their order/direction they come out! Handle with care. I cleaned all the internal, re-lubed, and went back together.

All works fine. Good luck.
 
Just pulled the dash apart a few months ago. 64 Plymouth that I know those buttons have not been pushed since 1974 at least. And I will not be reinstalling the control box. I can take a look at it and get back to you if you like. I don't recall noticing any damage but a glance is not enough as to the age of the plastic.
 
After seeing this thread, I reached out to Dante's via email and asked them about the switch they carry. Unfortunately, it's only for AC equipped cars.
 
Is this what you are looking for?

IMG_6955.JPG
 
Does anyone know where I can buy 1 of these? Or does anyone repair them?

Thanks, Eric[/QUOTE
Call Joe Suchy. He gave me a guy's contact info who restores them and sold me one for my 64 Belvedere. I can't find his contact info, so maybe Joe can help you. (770) 964-4441
 
FU64RY, I believe that's the part that the original poster is looking for. If you have one for sale and he doesn't buy it from you, please PM me as I might be interested it buying it. Thanks!
 
Like I said in my earlier post. Thats factory paint on the pushbuttons. The ball on the lever could use a good cleaning and maybe more. 4 of the 7 tubes are snapped off. But thats an easy fix. I am sure the plastic slides inside are almost like new as this switch has next to nothing usage.
20181224_213811.jpg
20181224_213250.jpg
20181224_213604.jpg
 
6T4polara.... Please empty your PM Inbox. The site says it's full and I'd like to PM you....

Thanks
 
Does anyone know where I can buy 1 of these? Or does anyone repair them?

Thanks, Eric
I just found the info on Joe Hudacheck in Wisconsin who rebuilt the one for my 64 Belvedere. Cost was $85 which included return shipping. I'll PM his phone number to you.
 
I just rebuilt mine last night. It was not very hard at all. The plastic nipples for the vacuum lines were all broken off and the slides were stuck solid. Took it out of the car and did the following:

Removed the plastic switch from the metal bracket.

Cut the plastic rivet heads off with a razor blade. Thankfully didn't cut my fingers.

I pulled the slides apart and labeled each one. Cleaned them each with 90% isopropyl alcohol, let them dry and then coated both sides of all three pieces with silicone paste.

I then drilled 3/32" holes where the rivets used to be and tapped them for 4-40 screws about a half inch deep.

Now for the top.

I cut the broken vacuum nipples flush with the case. Then filed the area down to be smooth.

Starting with a 1/16" bit, then increasing gradually up to 1/8", I drilled out each nipple hole. I clamped my bits into my bench vise...I didn't trust myself with a drill to be this precise!

I filed the top edge a bit with a round file, just to slightly flair it. This will make pressing the tubes in easier.

I made sure to clean up and plastic shreds from around the holes. This is critical on the inside of the switch, where the little slider slides under the nipples.

I then cut (7) 3/8" ling pieces of 1/8" OD brass tubing. The tube has a wall thickness of .014", so the inner diameter is still plenty big.

I lined up each piece of tube with it's respective hole. I dabbed red loc-tite on each tube, placed the assembly in my bench vise, and slowly pressed the tubes into the plastic. I stopped every so often to let them rest to avoid cracking the plastic. I pressed the tubes down till the bottoms of the tubes were flush with the bottom of the plastic, so the slider wouldn't bind on them.

I wiped up the excess loc-tite and blew out the tubes. I the super glued them all at their bases in the top side of the plastic.

I cleaned the slider and greased it, then reassembled the upper half of the unit.

For extra measures (okay, okay because I'm a bit OCD), I filed the tops of the tubes so they were all flush with each other as well.

Finally, I screwed it together and installed it in my car. No more vacuum leaks and bullet proof for years to come!
KIMG1218.JPG
 
Auto Transport Service
Back
Top