• When you click on links to various merchants on this site and make a purchase, this can result in this site earning a commission. Affiliate programs and affiliations include, but are not limited to, the eBay Partner Network.

74 Satellite Lower Control Arm Ball Joint Installation Issue

kcrdrnr

Member
Local time
5:31 PM
Joined
Sep 26, 2018
Messages
11
Reaction score
4
Location
Saginaw, MI
Hello everyone. I am in the process of replacing my lower control arm ball joint (Moog K7069) on my 74 Satellite and wanted to get some opinions before I install the tie rods and steering knuckle. Upon installation, I am noticing a very narrow gap on the underside of the control arm between my ball joint and the lip of the underside of the control arm (See circle in IMG 257). The gap is only present in one spot, not all the way around the lip. Also, looking at the ball joint flange (The top side of the ball joint where the zerk fitting would go), the distance between the flange and the lip on the underside of the control arm is not the same around the ball joint (See arrows on IMG 260). Looking on the top side of the control arm, the profile of the ball joint exiting the control arm is not the same around the rim (see circles in IMG 259). My questions are: Is this normal? I installed the ball joint the first time, noticed the same issues that I discussed above, removed the ball joint, and installed again, being careful to install properly. I got the same result. Is the lower control arm warped? I see no cracks in the control arm. Am I just being ridiculous? Thank you all in advance. This is my first restoration, so I'm still learning a lot. I just don't want the control arm to crack while I am driving it 10 years from now when I finish the car.
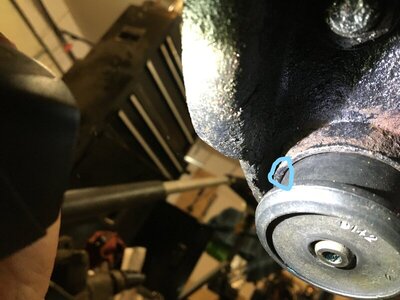
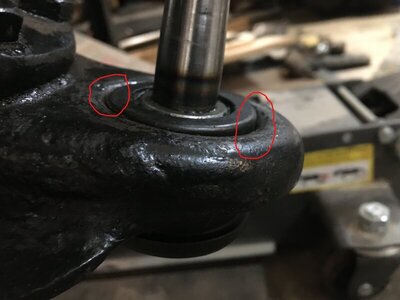
IMG_0257 With Gap Circled.jpg InkedIMG_0259_LI.jpg InkedIMG_0260_LI.jpg
 
Hello everyone. I am in the process of replacing my lower control arm ball joint (Moog K7069) on my 74 Satellite and wanted to get some opinions before I install the tie rods and steering knuckle. Upon installation, I am noticing a very narrow gap on the underside of the control arm between my ball joint and the lip of the underside of the control arm (See circle in IMG 257). The gap is only present in one spot, not all the way around the lip. Also, looking at the ball joint flange (The top side of the ball joint where the zerk fitting would go), the distance between the flange and the lip on the underside of the control arm is not the same around the ball joint (See arrows on IMG 260). Looking on the top side of the control arm, the profile of the ball joint exiting the control arm is not the same around the rim (see circles in IMG 259). My questions are: Is this normal? I installed the ball joint the first time, noticed the same issues that I discussed above, removed the ball joint, and installed again, being careful to install properly. I got the same result. Is the lower control arm warped? I see no cracks in the control arm. Am I just being ridiculous? Thank you all in advance. This is my first restoration, so I'm still learning a lot. I just don't want the control arm to crack while I am driving it 10 years from now when I finish the car.
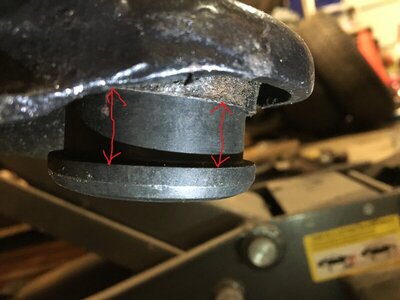
View attachment 973624 View attachment 973625 View attachment 973626

Hey there,

I also have a 74 satellite - we recently replaced the lower ball joint, when I go out to work on it today I’ll take some photos for comparison. I remember mine being similar, I think that’s normal and is just some inconsistencies in the lower control arm construction.
 
Hey there,

I also have a 74 satellite - we recently replaced the lower ball joint, when I go out to work on it today I’ll take some photos for comparison. I remember mine being similar, I think that’s normal and is just some inconsistencies in the lower control arm construction.

If you have pictures, that would be great. Thank you!
 
Are those pics before you finish pressing the ball joint on all the way?

That's a very good question. Long story, just warning you. So when I began working on the ball joints, I looked at what was already on there as a reference. A previous owner installed them the last time who knows how long ago. Both driver and passenger lower control arm ball joints were not pressed in up to the collar, so I assumed that was normal, although I thought it seemed odd that was the case. Anyway, I attempted to install the driver lower ball joint and what you see in the pictures is where I could no longer press it in. It felt like I hit a wall with the ball joint press. After my initial post, I moved to the passenger side and was able to press the lower ball joint all the way up to the collar. So, I am concluding that the previous owner did not install the ball joints properly. I'm wondering if my issue installing the driver side one was because I was not installing at the proper angle, which led to what I showed in the pictures. I ordered a new ball joint and am going to try again on the driver side, being sure to start installing at the correct angle.
 
I would seriously consider replacing the driver side lower control arm if you can't get the ball joint seated properly.
jus sayin.....
 
I grabbed a few photos of the drivers side lower control arm ball joint, it does appear to be seated a little differently than yours.

if you need any additional pics or from specific angles just let me know, I’m working on the car all day today and tomorrow and am happy to help!

5915B758-4CF5-4D27-AF0A-202C8AF2BE6C.jpeg
65671798-B319-499B-95DC-CCD6818EF068.jpeg
F55A325E-8A32-43C3-B6D9-597B92064C64.jpeg
4D7E704D-632A-494D-8C52-7CDBF8135B31.jpeg
 
I grabbed a few photos of the drivers side lower control arm ball joint, it does appear to be seated a little differently than yours.

if you need any additional pics or from specific angles just let me know, I’m working on the car all day today and tomorrow and am happy to help!

View attachment 979736 View attachment 979737 View attachment 979738 View attachment 979739

Thank you for taking the time to take and post pictures. I greatly appreciate it. My passenger side lower ball joint seated like yours in the picture, so I’m betting that I didn’t start pressing my driver’s side lower ball joint at the correct angle.
 
Thank you for taking the time to take and post pictures. I greatly appreciate it. My passenger side lower ball joint seated like yours in the picture, so I’m betting that I didn’t start pressing my driver’s side lower ball joint at the correct angle.

no problem, I’m happy it helped! Good luck getting the drivers side sorted out - if it keeps seating at that same angle I’m wondering if the bore for the ball joint might be oval-ed out or otherwise warped from a bend in the control arm.
 
If the ball joint does not go in straight you will have trouble
Set your press up so you can push with out the joint cocking like the one shot
Put joint in freezer and the control arm in the sun or oven if allowed but not to hot it should be easier
 
If the ball joint does not go in straight you will have trouble
Set your press up so you can push with out the joint cocking like the one shot
Put joint in freezer and the control arm in the sun or oven if allowed but not to hot it should be easier

Thank you for the tip. I will try the ball joint in the freezer.
 
Temperature makes life easy
I have install diff's with freezer and ring gears with the oven
and removed stuff with the torch
 
Auto Transport Service
Back
Top