• When you click on links to various merchants on this site and make a purchase, this can result in this site earning a commission. Affiliate programs and affiliations include, but are not limited to, the eBay Partner Network.

Dash wiring upgrades, Ammeter bypass, Dakota Digital guage cluster install...

Kern Dog

Life is full of turns. Build your car to handle.
FBBO Gold Member
Local time
9:30 PM
Joined
Apr 13, 2012
Messages
35,490
Reaction score
124,995
Location
Granite Bay CA
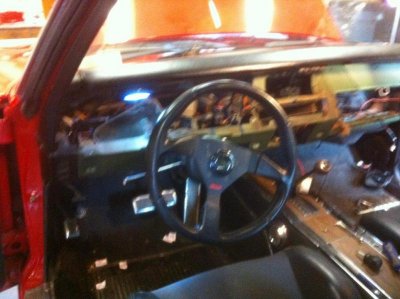
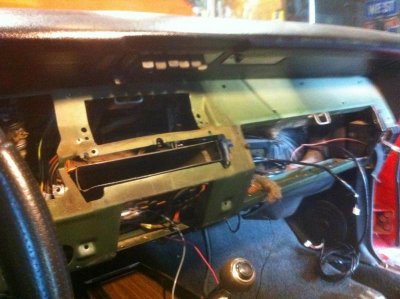
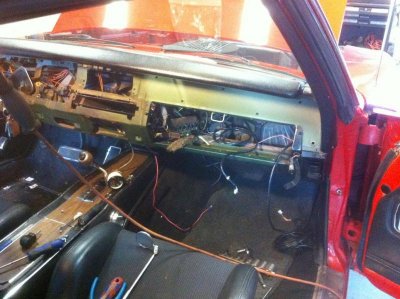
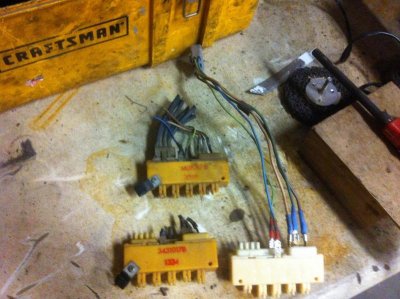
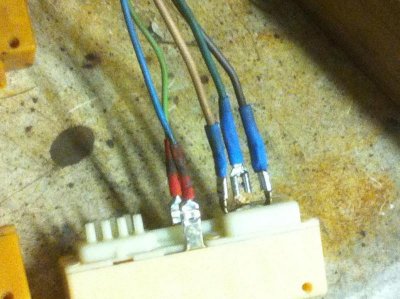
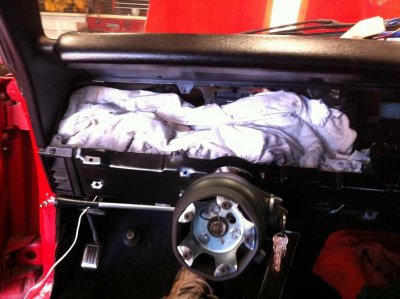
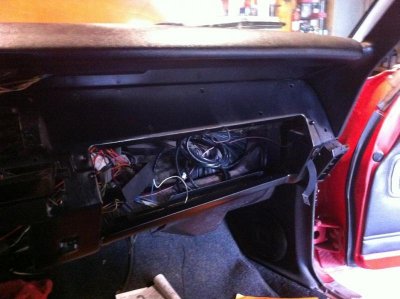
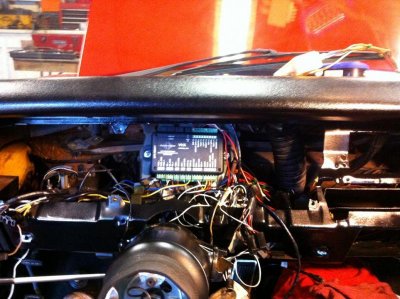
I have put it off for awhile. The Charger is 46 years old in December and almost all of the under dash wiring is original. Good thing it is in good shape.
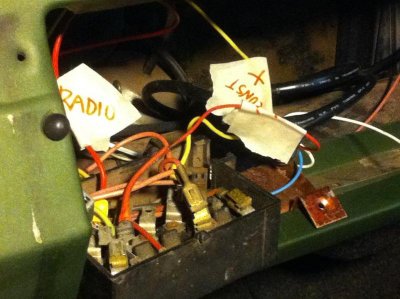
For years I have heard about the potential fire hazard lurking in the guage cluster : The Ammeter. The Chrysler design has been criticized for being a ticking time bomb. The entire current of the alternator passes through the bulkhead connectors and into the dash harness. Time marches on, wires get brittle, corrosion forms and you are closer and closer to a meltdown.
Wiring and electrical stuff is NOT my strong suit. I figured that "one day" I'll make some changes. Recently I bought a Dakota Digital guage cluster for the car and figure that now is as good of a time as any to make some changes. I checked out the following link on how to bypass the Ammeter guage and reduce the risk of a dangerous electrical fire. The article's focus is on a mid 70s Dodge truck but the principles are similar:

http://www.madelectrical.com/electricaltech/amp-gauges.shtml

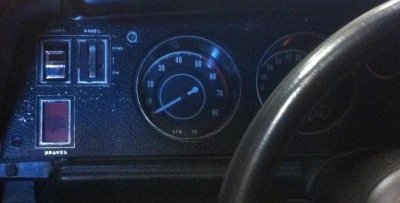
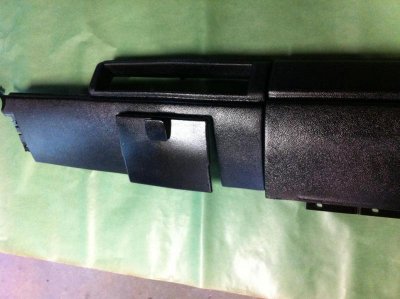
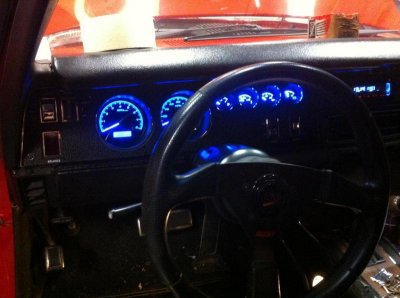
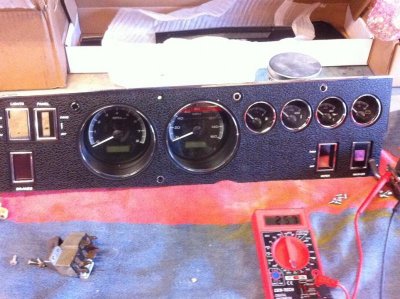
Old cluster with "Restorations by Julius" tachometer in above photo. New cluster is below.
 

Attachments

  • IMG_2488.jpg
    IMG_2488.jpg
    40.4 KB · Views: 968
  • DD cluster.jpg
    DD cluster.jpg
    84.2 KB · Views: 962
Looking good so far.
Please take lots of pictures as I have been interested in this upgrade as well.
 
Pictures will follow.
This has been a long road! I removed the wiring for the ammeter for two reasons: The new guages use a voltmeter AND I wanted to reroute the way the interior gets power. I had my factory service manual nearby and it really was necessary. You absolutely need it to identify the existing wires and to avoid removing stuff that you will need.
I followed the alternator charge wire from the alternator to the bulkhead. I cut it there and added a fusible link. The underhood wiring is 2 years old. I had a friend try to help me rewire the engine side but I didn't like how it was turning out. I bought an engine harness and a headlight harness from Evans Wiring. The stock alternator wire is a 12 guage. I replaced that with a 10 guage even though I have no plans to add a bunch of electrical accessories. Still, the bigger wire seemed like a good idea anyway.
Anyhow, the alternator wire now ends at the starter relay. On that same terminal, I attached another 10 guage wire and ran it through the bulkhead just like it is outlined in the MAD electrical instructions...Through a drilled out passage in the bulkhead connector. On the dash side, that new wire was soldered to 4 other wires: Fuse panel, Ignition switch, Headlight switch and the horn relay. Now that I have crimped and soldered every connection, I am embarrassed that I used crimp connectors without soldering for so many years.
This was not just a simple guage cluster swap for me. I took this opportunity to do a few things that really needed help. The dash frame was still the original green color even though the ''restoration" was done back in 2003. I painted the lower pads without removing them, same with the glovebox. Since way back then, I've spent a majority of my time fighting detonation issues, making brake upgrades, chassis improvements, etc. Interior stuff wasn't a priority because everything still worked. The gas guage hasn't been accurate since I installed the new sender but it did read. The temp guage always seemed to read low. The oil pressure guage crapped out 2 years ago. I had a side job a month ago that left me with some extra money, so I figured I'd do what I'd been putting off so long.

- - - Updated - - -

Sorry that some of these are blurry. Blame the guys at Apple inc.

- - - Updated - - -

Sorry that some of these are blurry. Blame the guys at Apple inc.

- - - Updated - - -

The heater and A/C haven't worked since I bought the car in 2000. The dash switch always felt too stiff. I pulled it out to find the keys are all gummed up or something. Lucky for me I bought one from NAPA in 2001. Odd thing is, the electrical connections are not slip on spades. They are actually soldered to the switch. The push keys on mine were really worn. I have a spare panel with slightly better lettering so I used them. I found out that Performance Car Graphics has adhesive backed overlays for these keys. They are currently out of stock.
 

Attachments

  • Oct 5 2014 257.jpg
    Oct 5 2014 257.jpg
    85.6 KB · Views: 490
  • Oct 5 2014 256.jpg
    Oct 5 2014 256.jpg
    84.9 KB · Views: 511
  • IMG_2572.jpg
    IMG_2572.jpg
    63.2 KB · Views: 498
  • IMG_2575.jpg
    IMG_2575.jpg
    66.7 KB · Views: 490
  • IMG_2577.jpg
    IMG_2577.jpg
    78.8 KB · Views: 521
  • IMG_2606.jpg
    IMG_2606.jpg
    69.2 KB · Views: 498
  • IMG_2578.jpg
    IMG_2578.jpg
    75.8 KB · Views: 495
  • IMG_2579.jpg
    IMG_2579.jpg
    77.4 KB · Views: 480
  • IMG_2580.jpg
    IMG_2580.jpg
    78.6 KB · Views: 507
Great job, looks like you're doing it right.
 
Fun, fun! Just be careful soldering the wires, if the solder wicks to far back in the wire you end up with a solid wire that over time can break. Sounds like your doing yourself a favor.
 
I'm glad to see you were able to do the Dakota dash swap with the dash still in the car. I'm keen to do the Dakota digital dash to my Super Bee but was scared about how to get the dash out. Nice to see it can be done with dash in car!!
 
Thanks guys.
If I were just replacing the stock guages with these aftermarket ones, the job would have gone much faster. The job is taking so long because of all the other things that I'm doing while the dash is opened up.
The setup comes with new sensors for the oil pressure and water temp. These HAVE to be used because they send the correct amount of voltage to ensure proper reading by the digital brain box. They supply fittings and extra adapters. I needed none of the adapters since I merely unscrewed the stock parts and put these in. The speedometer cable comes out. In its place is a "pulse generator". The cool thing about this is, no matter what speedo pinion you have in the transmission, the speedometer can be calibrated to read it. If in the future you want to change gears or tire sizes, the speedometer can be reset to accomodate it. The kit also allows the user to set the odometer to whatever number you want within the first 100 miles of operation. I'm going to set it to the miles my old odometer read. This will help since I keep a journal on the car with miles as a reference point in every journal entry.
Today I hope to get the gas guage calibrated and the rest of the dash back together. I have to take another car out to establish a known measured mile. The speedometer uses that to determine accuracy for the mph and odometer readings.
More pictures will follow.
 
If you have a smartphone just use GPS for speed and mileage, very accurate.
Hope it all goes well.
 
I never heard that too much solder could be a problem. Thanks for that tip.
I painted the dash frame today. Also, I found it weird that the ashtray is smooth painted steel while the lower dash plastic parts are textured. I decided to spritz some rubberized undercoating on the ashtray so it will sorta match.

- - - Updated - - -

X
 

Attachments

  • Dash 10.jpg
    Dash 10.jpg
    62.8 KB · Views: 399
  • Dash 12.jpg
    Dash 12.jpg
    61.4 KB · Views: 408
  • Dash 15.jpg
    Dash 15.jpg
    84.1 KB · Views: 415
  • Ashtray.jpg
    Ashtray.jpg
    69.2 KB · Views: 411
  • L D.jpg
    L D.jpg
    61.3 KB · Views: 405
  • LWR D.jpg
    LWR D.jpg
    55.6 KB · Views: 428
  • IMG_2654.jpg
    IMG_2654.jpg
    97.6 KB · Views: 407
If that's an electrical speedo the GPS units are really sweet, I knew I'd be swapping gears, trannies, etc so I installed the GPS sendor which is just a small 1"X 1" antenna so you never even calibrate it..... withing 1 mph accurate all the time no matter what you change. What your doing is still pretty handy and makes life easier.
 
When you say ytou bought a dash gauge kit from Dakota Digital do you mean this kit?

http://www.dakotadigital.com/index....t_id=939/category_id=679/mode=prod/prd939.htm

If so I would be very interested how the installation went....I am planning purchasing this kit for my 70 Roadrunner this next year.

Thanks

That is the one.
I may have mentioned it before.... The installation would have been really simple if I didn't also throw in several other tasks along with it.
I did the following:
Repainted the dash frame.
Repainted the plastic lower dash panels.
Replaced and rewired the heater/A-C switch.
Replaced the chrome trimmed dash panels.
Eliminated the ammeter wiring, rerouted the alternator charge wire, replaced a headlight switch connector and lead wire.
Installed an auto dimming rear view mirror with compass and temperature.
EVERY wire connection was soldered and shrink wrapped, not crimped with plastic coated connectors. THIS was a first for me as my soldering skills were terrible until about summer this year!

I looked at the cost of having my stock guages restored. It was going to cost almost the same, maybe $100 to $200 more than this kit. That would have included rebuilding and recalibrating all guages, repainting them and polishing the plastic cover. I saw this as an opportunity to have better lighting, a more accurate tach and gas guage and a few other features. The BRAKE light can be set to serve as a SHIFT light. The odometer can be preset to match your cars existing miles or any other number you want. It has 2 trip odometer settings.The speedometer can be programmed to accomodate any change in gearing or tire size. It also gives high speed recall, 1/4 mile ETs and maybe even a 0-60 mph reading...Not sure, I'll have to reread the booklet. The gas guage calibrates to any fuel sender! Think of how we all complain that the aftermarket fuel senders ALL suck ?? This compensates for that. It has a voltmeter instead of an ammeter too.
Hopefully if my desire is up enough, I can get the cluster installed tomorrow and give a performance report!
 
Almost done but there have been a few glitches.
The heater fan works with a jumper wire to the fan (Under the hood) but I have nothing hot on the inside. The switch wiring tests good with an Ohm meter. I haven't had a working heater ever so I'd really like to get this working.
I screwed up when trying to calibrate the gas guage. The procedure is to start with an empty tank, press a button, add 1/3 of a tank, press a button, add another 1/3 of a tank, (2/3 now) press a button, then fill it with the last 6 1/3 gallons for the full 19, then press a button. Apparently I was supposed to press and hold during the last step and wait to see DONE. The system lost my readings and I had to pump all the gas back out! Good thing though because this gave me the opportunity to pull the fuel sender. I wanted to straighten out the float arm a bit. I bent it down in 2002 in the vain attempt to get it to read something when I had 5 gallons in the tank!
I saw that the plastic float had gas in it. It won't squeeze out and I get no bubbles when I submerge it in a bowl of gas, but I want to replace it anyway. I heard that some Fords use the same one. Maybe I'll check with a local Mustang restoration supply house tomorrow.
 

Attachments

  • Guages in 1.jpg
    Guages in 1.jpg
    57.6 KB · Views: 355
  • Guages in 2.jpg
    Guages in 2.jpg
    68.9 KB · Views: 320
  • Fuel Sender unit.jpg
    Fuel Sender unit.jpg
    57 KB · Views: 321
  • Fuel sending float.jpg
    Fuel sending float.jpg
    55.2 KB · Views: 348
It looks really cool lighted up !
 

Attachments

  • Guages lit.jpg
    Guages lit.jpg
    56.7 KB · Views: 365
I have a spare plastic and a spare brass float if you want one they are both new and never used, your choice for free, just PM me your address and I'll mail it to you.

That cluster looks kick ***!
 
Last edited:
Haha! That all looks familiar! Way to go Kern.

I just switched to the Dakota Digital GPS unit to provide the speed data to my speedometer. Spendy, but it sure works. Perfect calibrated speed with any gear and any rear end. It took about ten minutes to calibrate the first time and has been perfect since. Works within seconds after the car is started even with the car in the garage - I think it's calibrated by magic unicorns when the GPS signal is lost...
 
I have a spare plastic and a spare brass float if you want one they are both new and never used, your choice for free, just PM me your address and I'll mail it to you.

That cluster looks kick ***!

Thanks everyone.
I did buy a brass float today from a local store that caters to Mustang restorations. I hope to get it done tomorrow.
 
Auto Transport Service
Back
Top