• When you click on links to various merchants on this site and make a purchase, this can result in this site earning a commission. Affiliate programs and affiliations include, but are not limited to, the eBay Partner Network.

Does anyone make a timing stencil? Tape is about worthless!!!!!

idrivemopar

Well-Known Member
Local time
12:08 AM
Joined
Apr 30, 2012
Messages
3,698
Reaction score
2,706
Location
Colorado
Does anyone make a stencil that can be used to paint on timing marks? Would be nice to have some sort of stick on stencil that you could then paint over peel and have painted on timing marks.


In my opinion, Tape is worthless, lost my 3rd one today, and I even took extra time cleaning the balancer, applied the tape and clear coated and let dry, but it flew off in less than 20 miles, lol, so I am done with that crap.

Would be nice to have a marked balancer, but those are not cheap, so looking for a low tech approach here.
 
Sure, I can use a paint marker, but would be nice if there was a template, I like straight lines!!!! LOL
 
Maybe a scribe and small square every 1/16" = 1°.
2-3/8" = 38°
 
Powerbond balancers, "Street" version are degreed + & - 60 degrees : BB Chrysler 440 7.24 Internal PB1112-ST
 
I bought a timing tape back in the 1970's from a company called "For 340's only" for a bracket car, never fell off. Poorer quality merchandise these days? Many mainstream graphics sold today are guaranteed I believe.
 
every Chrysler 7.25".

"Every" "all," "forever" and "none" covers a LOT of ground.

First use a piston stop to confirm TDC is correct

Then I would do like I've always done........measure CAREFULLY and TWICE around the outside with a small flexible tape to get circumference, then do a bit of math to figure "degrees per inch" Measure off an amount you can deal with...........40 degrees, 60 degrees, whatever you like.

then take dividers and divide that down.........1/2 of 40 is 20, 1/2 of that gives you 10 degree marks. You can work the dividers from both ends to confirm you are accurate. I find anything more than "every 5 degrees" is probably just not needed. You can eyeball "half" of 5 to get down to a "couple" and the rest is "bounce" on most engines.

Get or make a small square and scribe the lines in. If needed you can go over the important ones, like, say, 35* to make them heavier.

You want to get fancy, buy some "number stamps" and mark the scribed lines
 
Maybe a scribe and small square every 1/16" = 1°.
2-3/8" = 38°

"Every" "all," "forever" and "none" covers a LOT of ground.

First use a piston stop to confirm TDC is correct

Then I would do like I've always done........measure CAREFULLY and TWICE around the outside with a small flexible tape to get circumference, then do a bit of math to figure "degrees per inch" Measure off an amount you can deal with...........40 degrees, 60 degrees, whatever you like.

then take dividers and divide that down.........1/2 of 40 is 20, 1/2 of that gives you 10 degree marks. You can work the dividers from both ends to confirm you are accurate. I find anything more than "every 5 degrees" is probably just not needed. You can eyeball "half" of 5 to get down to a "couple" and the rest is "bounce" on most engines.

Get or make a small square and scribe the lines in. If needed you can go over the important ones, like, say, 35* to make them heavier.

You want to get fancy, buy some "number stamps" and mark the scribed lines

I've marked off a few balancers over the years like this. It's not hard at all but does take some time to make sure you're doing it right.
 
The proper equation to use to calculate arc length. Arc length is the distance between two points on the circumference of a circle.

The formula is: S = R x Angle Where S = Arc Length, R = radius of the circle, and Angle is measured in radians.

To convert degrees to radians, multiply degrees by Pi/180

Therefore, Arc Length = 3.62" x (38 x (Pi/180)) = 38 x 0.663225 = 2.40"

Once you identify true TDC as noted above, you can accurately transfer any degree marks you chose.
 
laser engraved 360° timing marks are how they make them nowadays. so finding a "stencil" is probably only going to be from a guy with an old library of stock stuff from a manufacturer.

Did find some reading help for you.

http://www.csgnetwork.com/timingmarkcalc.html


http://www.fordsix.com/forum/viewtopic.php?f=2&t=33697


As mentioned, put the # 1 cylinder at TDC. Use a stop to get it right. Scribe a mark on the damper to line up with your pointer. Put a white stripe there to tell which is the correct scribe mark.
 
Wouldn't it be easier to use a dial back timing light?
All that math gave me a headache.
 
For those who don't want to or do not know how to do the math wrap the dampner with 1 layer 3/4" wide painter's type and cut both end the same time with a sharp knife.Remove the tape and put on a flat surface. Measure the length and divide by 360. This will give you the distance per degree. If you what it marked every 10° divide by 36, for every 5° divide by 72. Put the marks on the tap in a color you can see. Install the tape back on the dampner and scribe the markings to the dampner. I only mark the perminate total timing after it has been set where I want it to save the confusion of all the now unnecessary marks.
 
As mentioned, put the # 1 cylinder at TDC. Use a stop to get it right. Scribe a mark on the damper to line up with your pointer. Put a white stripe there to tell which is the correct scribe mark.

this is the way we always did it.
it also will show you quickly if your balancer is shot,
which a lot of people never check.

how do you know?
well,if your new white scribed mark is nowheres near the original tdc = 0 on the balancer,then you know.
 
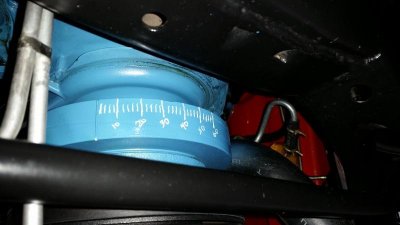
Thanks to everyone for the math lessons, but I was looking for a simpler method, i.e., my template idea, but this was my easier method. I found a nice fine point paint pen, and was able to transfer the tape markings on to the balancer, kind of hard to do when on the car and upside down so the lines are not perfect but it will work! A stick on template would have been nice to have for straight lines.

20151013_132156small.jpg
 
Auto Transport Service
Back
Top