• When you click on links to various merchants on this site and make a purchase, this can result in this site earning a commission. Affiliate programs and affiliations include, but are not limited to, the eBay Partner Network.

How do I replace the upper Control Arm Bushings on a '73 Roadrunner?

Trench

Well-Known Member
Local time
6:44 PM
Joined
Jan 26, 2014
Messages
178
Reaction score
74
Location
nova scotia
I am rebuilding the front end of my Roadrunner and am not sure how to change the upper control arm bushing, can any one give me some guidance? Thanks in advance!
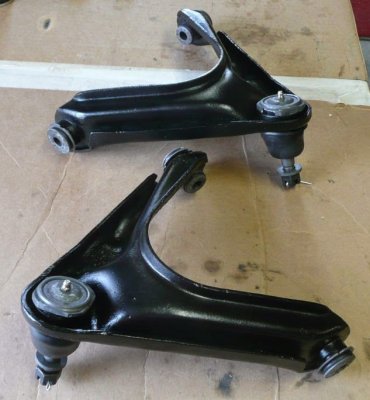
 
You need to support the inside of the A arm around the bushing with a piece of tubing then press the other side. The tubing will allow the bushing a place to go.
 
On my 67, I removed the control arms, bought new bushings and took them to my go-to shop guy, he pressed out the old ones and pressed in the new ones.

The bushings are fairly cheap as you know. I didn't want to booger up my control arms beating on them with a 2 lb. hammer because I do not have a press.

It's not a big deal for a shop with a press and a guy that knows what he is doing. Good luck.

UBJ1.JPG
 
Replace upper control arm bushings

Picture.jpgPicture 001.jpgPicture 002.jpg
I am rebuilding the front end of my Roadrunner and am not sure how to change the upper control arm bushing, can any one give me some guidance? Thanks in advance!

Trench

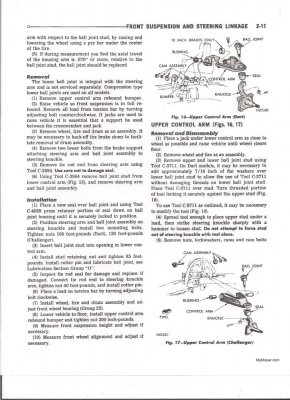
This should help you out,pay attention on the back or rear bushing on both sides when pushing the old bushing out because you can damage the control arm if you are not careful.That sleeve the way I understand was used on performance cars and heavy duty vehicles.

Jeff
 
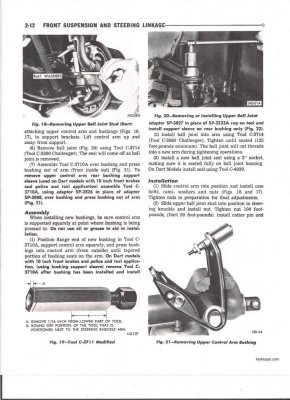
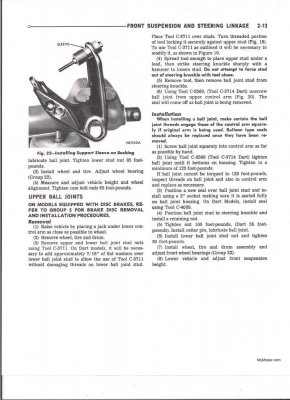
Thanks guys. The Roadrunner has a pivot bar in the middle of the bushings and I'm not sure how to get the bar out first. The manual says it is all replaced as a unit but I can get the bushings.
UpperControlArmInfo.jpgUpperControlArm.jpg
 
Thanks guys. The Roadrunner has a pivot bar in the middle of the bushings and I'm not sure how to get the bar out first. The manual says it is all replaced as a unit but I can get the bushings.
View attachment 203529View attachment 203530

When I did mine I:

-remove the nuts (B) from the bar
-remove the nuts (D) holding the bar to the support bolted to the Kframe
...now you have the control arm with the bar still in the bushings...
-Using a torch, burn out the rubber
...now the bar will come out
-press out the shells as previous posters describe
-press one new one in
-put cleaned up bar back in
-press second new bushing into arm but you need to find a way of supporting the control arm pr risk destroying it. I used thick walled hollow tubing cut full length down a side so that the bar would fit inside.... sorry hard to describe properly and I dont have it anymore to take a picture of. I'm sure I can draw it though if you cant picture it.
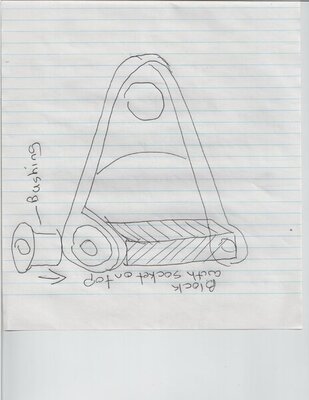
 
Thanks again everyone for the help, I think I understand it all now so I will give it a try. It will have to wait though, off to Boston for a week of vacation.
Cheers,
Trench
 
Success!

Weather delay so I had time to look at it today. All apart and just need cleaned up. Thanks again!
 
When I did mine I:

-remove the nuts (B) from the bar
-remove the nuts (D) holding the bar to the support bolted to the Kframe
...now you have the control arm with the bar still in the bushings...
-Using a torch, burn out the rubber
...now the bar will come out
-press out the shells as previous posters describe
-press one new one in
-put cleaned up bar back in
-press second new bushing into arm but you need to find a way of supporting the control arm pr risk destroying it. I used thick walled hollow tubing cut full length down a side so that the bar would fit inside.... sorry hard to describe properly and I dont have it anymore to take a picture of. I'm sure I can draw it though if you cant picture it.

Sorry to pull out an ancient post!
I'm exactly at this step at the moment.
If you could doodle up a simple drawing of the tubing and where you put it, that would be highly appreciated!
 
This is how I did it.
I used a piece of 2x4 and shaved it down to fit. Then found a socket that would fit over the bushing and put that on top of the wood. You could use a piece of pipe if you have it but you still want it to fit over the bushing. Also make sure the fit of the wood or pipe is snug, you don't want to compress the control arm.

Pushing in Bushing.jpg
 
This is how I did it.
I used a piece of 2x4 and shaved it down to fit. Then found a socket that would fit over the bushing and put that on top of the wood. You could use a piece of pipe if you have it but you still want it to fit over the bushing. Also make sure the fit of the wood or pipe is snug, you don't want to compress the control arm.

View attachment 1236007
Awesome, thanks!
How did you manage to push in the second bushing with the lever bar installed?
 
Awesome, thanks!
How did you manage to push in the second bushing with the lever bar installed?
I made a second piece of wood the full width of the opening (no socket) and placed it beside the bar while pushing in the bushing.
 
When I did mine I:

-remove the nuts (B) from the bar
-remove the nuts (D) holding the bar to the support bolted to the Kframe
...now you have the control arm with the bar still in the bushings...
-Using a torch, burn out the rubber
...now the bar will come out
-press out the shells as previous posters describe
-press one new one in
-put cleaned up bar back in
-press second new bushing into arm but you need to find a way of supporting the control arm pr risk destroying it. I used thick walled hollow tubing cut full length down a side so that the bar would fit inside.... sorry hard to describe properly and I dont have it anymore to take a picture of. I'm sure I can draw it though if you cant picture it.
Thanks for the explanation!
Most of the time, the picture have the control arm with both bushing install and without the bar in it. I was starting to question my judgement here...
 
A press, some 2 inch by 1/2 inch bar stock, and some rigid pipe in the proper sizes helps a bunch.
 
Back
Top