• When you click on links to various merchants on this site and make a purchase, this can result in this site earning a commission. Affiliate programs and affiliations include, but are not limited to, the eBay Partner Network.

How to bypass the ballast resistor??

74Runneer

Well-Known Member
Local time
8:40 AM
Joined
Jun 17, 2013
Messages
322
Reaction score
26
Location
Twin Cities, MN
I bought a new ignition system with a new control module (4 pin), coil, and distributor. Its Part # HRR688D at http://4secondsflat.com/Ignition.html.
So It says it eliminates the use of the ballast resistor. But im not sure how to do that and I didnt get any instructions. Has anyone done this before?

1974 318 Roadrunner
 
If you have a 2 prong resistor, pull the wire off one terminal, then pull the wire off the other terminal. Then put the two wire terminals together.
 
I bought a new ignition system with a new control module (4 pin), coil, and distributor. Its Part # HRR688D at http://4secondsflat.com/Ignition.html.
So It says it eliminates the use of the ballast resistor. But im not sure how to do that and I didnt get any instructions. Has anyone done this before?

1974 318 Roadrunner
and they didn't supply installation instructions ?
 
74 Runner,
Bypass the resistor on Firewall.

Ballast resistor:

Bypass the resistor by inserting another wire, perhaps a 16 GAGE wire in line.

1. Attach one end of your NEW 16 GAGE wire to the wire that connect (s) to your Ballast Resistor.

2. Attach the other end of your 16 GAGE wire to the output wire from the Ballast Resistor.

NOTE: Your Tech instructions may denote applicable wire size. Perhaps resistance wise, OHMs, the 16 GAGE may be too large (diameter). So be sure my suggestion of a 16 GAGE is applicable.
 

Attachments

  • chucker54_2271_4365173.gif
    chucker54_2271_4365173.gif
    2.1 KB · Views: 1,281
none at all. I called them and they said it should just hook up just like my old one but just bypass the resistor. I dont know how to do that....
 
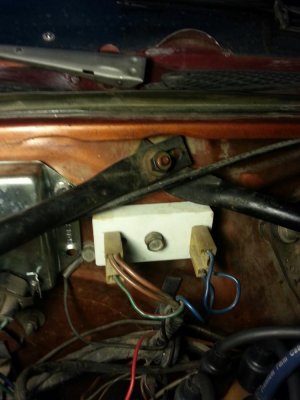
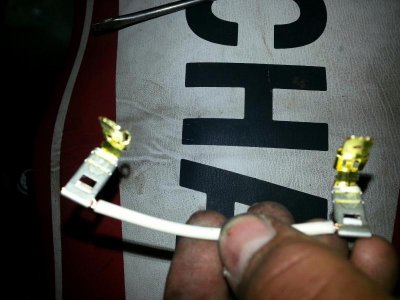
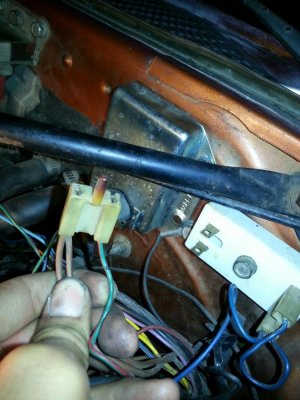
This is what i have to work with. The white wire is the wire that i'm supposed to bypass the ballast with. where do i put it? the top set or the bottom set?ballast.jpgIgnition6.jpgconnector.jpg
 
Yes, unplug both connectors from the ballast and put your jumper between either of the blue terminals and the terminal for the brown wires. Me personally, I would cut the resistor connectors off and just solder the wires together. But if you have any chance of going back to original then I wouldn't cut anything.
 
Just make you a set of wires about 3 or 4 inches long, attach male spades to each end, then plug them in as shown in the picture...

pic4.jpg


- - - Updated - - -

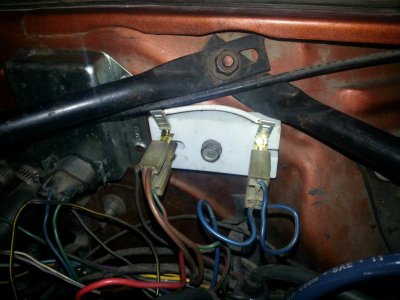
you are basically connecting each side(long ways on the ballast resistor, not top to bottom) of the ballast wiring together, thus omitting the ballast from the system...
 
Will this work?Jumper.jpg The bottom prongs arent even connected but i think this is what you guys were saying?
 
no, thats not the way...you need to connect BOTH SIDES together with jumper wires...and DO NOT connect them back onto the ballast resistor...

make up a couple pigtail jumper wires like these...or just make one pigtail jumper and use the supplied jumper that come with your kit..

2013-07-30_06-33-39_782_zps43e7ee2b.jpg


Then connect them like this....

2013-07-30_06-32-18_518_zpsf1bf61ef.jpg
 
What I did was put the jumper wires inside the ceramic. To do this is easy:

-Remove the ballast block from the car.
-Gut the ballast resistor from the back, keeping the spades that protrude through it.
-Solder in some 18 gauge wire in place of the resistors, then re-install everything.

Looks original when done, no wires have been cut or spliced, and should someone wish to make it original again they just need to buy another ballast resistor.
 
there are several ways to make it:

1-if you don care to modify, cut and splice together brown and blue wires. Remove the ballast.
2-jump as exposed with jumper wires.

but there are one which could be my fav and is cleaner. Remove resistors from back of ballast ( ceramic ) and sold jumper wires on ceramic cavities, using the existant prongs on ceramic. Refill the ceramic cavities with epoxy for added proteccion to save from a short againts firewall. Then conect again the original ballast plugs. Nobody will tell what happened ;)

- - - Updated - - -

What I did was put the jumper wires inside the ceramic. To do this is easy:

-Remove the ballast block from the car.
-Gut the ballast resistor from the back, keeping the spades that protrude through it.
-Solder in some 18 gauge wire in place of the resistors, then re-install everything.

Looks original when done, no wires have been cut or spliced, and should someone wish to make it original again they just need to buy another ballast resistor.

Wooops!!! didn't notice was already posted LOL...

But I'd use at least 16 gauge
 
Auto Transport Service
Back
Top