• When you click on links to various merchants on this site and make a purchase, this can result in this site earning a commission. Affiliate programs and affiliations include, but are not limited to, the eBay Partner Network.

Many problems at once - will ground wire kit help?

jogirob

Well-Known Member
Local time
3:13 PM
Joined
Aug 16, 2018
Messages
247
Reaction score
87
Location
California
I'm running into some electrical gremlins that appeared all at once. My voltage readings drop to the "Discharge" range when I turn the parking lights on (light knob pulled out half way), and they drop big when headlights are turned on (light knob pulled out all the way). Turn signals are suuuper slow and I can see the ammeter (volt meter?) pulse with each tick of the turn signal. If I have the headlights on while using turn signals, eventually they'll slow to the point where they don't blink anymore. The ammeter pulsing readings even happen with headlights/parking lights off (light knob pushed in) and turn signals activated. Turn signals blink slightly faster than if headlights were on but still way slower than normal. Gauge cluster lighting is very dim. Power windows function is slower...I could go on. Because of all this I'm thinking it's got something to do with a bad ground?

I was doing a search on here to see how you guys would wire an after market ground wire kit but was surprised to find there's no mention of this on here with how sketchy grounds are on these older cars.

In addition to adding a closer ground connection from the 4 headlights down to the bumper I'm thinking of adding the following grounds: neg battery to alternator casing, neg battery to intake manifold, engine to chassis and will redo the neg battery to chassis connection. I'll clean and test the existing neg battery to engine connection. I'm considering of just slapping my own batch of re-used 8GA wire I salvaged from a messy amp install this car used to have. What do you all think? Hopefully I don't melt my frame down to the ground haha :eek:
 
How about put a volt meter on the battery and tell us what your alternator is putting out. Load test that battery while you're there. It's not a ground wire issue, at least not the need for more of them than you already have.
 
How about put a volt meter on the battery and tell us what your alternator is putting out. Load test that battery while you're there. It's not a ground wire issue, at least not the need for more of them than you already have.
Thanks for reading through all that. I'll test it out and post readings tomorrow. Was leaning towards a ground problem because I used to have turn signal problems before but they went away after I re-tightened the screws that hold the signal markers to the bumper. This time I sanded the contact spots down to bare metal but no go.
 
Crank the engine and remove negative battery cable from the battery. If the engine quits replace the alternator. Also as @dadsbee said check the output of the alternator per his test.
 
Crank the engine and remove negative battery cable from the battery. If the engine quits replace the alternator. Also as @dadsbee said check the output of the alternator per his test.
Totally wrong to remove a cable while it’s running. If it is charging it will cause a voltage spike and fry a bunch of stuff in the car or possibly burn it to the ground. Ur if it’s not charging the motor will quit. Not a gamble I would take. Kim
 
Totally wrong to remove a cable while it’s running. If it is charging it will cause a voltage spike and fry a bunch of stuff in the car or possibly burn it to the ground. Ur if it’s not charging the motor will quit. Not a gamble I would take. Kim
Maybe I have been lucky, but I have tested them that way for 40 years on pre 74 cars when I didn't have a voltmeter handy. I never had an incident that fried anything. What's to fry, a voltage regulator possibly? If the alternator will not sustain the engine, it's toast anyway.
 
Set the engine idle a bit higher, say 1000-1200 rpm and try again.
Just to check if the alternator is not putting out enough juice at low rpm.
 
Can also take the bulkhead on the firewall apart and clean them.

I had been having my headlights pulsing at low speeds. Had an alternator go bad and replaced it, worked for a week or two then still having charging problems. New alternator checks OK so pick up new regulator, still having problems. Checked wiring with multi meter, seems OK, but something is wrong somewhere. Bypassed original wiring from regulator to alternator with new wire and used a keyed relay to supply 12V direct from battery, lights now steady at idle and charging well.

I think old wiring had problems, corrosion, possible breaks. Was going to buy a one wire alternator if new wiring did not work. Also bypassed ammeter long ago in effort to fix pulsing lights
 
Maybe I have been lucky, but I have tested them that way for 40 years on pre 74 cars when I didn't have a voltmeter handy. I never had an incident that fried anything. What's to fry, a voltage regulator possibly? If the alternator will not sustain the engine, it's toast anyway.
Have done the same thing for 45 years Jerry. The joys of a points Mopar vs a GM. Simplicity...
 
First off, much of what you posted is actually pretty common of these old cars that only have a 36 Amp alternator. And the output at idle is even less than that.
Second, you may find much of the original 50+ year old wiring is corroded.
To me extra grounds are a good thing to have, but it sounds like the alternator just does not put out much current at low RPM which is typical of stock parts.
Also, are the crank and alternator pulley sizes original? Underdrive pulley sets will slow down the alternator making charging worse.
A smaller alternator pulley would speed up the alternator to where it puts out more current at idle.
There is also the issue of the bulkhead connectors. If original they are likely corroded, and you may see the plastic has melted from the corroded connections getting hot. It is a good Idea to by-pass the charging current to the bulkhead connector. The easiest thing is just run a larger 8-AWG wire from the alternator output directly to the Battery positive, leaving the original wires in place. New wire will be in parallel to the original charging circuit. This will make the alternator gauge not read correctly and should just stay centered, so you would need a voltmeter to monitor the charging system.
 
I'll add that on some of the old cars wiring, not only are the connectors corroded, but the wiring inside the insulation has also been corroded for an a few inches from the terminals, and where some factory splices were made. If you find corrosion in the wires like this, just replace the wiring harness.
 
Another thing to chime in…as I had odd things happening is my fuse block was for chit. Corroded contacts and found one connecting to another circuit – don’t know why fuses didn’t blow. Doing work on older cars, it’s common that prior owners (or their buddy’s) putzed with wiring for stereo systems and such sometimes stabbing another spade or two in the block for power. Sometimes the ‘connections’ were just a piece of electrical tape that came undone after years. As posted here, the BH can be a demon from age. Finally replaced mine a couple years ago I should have done a decade ago. Maybe not your issue; but tossing it in. After restoring my car found some grounding issues from new paint/primer adding a couple more grounds.
 
I think jogirob mentioned power windows too. On my Coronet with power windows, the factory power splice (yellow wire) going to the rear windows was badly corroded. That car, the '69 R/T convertible, needs all new wiring as the copper was oxidized (green / black) even under the wire insulation.
 
Totally wrong to remove a cable while it’s running. If it is charging it will cause a voltage spike and fry a bunch of stuff in the car or possibly burn it to the ground. Ur if it’s not charging the motor will quit. Not a gamble I would take. Kim

Totally agree.....removing the alternators load while in operation USUALLY results in damage to the diodes. As suggested, check alternators output voltage and do a load test to confirn alternators output CURRRNT. The FSM describes how to do the load test. IMO.....your existing alternator exhibits a bad diode (open).....remove and rrbuild it or replace in kind with origional specs unit. Just my opinion of course.
BOB RENTON
 
I'm back. Thanks for all the input. Sorry about the delay, work had me up till the wee hrs of the night. Here are the results to my tests using a multimeter:

At the battery + to -
Engine off: 12.2v
Key to "on" position: 11.2
Engine on: 11.2v
w/ parking lights on: 11.64v
w/ full lights on: 11.49
After turning engine back off: 12.01v

Voltage drop tests
Engine on and revved to about 1000-1300rpm
From negative battery lead to:
Alternator case: 2.1v
Alternator bracket: 2.2v
Engine block: 1.3v
Chassis ground point: in the mv range

From the positive battery lead to the alternator lead: .33v

From the looks of thing it seems like my alternator is shot? Had no idea it was this bad since the battery hasn't been straining on start ups.
 
As suspected, alternator is currently doing nothing.

Get your meter and put it on the alternator stud and ground. Will show that 12.2 volts. Now get a short length of wire and start the car. Jump from the alternator output stud to the field spade and see if the voltage jumps up to 13++ volts. DO NOT LEAVE THAT WIRE IN PLACE longer than needed to test.

If you get the voltage up then the alternator is fine and it's either the voltage regulator, a bad wire to same, or a bulkhead wiring issue.
 
Let me know if I should still do the
Now get a short length of wire and start the car. Jump from the alternator output stud to the field spade and see if the voltage jumps up to 13++ volts. DO NOT LEAVE THAT WIRE IN PLACE longer than needed to test.

If you get the voltage up then the alternator is fine and it's either the voltage regulator, a bad wire to same, or a bulkhead wiring issue.

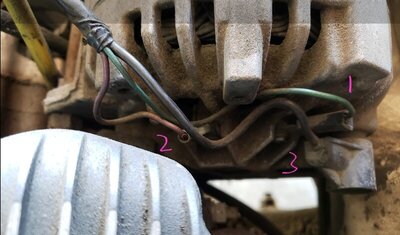
Which connector is the "field spade"? #2/purple lead? or #1/green lead?

Screenshot_20220215-114407_Gallery.jpg
 
Sorry, was thinking a pre '70 alternator with only one field spade... not your '74 now that I read your signature.

That wire at #2 doesn't look great in that blurry shot, so come back to it later if the alternator is good.

#1 is the ground side of your electronic voltage regulator and #2 is the power side. #3 is of course the main 12V stud to the battery.

SO... pull #1 and #2 off. Ground the #1 field spade and quickly jump #2 and #3 with a wire to see if the voltage jumps up to tell you that the alternator is at least good.
 
Auto Transport Service
Back
Top