• When you click on links to various merchants on this site and make a purchase, this can result in this site earning a commission. Affiliate programs and affiliations include, but are not limited to, the eBay Partner Network.

Rapid Air Maxline install

rmchrgr

Well-Known Member
Local time
7:56 PM
Joined
Oct 11, 2016
Messages
616
Reaction score
866
Location
Stamford, CT
After 3 years, I am finally getting my "shop" set up the way I want. Over the last few days, I have been installing the Rapid Air "Maxline" compressed air delivery system. It's been sitting in a box on the floor since 2018 when our house renovation was completed, 'bout time it's being put to use.

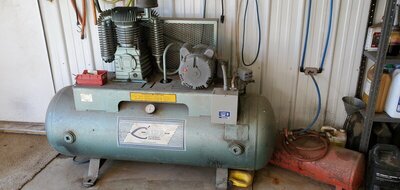
Once the garage was done one of my first purchases was a new 80 gallon compressor to replace the ancient 30 gallon Craftsman I've had for decades. You can see it in the foreground here. I bought the air system at the same time in September of 2018.
IMG_1987.JPG

Since then, I've been using the compressor with a hose connected directly to the outlet valve. It worked fine but sometimes it was a pain if I needed shop air beyond the reach of the hose.

I read up on it a bunch and decided on the RapidAir Maxline system. The kit comes with a bunch of parts to assemble it. I got 100 feet of 1/2" line and not the 3/4" diamter, didn't think I needed a larger diameter. The lines are basically teflon lined Pex. It's a little bit of a PITA to unroll it and get it straight, especially over longer lengths. You cut it to length and then kind of ream it out with a little tool they give you to bevel the edge.

As stated, the kit comes with several accessories to arrange the system. Right off the outlet valve is a water separator filter and pressure regulator. The compressor has a regulator on it but this is for the air line. Once past those two devices, it goes to the wall and connects to a manifold block. Theoretically, there should be a more flexible "whip" hose there but I only had one on hand and it's attached to my hose reel. I very well may change out that existing blue line for a flex hose, the compressor shakes pretty good when it first starts.

Anyway, the horizontal manifold block provides two branch outlets so the lines can go in different directions. So far I've only got the one side done. The other leg will go left towards the work bench on the back wall.
IMG_1415.jpg


This is about 30-35 feet of line.
IMG_1417.jpg


Got a hose reel installed on the lift. It needs to be up higher the hose is hanging right in my face. It's only held on by two bolts at the moment. There are four holes in the reel bracket so using the top ones will move up about 6" which will be about perfect.
IMG_1418.jpg


The hose reel connects to the main line from a T fitting.
IMG_1419.jpg


This is by the front. I wanted an outlet by the door for airing up tires, blowing things off outside, etc.
IMG_1420.jpg


The lines are attached to the wall with these plastic standoffs. They come with #8 nails in them but they were too short to fully engage the studs in the wall. I substituted the nails for some longer #8 screws which worked well.
IMG_1426.jpg


The kit comes with these type of fittings. You get several straight ones, elbows and one tee.
IMG_1422.jpg


The line is secured with the serrated ferrule thing.
IMG_1423.jpg


The ends of the individual legs terminate with these distribution blocks. There are three of these blocks included in the kit along with the 45º fitting, drain petcock and threaded plugs for unused outlets. I am using quick disconnects here, no need for a hose reel in either spot, they'd be in the way. I have two extra hoses that I can grab and snap it in when needed.
IMG_1421.jpg


Once I got going on it, the kit installed pretty easily. If you have it all laid out and have everything you need on hand, you could easily do it in a couple hours. The plastic standoffs are not included in the kit but you can get them or something similar at any hardware store or orange/blue big box home place.

There are a few drawbacks. The manifold blocks are flat and wider than a wall stud which can make it a chore to attach to the wall - in my opinion you need to have some sort of standoff bracket which an be tedious to come up with and drill out. And again, as with any type of coiled tubing, it sucks to straighten it out over long lengths. It turned out OK but I hate the appearance of the little waves between the standoffs. Is what it is I guess. I know there is a tubing straightener available but for a one-time install it's probably not worthwhile to spend the money on it.

Will update this thread when I get it all buttoned up. Hope this helps anyone considering this system for their own shop.

- Greg
 
Used the same thing on my garage, love it!
 
very nice setup. I think you'll like having the volume of air that compressor deliveries. Im a little skeptical of plastic hose for air or even pex for water, im still into black pipe and copper but the plastic is fine and a heck of a lot easier
You have a garage I can only dream of if I can ever get off of this rock I live on
Good luck
This stuff has an aluminum center as well, it's tough.
 
very nice setup. I think you'll like having the volume of air that compressor deliveries. Im a little skeptical of plastic hose for air or even pex for water, im still into black pipe and copper but the plastic is fine and a heck of a lot easier
You have a garage I can only dream of if I can ever get off of this rock I live on
Good luck

Black pipe has it's place. If it was a daily working/production shop environment, you'd want metal. But for home/hobby shops, you really can't beat this system. The plastic stuff is really easy to work with, no special tools needed. The hose does in fact have a thin layer of aluminum sandwiched between the Teflon liner and outer sheath. Kind of a neat product. My entire house is plumbed with Pex, seems to be holding up fine. Can't foresee any future problems, it's just pipe.

IMG_1425.jpg


And yes, sometimes I can't believe it's my garage, almost to the point of being a little ashamed of it. This is the house I grew up in and moved back in after 30 years. My wife and kids and I moved back here after living on Long Island for 9 years and before that living in the city since my mid 20s, I'm almost 51 now. Kinda strange coming back here.

House was destroyed by burst pipes in 2016 while my dad still lived here. He started the renovation but passed away right after he started and left me with a gutted shell. Our family was growing and we needed the space so we took the leap. We lived in a construction zone for a year and a half but it was worth it. I got to re-design the house the way I always thought it should be done. Not many people get that opportunity in life, I am certainly thankful to be in such a position and be able to act on it. Actually still not done but getting close! Thanks.

Spring 2018.
IMG_1275.JPG


Spring 2020
IMG_0012.jpg
 
Black pipe has it's place. If it was a daily working/production shop environment, you'd want metal. But for home/hobby shops, you really can't beat this system. The plastic stuff is really easy to work with, no special tools needed. The hose does in fact have a thin layer of aluminum sandwiched between the Teflon liner and outer sheath. Kind of a neat product. My entire house is plumbed with Pex, seems to be holding up fine. Can't foresee any future problems, it's just pipe.

View attachment 1096686

And yes, sometimes I can't believe it's my garage, almost to the point of being a little ashamed of it. This is the house I grew up in and moved back in after 30 years. My wife and kids and I moved back here after living on Long Island for 9 years and before that living in the city since my mid 20s, I'm almost 51 now. Kinda strange coming back here.

House was destroyed by burst pipes in 2016 while my dad still lived here. He started the renovation but passed away right after he started and left me with a gutted shell. Our family was growing and we needed the space so we took the leap. We lived in a construction zone for a year and a half but it was worth it. I got to re-design the house the way I always thought it should be done. Not many people get that opportunity in life, I am certainly thankful to be in such a position and be able to act on it. Actually still not done but getting close! Thanks.

Spring 2018.
View attachment 1096698

Spring 2020
View attachment 1096699
Thanks and best of luck to you
Your a young enough guy to really enjoy that garage
My time is a little late in the game but no complaints
 
Finished up the air lines today. Ran the second branch over to the workbench area, turned out OK I guess. Struggled with fitment a little bit, had to re-cut the lines a few times to get them just right. 'Scuse the mess, that's how I roll. It'll get cleaned up. Eventually. Moving on.
IMG_1430.jpg


When I first turned on the compressor, one of the lines popped off and bent the hose backward so hadda fix that. Found two other small leaks around which just required re-tightening the fittings. All good now!

Here's a detail shot of the workbench hose outlet. The manifold block is bolted to the rack upright with a piece of neoprene behind it to absorb any vibration. Will be good to have a hose here by the bench. It's within easy reach of the lift so if I'm doing something under the hood and need a hose I can take it either from the reel on the lift post or from here. This will also allow me to reach the other side of the shop with air or even out the back door. I put the outlet at this level so I wouldn't be constantly walking into it.
IMG_1427.jpg


This is the outlet by the front door which is about 35-40 feet away from the compressor. Works good, plenty of pressure. At first, I tried to get all fancy and make a mount out of 1" x 3" square tubing but it didn't work out. Took the easy road and used a wood block screwed to the wall stud and then fastened the manifold block to the wood with self tapping screws.
IMG_1429.jpg


Pretty happy with how this all turned out. Also really stoked to have readily-available shop air at various locations for when the need arises. This was a big step in getting my garage set up the way I envisioned it. Thanks for reading along.

- Greg
 
I used this system in my shop 7 years ago. No problems at all. I found it easy to install also.
 
congrats.jpg

Very happy to see this all coming together for you!
 
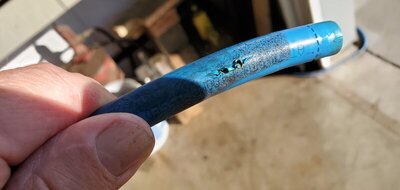
Has anyone had their Rapidair line rupture? I have had it happen twice in the last month. The system was installed 8 years ago and this has been my first problem.

20211003_092014.jpg 20211003_091937.jpg
 
Which part of your system is having the break? You should have a copper loop near the compressor for vibration, the aluminum in the Rapidair may not be as tolerant. The compressor vibration causes fatigue.
 
It could also be heat related if its near the compressor. Plastic tube softens with heat and will lose nearly all its strength. If you can get 4-6 feet away from the compressor with rubber hose it will take both heat and vibration away
 
Having the water trap that close to the discharge from the compressor is useless... Until the air cools the moisture is in suspension... You need about 50' of copper or steel line before the water trap....

Screen Shot 2021-10-03 at 10.11.33 AM.png
 
I run an after cooler mounted to the rear behind the flywheel to cool it and then to a water separator before it enters the line. Works great.

IMG_1875.jpg
 
It could be vibration related but one of the ruptured line was 20 feet away. The way I have this plumbed I get very little moisture our of my traps. One at each quick coupler.
 
Has anyone had their Rapidair line rupture? I have had it happen twice in the last month. The system was installed 8 years ago and this has been my first problem.

View attachment 1174406 View attachment 1174407
That looks like the nylon pex style not the polyethylene type with an aluminum core like shown in this thread? If so my understanding is oil breaks it down over time whereas the Maxline doesn't.
 
Last edited:
After 3 years, I am finally getting my "shop" set up the way I want. Over the last few days, I have been installing the Rapid Air "Maxline" compressed air delivery system. It's been sitting in a box on the floor since 2018 when our house renovation was completed, 'bout time it's being put to use.

Once the garage was done one of my first purchases was a new 80 gallon compressor to replace the ancient 30 gallon Craftsman I've had for decades. You can see it in the foreground here. I bought the air system at the same time in September of 2018.
View attachment 1096589
Since then, I've been using the compressor with a hose connected directly to the outlet valve. It worked fine but sometimes it was a pain if I needed shop air beyond the reach of the hose.

I read up on it a bunch and decided on the RapidAir Maxline system. The kit comes with a bunch of parts to assemble it. I got 100 feet of 1/2" line and not the 3/4" diamter, didn't think I needed a larger diameter. The lines are basically teflon lined Pex. It's a little bit of a PITA to unroll it and get it straight, especially over longer lengths. You cut it to length and then kind of ream it out with a little tool they give you to bevel the edge.

As stated, the kit comes with several accessories to arrange the system. Right off the outlet valve is a water separator filter and pressure regulator. The compressor has a regulator on it but this is for the air line. Once past those two devices, it goes to the wall and connects to a manifold block. Theoretically, there should be a more flexible "whip" hose there but I only had one on hand and it's attached to my hose reel. I very well may change out that existing blue line for a flex hose, the compressor shakes pretty good when it first starts.

Anyway, the horizontal manifold block provides two branch outlets so the lines can go in different directions. So far I've only got the one side done. The other leg will go left towards the work bench on the back wall.
View attachment 1096595

This is about 30-35 feet of line.
View attachment 1096596

Got a hose reel installed on the lift. It needs to be up higher the hose is hanging right in my face. It's only held on by two bolts at the moment. There are four holes in the reel bracket so using the top ones will move up about 6" which will be about perfect.
View attachment 1096598

The hose reel connects to the main line from a T fitting.
View attachment 1096597

This is by the front. I wanted an outlet by the door for airing up tires, blowing things off outside, etc.
View attachment 1096600

The lines are attached to the wall with these plastic standoffs. They come with #8 nails in them but they were too short to fully engage the studs in the wall. I substituted the nails for some longer #8 screws which worked well.
View attachment 1096612

The kit comes with these type of fittings. You get several straight ones, elbows and one tee.
View attachment 1096614

The line is secured with the serrated ferrule thing.
View attachment 1096615

The ends of the individual legs terminate with these distribution blocks. There are three of these blocks included in the kit along with the 45º fitting, drain petcock and threaded plugs for unused outlets. I am using quick disconnects here, no need for a hose reel in either spot, they'd be in the way. I have two extra hoses that I can grab and snap it in when needed.
View attachment 1096617

Once I got going on it, the kit installed pretty easily. If you have it all laid out and have everything you need on hand, you could easily do it in a couple hours. The plastic standoffs are not included in the kit but you can get them or something similar at any hardware store or orange/blue big box home place.

There are a few drawbacks. The manifold blocks are flat and wider than a wall stud which can make it a chore to attach to the wall - in my opinion you need to have some sort of standoff bracket which an be tedious to come up with and drill out. And again, as with any type of coiled tubing, it sucks to straighten it out over long lengths. It turned out OK but I hate the appearance of the little waves between the standoffs. Is what it is I guess. I know there is a tubing straightener available but for a one-time install it's probably not worthwhile to spend the money on it.

Will update this thread when I get it all buttoned up. Hope this helps anyone considering this system for their own shop.

- Greg
Thanks for putting this out there, I'm getting ready to run air line in my shop, and was getting ready to start looking for kits. I'll check this out, looks good. Whats the poly line PSI rating?
 
It is rated at 150 psi. I had it set at 160 but reset it to 150 now.
 
I’ve had my system in for about 6 yrs with no issues or signs of rubbing/wear-through like on your line. Was that section near the compressor end?
 
Auto Transport Service
Back
Top