• When you click on links to various merchants on this site and make a purchase, this can result in this site earning a commission. Affiliate programs and affiliations include, but are not limited to, the eBay Partner Network.

Re: 383 Cam/Dist. Timing Issues

cr8crshr

Well-Known Member
Local time
3:38 PM
Joined
Feb 13, 2009
Messages
6,603
Reaction score
11,803
Location
Northwest Nevada
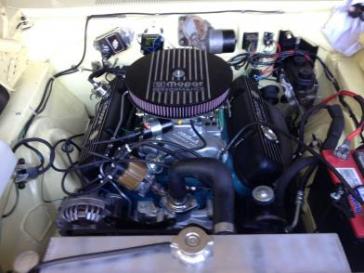
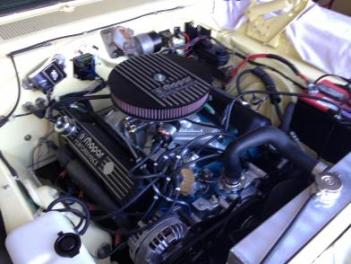
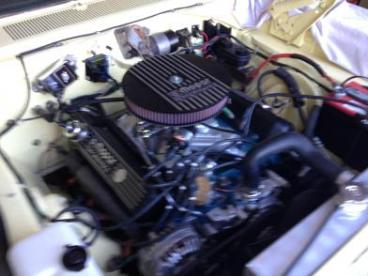
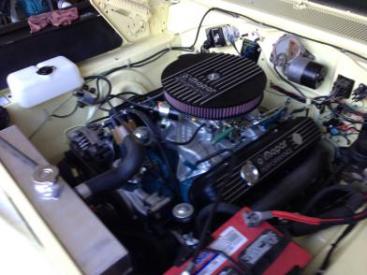
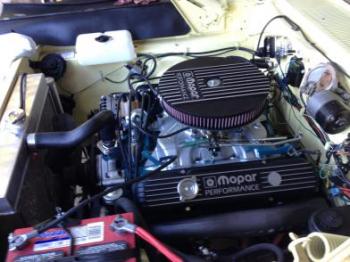
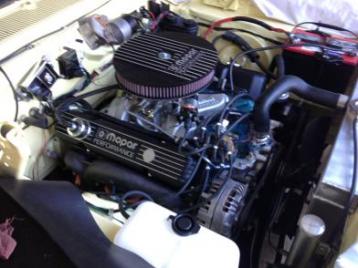
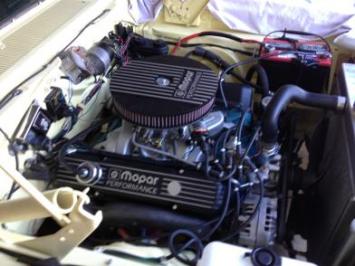
So now here is a new wrinkle on my 66 Sat build. We got the whole thing put back together with the new motor/engine. Just a brief run down. Old motor had a sever knock to it. Replaced it with a new re-built short block and swapped over all the parts except the bottom end to the new motor. The 1st motor had been broken in and had at least 10 hours of run time to it plus some street time.

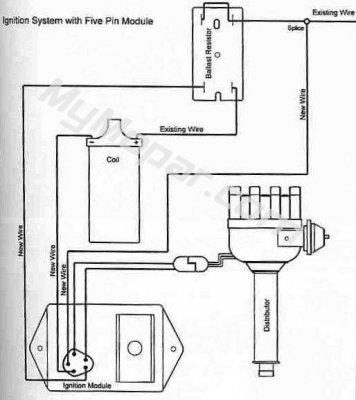
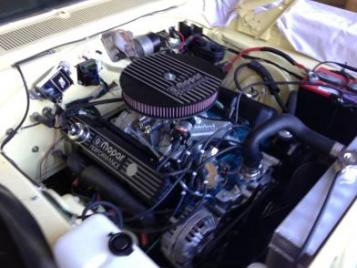
With the first motor, the builder had set up the Cam @ 4 degrees retarded. The Cam is a Hughes Cam which is ground @ 3 degrees advanced so there really shouldn't be an issue here with that set up. Sprockets are aligned dot to dot and the chain installed correctly. Everything else is the same from the old motor to the new with the exception of a different carb. It wouldn't fire right away so I looked things over and could find nothing wrong or out of place. Bumped in a little more timing and tried again. It wanted to fire but instead we got a big backfire through the carb. This happened again after giving it some more timing. Now normally when it backfires through the carb the first thing to check is the 180 degree out equation. We were out so we corrected that. Still got backfire through the carb. Thinking that something might be screwed up, we put the motor back to TDC and pulled the distributor to check that and discovered that the key way for the distributor shaft was not @ parallel to the center line of the BB @ TDC. On BB motors the key way should be @ parallel center while on a SB the key way should be @ just up from parallel and facing towards the #1 piston or the first intake manifold bolt on the #1 side. This is per the FSM and Mopar Actions/EBooger's latest article on initial fire up. We then tore into the front end of the motor thinking that there might be something with the timing chain and or the gears. The timing gears were lined up dot to dot with the Crank sprocket set @ 4R key way. This is what was degree'd in by the first motor's builder. Once again other than the knocking, the first motor worked and ran. No matter how we tried to get the cam distributor gear to set @ parallel, it wouldn't do it. It would seat at either the 4-10 or the 2-8 position. Not parallel @ the 3-9 position if you are looking straight down into the distributor opening. I can see where that would be confusing. Good catch.I then referenced back to the first motor as I have been putting that one together with parts I have. The short block came already with a very tame cam and a single roller timing chain and gears so I put them into the first motor and they are aligned correctly and the same distributor put in to see if it would align correctly. The key way aligned parallel to center. With the new motor I don't remember if the single set up was aligned correctly or not as I didn't pay much attention to it when I was removing it. I plan on checking that out this weekend before I try this....

If I understand all this that goes into engine and motor building correctly, it is that even though we are not @ parallel center on this BB, we are OK as long as we have the motor correctly @ TDC and the #1 plug wire tower and the rotor pointing correctly towards #1. By this I mean that the rotor is contacting the #1 contact point inside the cap at the #1 plug post, and that the #1 plug wire is in the same #1 position, we then should be OK in the theory of it. As long as everything is lined up correctly in relation to #1 and we are @ TDC then it really doesn't matter where the distributor gear is placed or if it is off of parallel center line. Is this a correct understanding? I have been kind of analyzing this on my own and have been wondering if this is all that needs to be done to get this back up and running. Again in theory it should work fine. Jump in and discuss. Pictures are hard to get to come out clearly so written descriptions will have to do for now.
 
Your last paragraph is correct, as long as you are on TDC on the compression stroke. Remove plugs. Turn crank by hand until compression tries to push your finger off the #1 plug hole. Then slowly turn crank CW until your balancer mark lines up with your +-10* mark on your timing pointer. See if your rotor is pointing to the #1 plug tower on the cap. If not, pull distributor and re-insert at the correct point or just put #1 wire so that the rotor and that terminal are aligned and rewire the rest of the cap. You can lift the distributor gear and drop so that distributor tang will drop in. Make sure the cap is wired CCW #1-8-4-3-6-5-7-2. Good luck.
 
Two things come to mind. First, if you cannot physically line the intermediate shaft as you should, you may end up with a rotor phasing problem, where the rotor is pointing between the posts in the distributor cap instead of directly at a terminal. You can check this buy drilling a hole in a spare distributor cap, in line with the #1 spark plug terminal and the coil wire connection. When you are trying to fire the engine, point your timing light at the hole and see where the rotor is pointing. If not pointing in the direction of the terminal, but between them, rarely, but possibly, the gear isn't positioned correctly on the intermediate shaft.


Secondly, what distributor and ignition are you using? If you have inadvertantly switched the two wires connectiing the ignition box to the distributor it will make it so you must have 40-60 degrees advance just to get the engine to run without back firing and it will have no power. If this is so, with the timing light pointed at the hole in the distributor cap, you will also see a severe rotor phasing problem.

Dot-to-dot isn't going to cut it. You really need to time that camshaft if you haven't already! Remember also, on the crank gear there is a 0 degree keyway and a 0 degree tooth, a +4 degree keyway and a +4 degree tooth, a -4 degree keyway and a -4 degree tooth. If you don't use the correct tooth with the corresponding keyway the timing will be all screwed up.
 
Should have added this at first. I am running the MOPAR Electronic Distributor along with the Chrome Box. All wires are in their correct spot and orientation including the Coil wires. The builder of the 1st motor did degree the Cam and had marked the timing gears with a white daub of paint which is the dot on the cam sprocket and then the dot on the crank gear. It was degreed at the 4R position and the white mark was there. So...upon the transfer I just matched up what he had done from the old to the new motor. The old motor did run using the same electronics and chrome box, along with the sprockets in the same position. Just the knocking in the first motor couldn't be found so thus the swap. Again nothing was changed other than to take components from the first motor and then move them to the second one. Should be a simple transfer, Yes? No?

Just as a side note here:

I have a similar post over on MOPARTS and boy am I getting slammed by a few over there with their way out of limits comments and suggestions. Some responses have been useful and helpful. But for the most part, a condescending and even "smug" reply so I think I will just utilize the great minds and help that FBBO offers. IQ52 I have read countless replies from you here on various topics. You are always precise and complete in your offers and that is much appreciated. Can't do much today as I got yard work to do and I have to make some Potato Salad and rub down my Pork Shoulder for tomorrow's meal over at my Brother's where the project is. But do one and all please keep those suggestions a comin'. I will post more as I have an update from the recommendations received. Thanks a bunch....cr8crshr/Tuck
 
1st off... This might seem overly **** but bare with me... Only trying to help... Not a reflection on you or your crew, no offence meant... some stuff maybe a repeat of what others have said too... are you sure you have the plug wires going in the correct direction on the cap & in the proper order ??, are you sure you have a good ground on your ignition ECU ??, are you sure the coil is any good ??, are you sure you don'y have a broken or wire grounded somewhere or disconnected or connected wrong ??, have you checked your preload/valve adjustment with the lifters pumped up ??, you could have a few valves slightly open... Are you getting fuel ??, is the only thing different the Edelbrock carb ??, it ran with the Holley... or the lack of the old engines knock, sorry Tuck, I couldn't resist... not trying to be a mean/rude Modorks guy...lol... just some much needed levity/humor, at your expense... Are you sure the air gap, between your reluctor & pick-up is set properly, using a non-magnetic feller gauge 0.08" ??, is the pick -up installed right side up {remember that one ?? IQ52}, have you changed anything in the wiring or anything else, since the old knocker was in there ??... you need 3 things #1 ignition spark , #2 compression , #3 fuel, check to see & make sure you have all three... FYI Every crankshaft can be different just because one crank was degreed one way, doesn't mean they all are the same, the keyway could be farther advanced or retarded a degree or 2 either way, depending on factory tolerances, verses your #1 crank journal in relation to the crankshaft keyway & the TDC mark on your hub/balancer from the said keyway & that's partially why you degree in, every camshaft/crankshaft, hub/balancer & piston combo... that 3* retarded doesn't sound right either, even if the other engine was degreed properly, I personally wouldn't trust anything that old engine builder did... Just because the cam was ground 4* advanced, doesn't mean you specific crank/cam combo it is the same... it still should always be checked anyway... Good luck cr8crshr/Tuck I hope all goes well next attempt...
 

Attachments

  • Chrysler Ignition Wire Diagram w-5-pin module & 4 spade dual ballast.jpg
    Chrysler Ignition Wire Diagram w-5-pin module & 4 spade dual ballast.jpg
    60.3 KB · Views: 348
  • Chrysler Elec. Ign. wire diagram #1 4 pin Ballast & electronic regulator #12.jpg
    Chrysler Elec. Ign. wire diagram #1 4 pin Ballast & electronic regulator #12.jpg
    72 KB · Views: 493
  • Chrysler Electronic Ignition distributor air gap .008 view #11.gif
    Chrysler Electronic Ignition distributor air gap .008 view #11.gif
    37.2 KB · Views: 368
OK...Thanks for all the input. Yesterday I put everything back together after making sure that I was @ TDC on Compression Stroke and that the Distributor was aligned correctly with #1. Went to fire it up and we didn't have the backfiring which is a good sign. Now I am having an issue with the engine firing. I have air, fuel and combustion/fire/spark. It has been thoroughly checked and then re-checked. All wires, Coil, ECU, Voltage Regulator, Ballast, Plug Wires, Wiring Harness, you name it and I have checked it. Even the engine block to ground. It cranks and cranks but will not light off. The good side to this is the motor while cranking sounds so much healthier than the 1st motor I had in. I just cannot figure out what the issue is with this build. So...Here are some pics of what the whole engine compartment looks like now that it is all back in place. Tomorrow I will spend one more try on getting this thing running. If it doesn't then I will be putting the Hood back in place, taking a bunch more pics and inventorying all the parts I have for this project to be completed. I will then be posting numerous for sale ads both here and on the other sites available as I am not going to spend another nickle on this car. Done, Finito, Complete, I am done with it and the Hobby. Whomever winds up with this project and can get it to where it should be is going to have a really great car. It is just a Damn shame is all....cr8crshr/Tuck
 

Attachments

  • 001.jpg
    001.jpg
    20.2 KB · Views: 306
  • 002.jpg
    002.jpg
    20.7 KB · Views: 344
  • 003.jpg
    003.jpg
    20.1 KB · Views: 305
  • 004.jpg
    004.jpg
    20.4 KB · Views: 304
  • 005.jpg
    005.jpg
    20.3 KB · Views: 293
  • 006.jpg
    006.jpg
    19.8 KB · Views: 305
  • 007.jpg
    007.jpg
    20.1 KB · Views: 326
  • 008.jpg
    008.jpg
    20.5 KB · Views: 310
  • 009.jpg
    009.jpg
    20.6 KB · Views: 318
  • 010.jpg
    010.jpg
    20.3 KB · Views: 345
  • 011.jpg
    011.jpg
    20.4 KB · Views: 321
  • 012.jpg
    012.jpg
    20.7 KB · Views: 299
cr8crshr/Tuck you've come so far not to benefit at all, from all the hard work & money spent... make absolutely sure the ECU is making a good ground, paint in the mounting holes or between the ECU & the firewall won't give it a very good ground & then make absolutely sure it's getting fuel, check to see if it's squirting a nice full stream of fuel, when moving the throttle, then if you have compression, it should at-least fire, as long as the rotor is pointing to #1, when #1 piston is on it's compression stroke @TDC, it should fire with just minor turning one direction or another of the distributor... have you blown the fuse-able link maybe ??... beyond all the other stuff already mentioned, I'm not really sure, what to tell you now... I wish I could help more...Good luck, :headbang: you've earned it...
 
So now you are cranking and not firing? Seems you have set TDC #1 on compression, you have fuel and the cam seems to be lined up well enough to run. During cranking it sounds like a normal engine, right? A rhythmic sound like you hear from any engine during cranking? Not skipping a beat? If all that checks out things should be pretty close mechanically.

Do you have a volt meter to check for coil voltage? Have you verified you have spark out of the coil AND from a plug wire? Spark plugs fresh? If not put fresh ones because what you have now might be fouled.

If you think the electronic system is a can of worms then get a single point distributor and throw it in. Neg coil wire to points and the blue from ballast to coil +. Do the static timing procedure and it should fire.
 
Bud's- Is there a way to check/test the ECU. I also look at that question that it isn't grounded well or took a dump?? Getting a good squirt with throttle. I did clean up the rotor as it looked grotty and rechecked the clearance on the reluctor/pickup as it was very close/almost touching. I don't have a .08" brass feeler, just a .10. How much margin of error can there be on that airgap space before it causes problems with firing? I'm wondering if that could be fried?
Meeps- Yes, that's what were getting now. I looked at coil voltage and it checks. Coil sparls, didn't check at the plugs as it was getting late. Going to check that today when he shows. I feel we are very close myself. Just have to troubleshoot a little more. Wish us luck and keep fingers crossed!
 
We found the problem and will up date ya'll later next week. It is really quite funny too. Stay tuned...cr8crshr/Tuck
 
ok i think we have waited long enough!!!!!!!:icon_evil:
 
Auto Transport Service
Back
Top