• When you click on links to various merchants on this site and make a purchase, this can result in this site earning a commission. Affiliate programs and affiliations include, but are not limited to, the eBay Partner Network.

Who has tried installing their own headliner ?

Kern Dog

Life is full of turns. Build your car to handle.
FBBO Gold Member
Local time
11:21 PM
Joined
Apr 13, 2012
Messages
35,500
Reaction score
125,038
Location
Granite Bay CA
It does not look to be that hard of a job but I have yet to do one.
Well, not a fabric one anyway. I've installed several cardboard and plastic ones in Dusters and Dart Sport cars.
Currently I am getting ready to install one in a 65 Dart. The guy that did a 65 Barracuda for me in 2014 disappeared from the Earth as if he owed me money or something. I don't feel like waiting for another shop to get around to it either. I've never done one so I'm looking for some tips from those that have.
These cars use a series of steel rods that suspend the headliner similar to the B body cars we love. I figure that the practice on this one should help for when I replace the one in my 70 Charger. My Charger looks fine. for the most part. I had the headliner done in 2003 by a shop. The sail panels still have a few small wrinkles though. The main reason I am thinking of replacing it is to add some effective sound deadener up there.
Back to the Dart:
IMG_1444.JPG

I added a thick jute type pad to the underside of the roof skin. This stuff is about 5/16" thick!
IMG_1447.JPG

I used some 3M spray adhesive to hold it in place.
IMG_1445.JPG

IMG_1446.JPG


I like this stuff. I might use the same stuff when I get around to doing the Charger!

Next up, the headliner itself.
 
My sail panels are crap, so I'll be following along with you KD!
 
I have done many.......the worst part is kneeling and moving around inside the car......Be sure to place several moving blankets inside the car.......
 
I done one once, never again. It looks straight forward but not.
 
I installed a 1967 VW Bug headliner with a sunroof. It was white perforated vinyl and was suspended by bows. It was a dance of stretching, hairdryer, securing in place with spray adhesive, lots of binder clips.

Having never done one before, it turned out good.

I say do it yourself. Its about 8 hours worth of work, maybe less.

Watch a youtube video, or scout out some good picture filled tutorials, that's what I did
 
Did my '66 Belvedere II myself, 7 years ago...1st of this type. Turned out as good as any 'shop install' I've seen.

By what you've posted in the past, you have the skills to do it. The trick is to take your time and not 'over stretch' as you pull the edges over.
 
It's fairly easy. First, lay it out flat over the roof for a while and lay a bed cover on it to flatten. If the seats aren't out, I take them out. Make sure you keep the rods in sequence. Cut reliefs in the fabric carefully.
 
Still the greatest sense of accomplishment in my entire car build KD... I covered it pretty well in the early part of my Bee thread on DC.
 
You can do it everything posted above is true. Many hours of overhead work so are your shoulders and back up to it? If so then do it.

Start at the back and pull forward. There are 2 wires that anchor in the rear of the roof and hook over the rear bow to stop it’s forward travel. Start rotating the bows forward until you get to the windshield. Then pull the sides out and secure them getting out as many wrinkles as possible. Finish with the hair dryer.

Material will either mount to the teeth or have the little clips to slide of per the metal. Some areas will need spray glue. Every car is a little different mix of these methods.

Like said above you can do it just as good as a pro. Not very hard but it takes some hours.

I’ve done 67 Belvedere, 70 Challenger, and 70 Charger. All went the same.

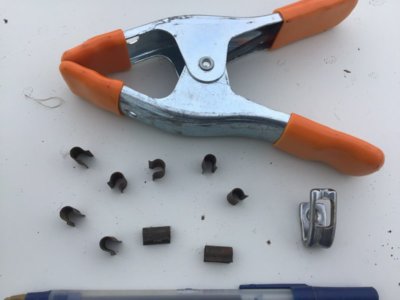
The clips that hold it. Avail from resto suppliers. If you need glue these clamps will hold it until dry.

View attachment 721451

7B0C7E01-5ABC-4692-9D79-9CDFC822CE8E.jpeg
 
Last edited:
You can do it everything posted above is true. Many hours of overhead work so are your shoulders and back up to it? If so then do it.

Start at the back and pull forward. There are 2 wires that anchor in the rear of the roof and hook over the rear bow to stop it’s forward travel.
Thank you. This car had both but one fell out and I cannot find it. I might have to take the remaining one and make another out of a carb return spring. I can see how starting here at the back makes more sense than starting at the front or middle. With the rearmost bow rod secure, it establishes a proper starting point where the rest of the bows (theoretically) should rest in the correct position.
I like the idea of letting it sit out of the box and in the sun. The trouble with that is that we are having an especially rainy winter here. I set it on the roof of another car for 4 days and it barely made a difference. Today I set it in the partly cloudy sun & shade and again, not much difference. I've read that most wrinkles flatten out over time.
 
Letting it sit in the sun helps a lot. Buy a bunch of Pony clothespin style clamps to keep the edges
from moving out of place with no wrinkles. Glue down the edges and move slow. You'll get a really
good feeling seeing all the wrinkles disappear and the headliner nice and tight. Sail panels are pieces
all by themselves, and shouldn't be much of a worry. If you take your time, it'll be a piece of cake!
 
I did one once ! What a freaking nightmare I'll pay someone to do the next one!
 
Lost my cherry '89-'90 on my SuperBee. Did ok, but no matter how I tried, I couldn't shrink the wrinkles in the sail panels. After about a year, Mother Nature fixed it for me. My friend tried to tell me we did his '58 Biscayne together, but it must have been so difficult, I am blocking the memory...
 
Last edited:
We put the headliner in a box with a heat lamp before install. and use contact cement for the edges. And also use moving blankets, its a killer on the knees.
 
Letting it sit in the sun helps a lot. Buy a bunch of Pony clothespin style clamps to keep the edges
from moving out of place with no wrinkles. Glue down the edges and move slow. You'll get a really
good feeling seeing all the wrinkles disappear and the headliner nice and tight. Sail panels are pieces
all by themselves, and shouldn't be much of a worry. If you take your time, it'll be a piece of cake!
The sail panels on this and the Charger are sewn into the headliner, not separate.
 
your sun visor , mirror , garment hooks , dome light, screws need to be installed before the headliner. Just get them started so they are easy to locate then you can make a tiny slit to expose the screw head after your sure your done pulling and adjusting.

Me and the better half have done 2 over the years, great test for staying married.
 
Auto Transport Service
Back
Top