• When you click on links to various merchants on this site and make a purchase, this can result in this site earning a commission. Affiliate programs and affiliations include, but are not limited to, the eBay Partner Network.

wiring issues 1972 Roadrunner

plymouthman72

Well-Known Member
Local time
12:22 PM
Joined
Dec 3, 2013
Messages
736
Reaction score
636
Location
Dallas-Fort Worth
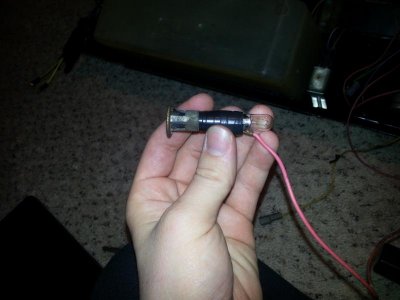
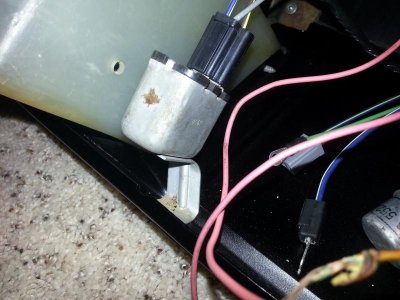
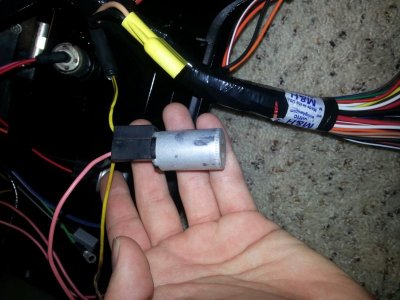
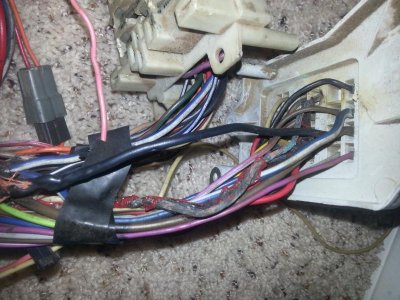
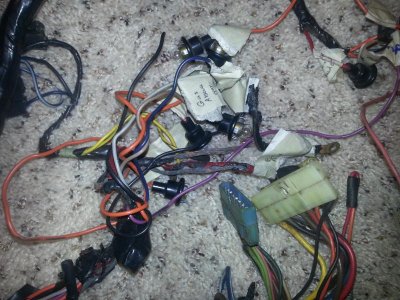
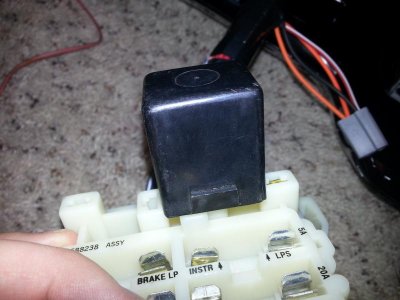
So I am replacing the complete wiring harness for my roadrunner and am having a few issues. First of all, the vendor for year one didn't separate the wires correctly so it doesn't fit in there great but i can live with that. So here goes, Originally my bro owned the car and had an electrical fire 10 years ago and its sat until now. I replaced the wiring harness but am afraid I didn't fix the original problem. I saw that the main red and black wire that goes to the back of the alternator gauge was burnt to a crisp and have seen many posts about by passing the ammeter? I hate being ignorant by i have no clue what that and therefore know how to bypass it. I also have several wires not matching up which is expected because its not a highly optioned car and won't use all ends. My brother already disconnected a lot of wires before vigor it so I don't know what they do. I am post in pictures below with hopes someone knows their function and possible where to get the sensors . My biggest concern is the pic with long cylinder tube asbo have no idea what that is or what it goes to. I am not sure what the sensor in the fuse box does either. I appreciate all you help, wiring is not my forte and this is very crucial to get right. Sorry for typos phone is difficult to use on here. 20140326_220920.jpg20140326_221007.jpg20140326_220848.jpg20140326_220941.jpg
 
View attachment 177831
View attachment 177832

Here are the factory diagrams you can use to trace your existing wiring and figure out what you're looking at. I think the top pic is your horn relay, I'm not sure what the light bulb is for (where it goes), and I think the bottom pic is a time delay. There are different ways to bypass the ameter. On my car I run a heavy gauge wire from the alternator directly to the starter. To keep the wire as short as possible and limit voltage drop I run it straight down from the alternator and route it around the oil pan rail to the starter. I used a few wiring clamps to attach it to the oil pan polts. I think the wire is only about 2-3 feet long now. The factory ammeter routing is much longer when it goes up and over the motor, back and forth through the firewall, and then down and around to the starter relay.
 
Thanks for the diagram, the one Ih ave is not very good. Is the ammeter in the cab or engine bay? sorry for my ignorance. The altemeter will still work wont it?
 
Thanks for the diagram, the one Ih ave is not very good. Is the ammeter in the cab or engine bay? sorry for my ignorance. The altemeter will still work wont it?
The Ammeter is the gauge in the dash that many recommend bypassing due to it can be a fire hazard. It will not work if bypassed, some have converted it to a volt meter or just added a voltmeter to monitor alternator output.
 
Thanks Green, that's EXACTLY what caught fire in my car. The red and black wire that goes directly behind was fried and took out everything that was touching it. I never knew what caused it until I started researching replacements wires. I may try to convert it but I am thinking I may just bypass it myself just to be safe. I don't want to have to buy another $450 wiring harness from Year One again!
 
If you bypass the ammetter gauge while keeping the stock harness setup, don't forget the black wire coming from the ammeter gauge with everything spliced into it feeds power to the turn signal, horn, fuze box, ignition key switch, and headlight switch. (look at the diagrams above) When you bypass the ammeter you also have to re-route those wires to get power from somewhere else. (Preferrably the fuse box) On my set up my fuse box main power feed goes directly to the starter post. It's a short distance from the fuse box to the starter (maybe less than two feet of heavy gauge wire).

I might have missed a detail here or there, but I hope you get my drift. When bypassing the ammeter gauge, you MUST find alternate sources of power for everything that spliced into the old ammeter wires. (The ones that caught fire under your dash).
 
Picture #1; Aftermarket horn relay, the original horn relay plugged into that location on the fuse box and also contained the buzzer for the key in the ignition.
Picture #2; is the light for the glove box, appears to be missing the plunger.
Picture #3; is the seat belt warning system relay.
Picture #4; is the time delay relay for the ignition switch lamp.

If both the black and red wires show extensive heat damage along their length, would likely indicate a short circuit at the alternator or someplace along that alternator output lead in the engine harness. Typical old Mopar heat damage in the charging circuit is usually limited to the bulkhead connectors or one or both ammeter terminals and resulted from high resistance. Check for resistance with an ohm meter between those wires and chassis ground prior to connecting the alternator and battery.
 
Last edited:
old wiring harness

Thank you all for the help. It helps to know what I am looking at and What needs to be done. My brother always wondered what blew to cause such damage. All he remember was this it was raining that night.Here are some pictures of the damage done to the old one. Definitely don't think I will be able to save it haha.20140327_234725.jpg20140327_234744.jpg
 
Appears to be over current wire damage to most of the charging circuit in the dash harness. There is a short section of the black 12ga charging circuit appearing to be undamaged. The section that runs between the take-off slice (#1) and the bulkhead connector looks undamaged. This indicates a dead short somewhere downstream of the slice. The fuseable link near the starter relay should have protected these wires, check that it has not been defeated or by-passed. Headlight switch and ign. switch are a couple items feed from the slice that are un-fused. Headlight switch has a circuit breaker built-in, check for shorts on the switched side of the ignition switch.
 
you are in luck my friend as i have been enquiring about this very subject for my 71 runner. I have found this diagram:

ammeterbypass_zpsb24a00b0.jpg


and if your in need of replacing the alternator for the new toyota denso alternator, and moving the battery to the back like I am, I just finished adding this:

batt-cuttoff_zpsc0afa28e.jpg
 
Here is the write up of the problem. AMP gauges at the dash are troublesome.
They should be by-passed, and then install a VOLT gauge.
http://www.madelectrical.com/electricaltech/amp-gauges.shtml I have done this on the mopars I have with great success. Others will say different, but I did it cause I did not want the problems again. I had the same burnt wires you have and rewired both my cars.
 
Auto Transport Service
Back
Top