43tutor
Well-Known Member
Zinc Plating and Chromate Conversion Process (see photos at end of text)
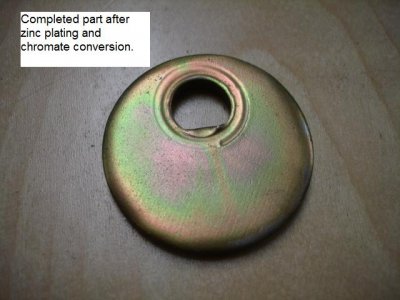
The following process is how to zinc plate steel and then apply a zinc dichromate conversation process to change the appearance of the zinc plating over to the yellow-gold iridescent look. Some might refer to this process as Cadmium plating but it is not, that is a completely different process entirely. This is a simply process that can will yield consistent results when followed completely. Follow the step by step instructions listed below in order to achieve the zinc plating and then apply the chromate conversion.
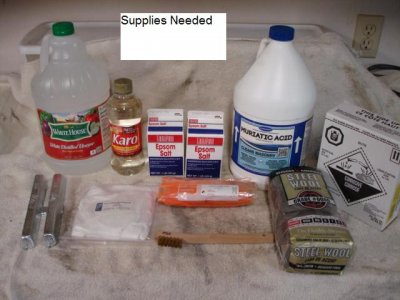
Materials required for Zinc plating (amounts shown are for a small buckets quantities)
Small postal scale and plastic containers for weighing materials (butter container work great)
Measuring cups large enough to measure quarts (liters)
(1 lb) Epsom salts
(1 lb) Zinc sulfate - purchase online (Ebay is a good source)
Karo brand corn syrup (small 16 oz. bottle) – make sure to use Karo brand only (explained later)
(1 Qt) White vinegar
(1 gallon) Muriatic (hydrochloric) acid - available at home improvement stores
(3) Plastic buckets with sealable lids (2 gallon size) - available at home improvement stores
(1) Plastic bucket (standard size) lid not required
Short piece of copper pipe (long enough to bridge across the top of one bucket)
Small gage solid copper wire (approximately 4 to 6 ft)
(2 or 3) Zinc anodes - purchase online – Ebay is a good source (see details below)
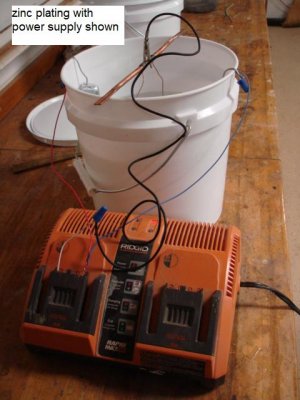
DC power supply(s) – I used a Rigid 18V tool battery charger (see details below)
(1 gallon) Denatured alcohol (this is used to clean parts)
Small brass wire brush
Nitrile gloves
#0000 steel wool
Kitchen timer (used to time the plating process for consistent results)
Media blast cabinet to help prepare parts for plating
This process does take some time so “patience” is another key ingredient, do not hurry the process.
Materials required for the Yellow Zinc Chromate conversion
(1 box) of battery acid (local auto parts store)
(1 lb) of Sodium Dichromate (yellow) - purchase online (Ebay is a good source)
(1 gallon) of distilled water
Hair dryer (used to dry the parts with low heat)
Step by step instructions for Zinc Plating
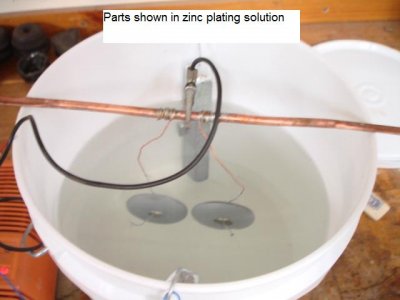
First step is to make your cathode hanger from the short piece of copper pipe and some solid copper wire. I cut the pipe to length so it would bridge across the top of my bucket. Crimp the ends of the pipe in a vise to prevent the pipe from rolling when on top of the bucket. Cut a piece of the solid copper wire, about 10-12 inches and wrap one end of the wire around the copper pipe (solder if desired). I installed two pieces of wire on my hanger so I could plate more than one small part at a time. Next step is to wire the zinc anodes together so these can be attached to the positive side of the DC power supply. Install a hanger wire on each zinc anode so it will hang over the edge of the bucket as shown in the photos. I purchased my zinc anodes online at Ebay. There are many styles of zinc anodes available, make sure to select zinc and no other material. Now a little more about the DC power supply. Voltage is not important but instead current is more important (mA). Ideally zinc plating should be 140mA per square inch of material to be plated. I tried several DC power supplies that I had but found the 18V charger (shown in the photo below) worked best for me. My plating time varied based on the size of the part. I tried my car battery charger and found this was way too much power and it gave the zinc plating a burnt appearance. You can try different power supplies to see what works best for your situation. Next, mix your Zinc plating solution per the formula below.
Zinc plating formula
Remember you will be working with chemicals here so use nitrile gloves to protect your hands and safety glasses are also a great tool to protect your eyes in case of splashing.
Add 4.5 liters of tap water to one of your buckets. Mix into the water 300 grams of Epson salts (making sure the salts are completely dissolved before adding the next ingredient), 100 grams of zinc sulfate (use the postal scale and a small plastic container), 200ml of white vinegar and 1/3 of the Karo syrup bottle (about 5-6 oz.). The Karo syrup contains glucose and will act as a brighter for the zinc, other brands of corn syrup contain high fructose corn syrup and will not provide good results. Mix together the solution until all ingredients are completely dissolved. This is the zinc plating solution. Next, prepare your part for zinc plating.
Preparation of parts before plating
Your parts must be completely cleaned to bare metal before plating. Use your favorite degreaser and remove all forms of grease and oils from your part(s). After degreasing my parts I used a small media blast cabinet to completely strip all remnants of old paint and rust from the parts. I tried using a wire brush wheel on my grinder but the results were just not the same, the zinc plating just didn’t adhere correctly if I didn’t use a media blast first. After media blasting, soak the parts in denatured alcohol to completely clean the parts again. Cleanliness is key to make sure the zinc will properly adhere to the part. Use a clean pair of nitrile gloves while handling the part(s) to avoid the oil from your skin getting on the parts.
If your part(s) have a heavy layer of old zinc plating on them and it will not media blast off it can easily be removed by soaking the part in a bath of muriatic (hydrochloric) acid and water mixture. Start by degreasing the part as mentioned above. Using a clean plastic bucket, add about 3 quarts of water and then 200ml of the muriatic acid. SAFETY NOTE: always, always, always had the acid to water. NEVER add the water to the acid (this can cause a tremendous amount of heat and splash the acid on you). Slowly had the acid into the water and remember to use nitrile gloves and safety glasses. Once you have the bath solution mixed soak your part in the solution for 5-10 minutes to completely remove the old zinc plating. Use a wire to hang your part over the edge of the bucket, DO NOT place your hand into the bath. Rinse the part with water once the zinc is removed and then media blast the part before plating. Hint; You can store your parts in the denatured alcohol, for a day or two, to prevent flash rusting. OK, now it is time to zinc plate. See below….
Zinc Plating
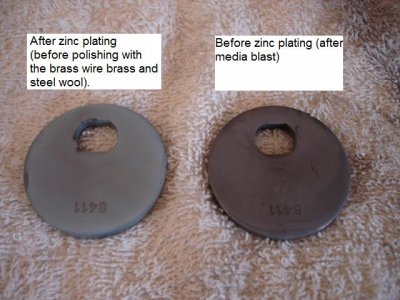
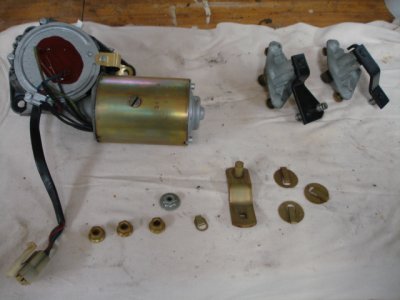
Assemble the zinc anodes into the plating solution bucket as shown and attach the wire(s) from the zinc anodes to the positive side of the DC power supply. Next, install the copper pipe hanger (cathode) on top of the bucket and hang your part on the wire attached to the hanger. The part must be completely submerged in the plating solution. Connect a wire lead from the copper pipe to the negative side of the DC power supply. Alligator clips work great. Verify the hanger wires, inside the plating solution, are not touching the zinc anodes so it will not short out. Plug in the DC power supply. After, a few minutes you may notice a few bubbles on the part, this is the process working. This is where “patience” is key, this does take some time. The zinc plating can take several minutes to complete. I used a kitchen timer and set it for 10 minutes on small parts (nuts and bolts) and up to 60 minutes for larger parts (wiper motor housing). This time will vary based on the current (mA) output of your DC power supply. You will need to test your process to determine what times work best for you. It is OK to stop the plating process to check the part. How do you know when the part is plated? The part should have a dull grey appearance on the entire surface. The parts should be plated 2-3 times with the zinc plating process before the application of the yellow chromate conversion. Start testing your process with small parts, such as washers, these are easy to plate and easy to start over just in case something doesn’t look right.
Once you have completed the first layer of the zinc plating, unplug the DC power supply and remove the part from the plating solution. Use the brass wire brush to buff the surface of the part and the zinc plating will turn from dull grey to a brighter silver color. Next, use the #0000 steel wool to polish the surface of the zinc and it will further turn a nice silver color. Now, repeat the zinc plating process, wire brush and steel wool polishing at least one more time. Use denatured alcohol to clean the part before plating again, remember the parts need to be clean. Remember to use clean nitrile gloves to handle the parts. I have found at least 2 layers of the zinc plating process produces the best results but you can test the process for yourself. Once the parts are zinc plating set them aside to dry and they are now ready for the yellow chromate conversion process. Once you have completed the zinc plating process then it is time to apply the chromate conversion to achieve the yellow-gold iridescent look. Follow the steps below.
Yellow Chromate Conversion formula
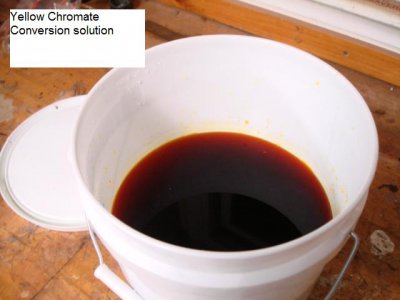
Use a clean plastic bucket and add 1 gallon of distilled water (not tap water). Next add 35ml of battery acid to the distilled water. SAFETY NOTE: always, always, always had the acid to water. NEVER add the water to the acid (this can cause a tremendous amount of heat and splash the acid on you). Slowly had the acid into the water and remember to use nitrile gloves and safety glasses. Next add 365g of the sodium dichromate (use the postal scale and small plastic container to measure) to the one gallon of distilled water and battery acid solution. Mix the solution with a wood paint stir stick until dissolved. The solution will look dark orange when completely mixed but will yield the yellow color on your parts.
How to Apply the Yellow Zinc Chromate Conversion
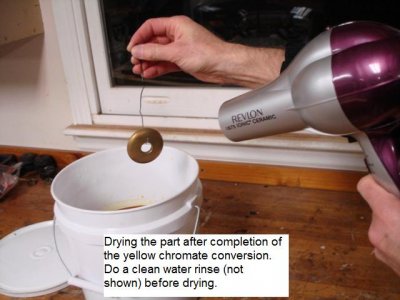
Use this process to convert your previously zinc coated parts to the yellow-gold iridescent look. This is a simple process of dipping the zinc plated parts into the Yellow Chromate Conversion solution, then a clean water rinse followed by drying the part with warm air. Follow this process in this order. First, the Yellow Chromate Conversion solution must be between 70 – 90 degrees F. If your solution is cold simply wrap a heating pad around the outside of the plastic bucket and use a bungee cord to secure the heating pad. Once the solution is at the proper temperature use a small wire to hang your zinc plated parts on and hand dip the part into the Yellow Chromate Conversion solution. Make sure to completely submerge the part for 15 to 20 seconds and remove the part. A shorter time will produce a lighter yellow color and longer dip times will produce darker yellow colors. Next, I waited for approximately 30 seconds after removing the part from the solution and then quickly dipped the part into a clean water rinse (tap water in a clean bucket). I only submerged the part into the clean water for approximately 1 second. After the clean water rinse use a hair dryer with a warm heat on low fan to slowly dry the part. Hold the hair dryer approximately 12-18 inches from the part. I found that too much heat will turn the Yellow Chromate Conversion too dark. Slowly, dry the part with medium heat. As the part slowly dries you should notice the yellow-gold iridescent look start to appear. The part should be set aside for 2 to 3 days to allow the chromate conversion to fully harden.
It is best to practice with a few small bolts or washers before attempting the larger parts.
Once you have completed your parts, seal the buckets containing the zinc plating and chromate conversion solutions, with lids and the solutions should be able to be used again and again. I’m not sure of a self-life.
Send me a PM with your questions. I will try to help out as much as I can. Please allow a few days for me to respond. I'm not on FBBO everyday.
Disclaimers
This is a “home brew” process and I have not testing the durability of the plating process for any extended period of time. No guarantees with this process.
I have tried to completely describe the process in order to achieve the factory appearance that will yield the yellow-gold iridescent look but you will need to experiment with your process to yield the best results.
I’m not a plating expert or chemist by any stretch of the imagination. I’ve simply researched the process and experimented to achieve the best results that I can.
You will be working with chemicals. Use all safety methods to protect yourself.
Dispose of the chemical solutions when you are finished with them per your local regulations.
Credits and acknowledgment
A very big thank you goes out to Tom Gugliotta, a gentlemen that provided most of the technical data for this process.


