• When you click on links to various merchants on this site and make a purchase, this can result in this site earning a commission. Affiliate programs and affiliations include, but are not limited to, the eBay Partner Network.

Electric Life power window regulator conversion kit

themechanic

Oklahoma is OK
Local time
6:55 PM
Joined
Nov 11, 2012
Messages
16,533
Reaction score
19,520
Location
Moore, Oklahoma
I finally got my Electric Life power window regulator conversion kit installed. I was surprised they work so well. One problem, though, is when they go down they stop about 1 inch too soon. They stop right at the top when going up, though.

I don't see a down stop like the manual regulators. Do these have a down stop adjustment?

I saw another post that said the Nu Relics don't have down stops, either.
 
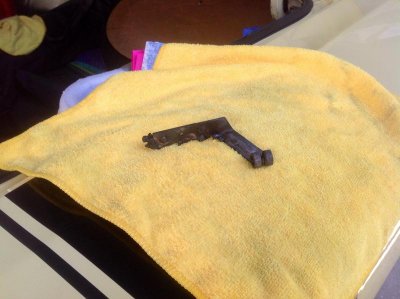
Not sure, but thought the stopper was shared with the manual crank. This was rattling around in the passenger door. Didn't know what it was. Now the passenger window will go below door level if you don't release the button. Thought this is the stopper?

image.jpg
 
That bracket goes on the bottom of the wing/window channel. Spot welds probably broke off. Pretty important in keeping the window assembly in the proper position.
 
That is common with these cars. You can drill them out and use screws with flat heads but they have to be very flat so the channel felt can slide on the window without catching on the screw. Better to have them welded, though.

- - - Updated - - -

I emailed Tech Support last night. Sadly, I got this reply today:

"I do not think there is an adjustable stop on this kit. I am also unsure if they designed it intentionally to stop before it hits the bottom. My guess is that it is a variance between different doors they did not account for.
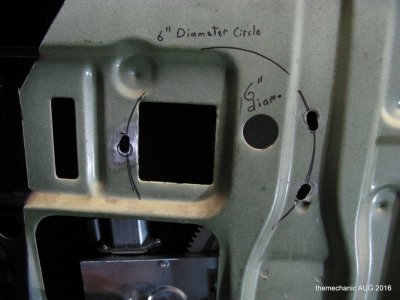
You can try to get a little more down travel by loosening the mounting bolts with the window a few inches from the bottom. Rattle it a little and retighten the bolts. Another thing you can try is to draw a circle through the 3 mounting holes, unbolt the regulator and use a round file to oblong the holes 1/16 to 1/8 inch in the direction of the circle, counterclockwise on the drivers door and clockwise on the passenger door. This will allow you to rotate the regulator slightly to change where it stops. A small change in the mounting will multiply out to a much larger difference at the
window. I would not recommend filing holes more than 1/8 inch.

A1 Electric Automotive Accessories
2301 W 205th St Ste 101
Torrance CA 90501"

A1 does have good customer service and support. I spoke to their tech guy, Miles, before I got that email. The regulators are imported from Italy. They used one 68-70 B body door for a test fit (and apparently didn't see the adjustable down stop on the OEM style regulator). So, apparently I have to file on the screw holes (get your mind out of the gutter, RC) until the power regulator fits correctly. Argh!
 
I think I have the exact kit. Dropped to door level day one no modifications. 69 Coronet R/T.
 
What are the chances of one of my doors coming from another car and having the same down stop issue on both doors? Now you know why I never gamble; unlucky.

I did ask Miles if the window regulator has a fixed travel won't I just be trading a down stop problem for an up stop? "It's possible" he said. Miles was dumbfounded that these cars don't have up/down stops in the doors like other cars. I splained it to him about the plug in the back of the window and the cam on the OEM regulator.

On second though, I think I'll ask for another regulator to try before I go modding the holes in my doors.
 
I used the Nu Relic ones in my GTX. I cut a 2" long piece of 2x3 square tube and mounted it on the inside bottom of the door by drilling a hole in the bottom of the door thru the sq tube and bolted it in there. I then glued a piece of 1/2" thick semi hard rubber I found lying around to the top of it. I positioned this piece by lowering the window to where it was just barely proud of the door sill and finding the spot where the bottom of the window would land appx in the middle of the stop. This works just fine but I do have to be aware of when the window is getting there and let off the switch. If you hold the switch it will put lots of pressure on the nylon keeper plug that holds the window to the steel roller guide. It broke the ancient one I re-used. This fortunately happened at Spring Fling so I went to the Mr Moparts booth and bought a new one.....guess what? THEY DON'T FIT!!!!! They are about 1/16" short of making it all the way thru the glass and the metal roller guide!
 
I used the Nu Relic ones in my GTX. I cut a 2" long piece of 2x3 square tube and mounted it on the inside bottom of the door by drilling a hole in the bottom of the door thru the sq tube and bolted it in there. I then glued a piece of 1/2" thick semi hard rubber I found lying around to the top of it. I positioned this piece by lowering the window to where it was just barely proud of the door sill and finding the spot where the bottom of the window would land appx in the middle of the stop. This works just fine but I do have to be aware of when the window is getting there and let off the switch. If you hold the switch it will put lots of pressure on the nylon keeper plug that holds the window to the steel roller guide. It broke the ancient one I re-used. This fortunately happened at Spring Fling so I went to the Mr Moparts booth and bought a new one.....guess what? THEY DON'T FIT!!!!! They are about 1/16" short of making it all the way thru the glass and the metal roller guide!


Darius,
Just a thought - what if you installed a heavy duty flasher in line with the power down circuit. When the glass bottoms out, the current will shoot up and break the contacts open, removing the need to "time" the release of the switch.
 
- - - Updated - - -

I emailed Tech Support last night. Sadly, I got this reply today:

"I do not think there is an adjustable stop on this kit. I am also unsure if they designed it intentionally to stop before it hits the bottom. My guess is that it is a variance between different doors they did not account for.
You can try to get a little more down travel by loosening the mounting bolts with the window a few inches from the bottom. Rattle it a little and retighten the bolts. Another thing you can try is to draw a circle through the 3 mounting holes, unbolt the regulator and use a round file to oblong the holes 1/16 to 1/8 inch in the direction of the circle, counterclockwise on the drivers door and clockwise on the passenger door. This will allow you to rotate the regulator slightly to change where it stops. A small change in the mounting will multiply out to a much larger difference at the
window. I would not recommend filing holes more than 1/8 inch.

A1 Electric Automotive Accessories
2301 W 205th St Ste 101
Torrance CA 90501"

A1 does have good customer service and support. I spoke to their tech guy, Miles, before I got that email. The regulators are imported from Italy. They used one 68-70 B body door for a test fit (and apparently didn't see the adjustable down stop on the OEM style regulator). So, apparently I have to file on the screw holes (get your mind out of the gutter, RC) until the power regulator fits correctly. Argh!

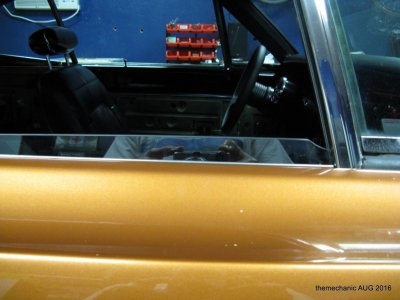
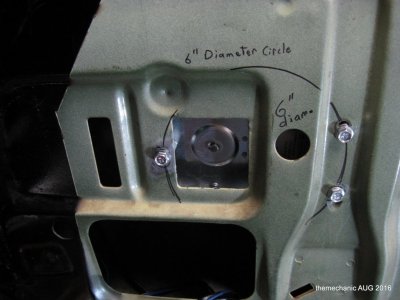
Well, I finally got around to fixing the down stop problem yesterday. I had to file 1/4" in the direction I needed the regulator arm to go (downward) to get the top of the glass to sit flush with the top of the door. I used an empty Cool Whip container without the lid to draw the bolt circle on the door. Then took a 8" round file (had the correct diameter) to file the holes in a circular direction. Problem solved.

Here are a few photos in case anyone else has the same problem.

BEFORE

1-side window fix.JPG

2-side window fix-001.JPG

3-side window fix-002.JPG

AFTER

4-side window fix-003.JPG
 
Well, I finally got around to fixing the down stop problem yesterday. I had to file 1/4" in the direction I needed the regulator arm to go (downward) to get the top of the glass to sit flush with the top of the door. I used an empty Cool Whip container without the lid to draw the bolt circle on the door. Then took a 8" round file (had the correct diameter) to file the holes in a circular direction. Problem solved.

Here are a few photos in case anyone else has the same problem.

BEFORE

View attachment 355146

View attachment 355147

View attachment 355148

AFTER

View attachment 355149
I now this an old post but did the window switches from A1 work also? I have an original PW B body but need to replace the widow switches only and they are much cheaper than trying to find old OEM.
 
Mopar style switches are now repro'd.

That's also caused OEM prices to drop.
 
Auto Transport Service
Back
Top