• When you click on links to various merchants on this site and make a purchase, this can result in this site earning a commission. Affiliate programs and affiliations include, but are not limited to, the eBay Partner Network.

Introducing "Project Odyssey" a 1972 "Super Satellite"

I saw that Video of the 71 Superbird up there a while back, before getting my 74 RR, and was wondering how kewl my 74 would look as a SuperBird LOL. Nice Job so far.
 
Restoration Update: 1972 Road Runner Grille Honeycomb Mesh

I found initial damage to mesh on passenger side (near center), and after paint stripping, another small defect on drivers side (near end). The spray-on liquid paint remover I used first, turned the paint on the mesh into a sticky mess. it kept drying before I could gently scrub it off.

I first used an emery board to file off this hardened combo of old paint/paint remover from all sides of the honeycomb. After cleaning one half of the grille mesh that way, I tried using a toothbrush and acetone on the second half. Either way, it was super tedious but I finally got it stripped down to the bare aluminum.

I went to a local jeweler to see if he could repair the mesh. He did not work with aluminum, but flattened a long strand of solid aluminum electrical wire for me. I took this to the fabricator who used it to "weld" up the spaces in the major hole of the mesh ($20.00 US labor). The other minor defect I repaired with JB weld. Then I sprayed on the wax and grease remover, self-etching primer (Rust-Oleum green), and sealer (Rust-Oleum gray). The body shop sprayed the final body color (Bahama Yellow). Hopefully this will preserve the mesh for another generation or two.

Following fotos show initial damage, mesh stripped of paint, repairs, and final paint finish (not in that order).
 

Attachments

  • DSC00451.jpg
    DSC00451.jpg
    88.5 KB · Views: 412
  • DSC00473.jpg
    DSC00473.jpg
    66.8 KB · Views: 406
  • DSC00505.jpg
    DSC00505.jpg
    101.3 KB · Views: 406
  • DSC00507.jpg
    DSC00507.jpg
    129.6 KB · Views: 417
  • DSC00514.jpg
    DSC00514.jpg
    62.8 KB · Views: 402
  • DSC00515.jpg
    DSC00515.jpg
    70.2 KB · Views: 397
  • DSC00532.jpg
    DSC00532.jpg
    56.1 KB · Views: 401
  • DSC00533.jpg
    DSC00533.jpg
    63.5 KB · Views: 413
  • DSC00536.jpg
    DSC00536.jpg
    41.5 KB · Views: 398
Restoration Update: Passenger side view mirror

Right side mirror was useless, due to a worn/loose ball and socket. Phillips head screwdriver modified into "S" shape to reach screws behind glass. Screws were frozen and would not budge. After sitting for the weekend, tapping on the screws did the trick (the threads were a whitish color, probably due to the pot metal base they were in and dis-similar metals).

The first jeweler I visited was not equipped to help me insert a small 10/24 3/16" set screw against the ball. The second jeweler had all kinds of tiny drill bits and taps, but suggested I try a bicycle shop. The bicycle technician sent me down the street to "Alfonso", a motorcycle mechanic. Without any hesitation, he grabbed his large Dremel like tool and jumped right in to drill a pilot hole.

We decided not to try and tap the hole for threads and just began to force the set screw in the pot metal mirror base. It refused to thread itself in. Plan "B" was to force a phillips head screw (of unknown size and thread pitch) into the orifice, and with some fine tuning of the hole, it finally cooperated with our wishes. The pot metal we drilled into was darn hard, and the material left on the top edge of the hole was minimal, but fortunately it did not split during the procedures.

Now the mirror is installed and not so droopy anymore. However, some further road testing will be necessary to determine if the "fix" was permanent or temporary. Three fotos follow:

DSC00001.JPG DSC00002.JPG DSC00003.JPG
 
Restoration Update: RR Grille

Purchased a RR grille to replace the Satellite grille. Won't use the Road Runner script/logo for the grille, not trying to call this a Road Runner and prefer to keep the correct identity as a (super) Satellite. The metal mesh needed stripping and re-soldering in a couple of places. Used solid aluminum electrical wire as the "solder". I decided to go with body color on the mesh.

The plastic pieces needed a bracket glued back on, paint stripped (PO had painted it black with a heavy clear coat-took forever to sand it all down), and I fabricated some make-shift threaded studs on the lower lip that hold the plastic center section to the lower rim of the front bumper to replace the little factory plastic studs that snapped off decades ago. Used SEM bumper coating (med driftwood metallic) to mimic the factory silver. I am pleased the way it worked out.

DSC0000B.JPG DSC00C.jpg DSC00D.jpg DSC000E.JPG DSC000F.JPG DSC000J.JPG DSC000K.JPG DSC0000L.JPG DSC00M.JPG DSC0000N.JPG DSC000O.JPG
 
This looks like a cool project! With the mirrors giving you a problem if loose, take a piece of emory cloth and take it apart and use it... works well to tighten it down and lasts loner then i thought!
 
Cool project. I remember that model kit well when I was a kid.
 
Restoration Update: Ceiling renewal

After removing the old headliner, found some problems.

Foto #1: First of all, the ceiling had more than surface rust, it was pitted. In addition, the factory adhesive that held both metal ceiling cross-members to the roof had let go, and the cross-members had fallen a quarter inch and three quarters of an inch respectively from the roof they had been originally glued to.

Foto #2: Used 3M product 08115 to reattach the cross-members to the ceiling on separate days.

Foto #3: A wood post supported the cross-members for for 48 hours dry time. The forward one was done first, two days later the rear cross-member affixed. You can see that here the surface has been prepared for paint. The badly pitted and rusted ceiling has been hand-sanded, buffed with one of those fiber wheels/rust stripper wheel in a hand-held drill, followed by a session of Naval Jelly, washed with soap and water, then wiped down with wax and grease remover, then a coat of RustOleum Rust Reformer. A royal pain in the butt--a couple of hours a day for a couple of weeks.

Foto #4: Two coats of RustOleum rusty metal primer (red oxide).

Foto #5: Thermotec insulation and aluminum tape.

Foto #6: YearOne white perforated headliner (four rod supports-not six) and sail panels installed by local upholstery shop owner before installation of front and rear glass.
 

Attachments

  • DSC00005.JPG
    DSC00005.JPG
    58.4 KB · Views: 296
  • DSC00010.JPG
    DSC00010.JPG
    59.3 KB · Views: 263
  • DSC00009.JPG
    DSC00009.JPG
    63.7 KB · Views: 276
  • DSC00008.JPG
    DSC00008.JPG
    61.8 KB · Views: 265
  • DSC00004.JPG
    DSC00004.JPG
    59.1 KB · Views: 279
  • DSC00598.jpg
    DSC00598.jpg
    29.2 KB · Views: 270
Last edited:
Restoration Update: Legacy Plates arrived

I can't put my finger on it, but these copies of the 1960's license plates look different from what I remember as a youngster. Don't know if the colors are a little off or the shape of the lettering. When the DMV clerk opened the envelope, what he read aloud was "Super Saturday", I corrected him with the intended translation of "Super Satellite" and he came back with "Super Saturn". The mother of one of my best friends had a good one I had never thought of, "Super Satisfied". That fits too!
 

Attachments

  • DSC00807.jpg
    DSC00807.jpg
    72.8 KB · Views: 333
  • DSC00808.jpg
    DSC00808.jpg
    102.1 KB · Views: 236
Restoration Update: 1971 side marker light conversion

Finally completed the changeover from '72 to '71 side marker lights. Since the car was already painted could not weld, so I used a strong two part 3M brand panel adhesive to bond the stainless steel templates on the inside of the fenders. On the rear, used an adjustable shower curtain rod to hold the two lamps/templates simultaneously in place while the adhesive dried and on the front used PVC pipe about 7.5 inches long that I squeezed in the gap to apply the needed pressure. The only problem is a little of the black adhesive squeezed out and landed on the perimeter of the opening (only shows up on very close inspection).
DSC00163.JPG
DSC00164.JPG
DSC00170.JPG
DSC00169.JPG
DSC00172.JPG
DSC00177.JPG
DSC00214.JPG
DSC00217.JPG

Note: On page one of this thread, post #5, I have already posted pictures of the modified openings and the templates before installation.
 
nice progress dibbs
if your mirror repair doesn't hold up for you
here is what i did to mine that had the exact same problem
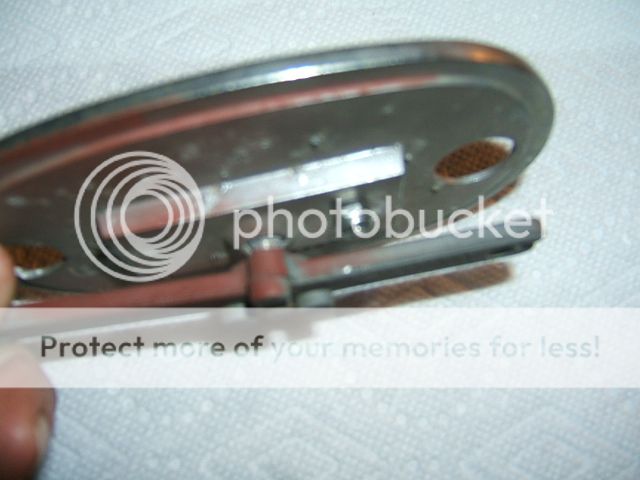
the mirror glass will come off the base
you just need to heat the hell out of it with a heat gun
moving it around evenly on the glass.
with my pic you can see where the blobs that hold the glass in are located
i had also wrapped a wet towel around the housing and wore oven mitts
as it gets pretty hot before the black silicone holding it will release
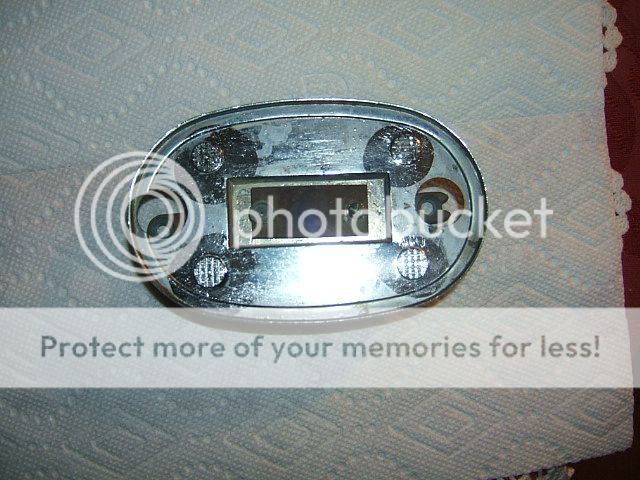
once you get the glass off you will see right away what the problem is
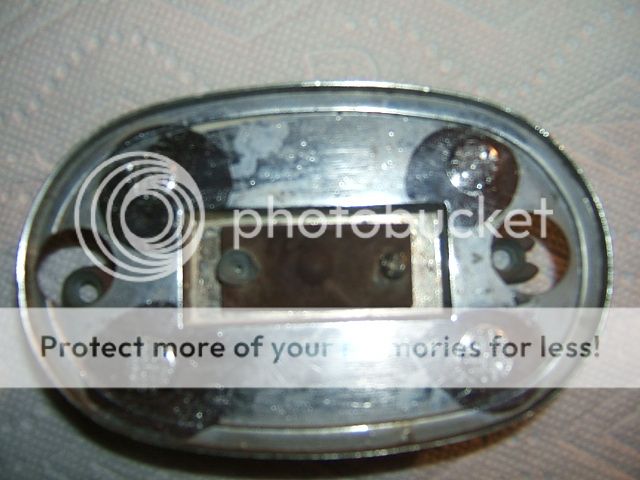
the ball is held in by a metal plate that is attached in by 2 rivets
one of my rivets wore away leaving one side of the plate loose
and giving me my droopy mirror.
i would bet that is what your problem is
so i drilled thru the housing and put a small screw thru it with a lock nut
in place of the broken rivet and i tightened up it pretty good
giving me a nice tight mirror..
DSCF8275_zpsxd3vwxtf.jpg

DSCF8273_zpsgprqahgd.jpg

DSCF8274_zpsmxo0ghet.jpg
 
Last edited:
Restoration Update:
Package shelf (bottom portion) and trunk refinish. Used the same routine as always: wet sand/grind (looking for rust), naval jelly (does not do much but is a good cleaner), Rust-Oleum rust reformer (spread it on everywhere-unpainted and painted areas), and then Rust-Oleum Rusty Metal red primer. I was running low on the red, so I used some Rust-Oleum clean metal primer (white) on certain areas as a base coat (used a paint brush-no spray). The floor of the trunk and package shelf received two coats of the red while other areas received a white and then a red final coat. Did not find any pinholes in the trunk floor.

DSC00337.JPG DSC00379.JPG DSC00400.JPG DSC00347.JPG DSC00478.JPG DSC00482.JPG DSC00423.JPG
 
Restoration update:
First trial fitting of the 1971 factory style backlight louvers produced by Mike of "Dayclona" fame. I (sixteen years old at the time) originally recommended this option to my mother before she special ordered the family's bahama yellow 383 automatic (air grabber) 1971 Road Runner back in the day. She opted for the rear spoiler instead after having doubts about keeping that window clean.

louver1.JPG
 
Here are the four holes that were drilled necessary to the louver installation (for some reason I really had get up my nerve that day to drill into the sheet metal).

DSC00993.JPG DSC00992.JPG DSC00991.JPG DSC00990.JPG
 
Auto Transport Service
Back
Top